In order to better understand how the driver platform (Manatee) operates and how the configuration interface (Cuesta) is structured it is helpful to know a bit about the history of the system.
# Introduction
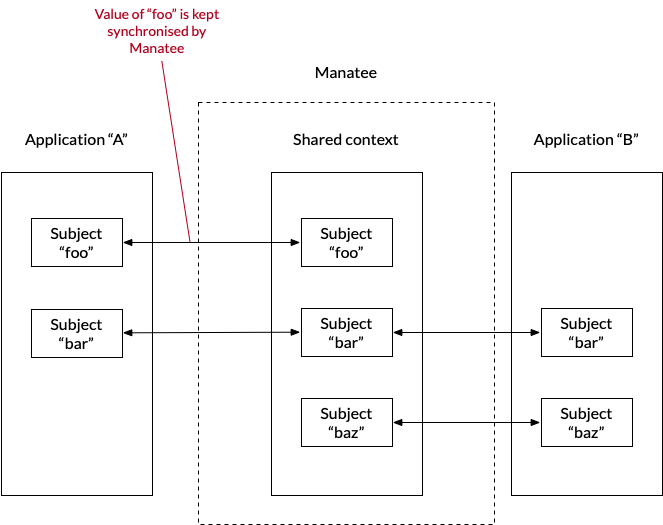
The CCOW standard specifies an arhcitecture for keeping multiple applications synchronized within a shared context. Typically this context could be a patient and when one application decides to switch patient all participating applications are made to follow the switch by a context manager (CM).
Originally Manatee was built to support our CCOW context manager (Seacow) since very few applications actually implement the HL7 CCOW protocol needed to interoperate with Seacow. Manatee then provides a layer which operated on the UI or API of an application to make it CCOW compliant. Gradually Manatee outgrew the Seacow and began to support regular UI automation as well, i.e. a sort of virtual machine for scripting steps to be performed on the UI of a given application.
The concepts from the CCOW standard is still prevalent in the configuration interface and in the engine which schedules automation as well as context synchronisation is still a true CCOW context manager.
# Cuesta and Kwanza
Cuesta is the name of the configuration interface in which Manatee can be configured and the subject of this manual. All configurations are stored in our Context Management Registry, CMR in shorthand, which we have called Kwanza. Kwanza is a fairly simple infrastructure element - it has a couple of features which are worth noting though.
# Landing page
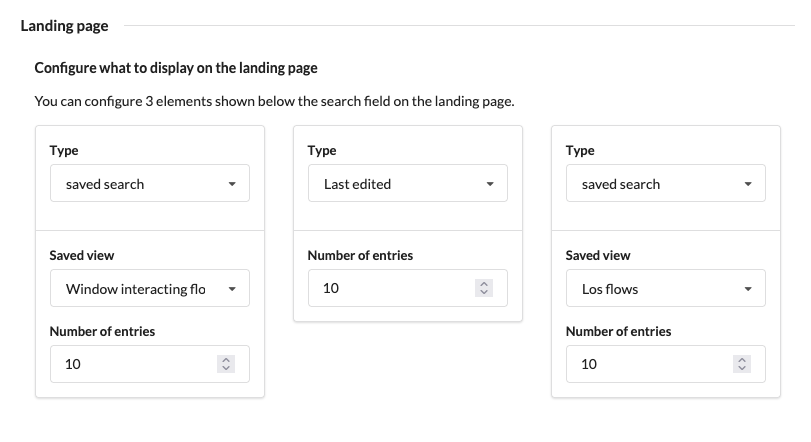
After logging in you’ll see the landing page.

The landing page has two primary elements. The first is a global search from which you can search for flows, apps, fields and tables by their name. The second is a user configurable area where 3 elements can be configured to show. This is done by finding your username in the primary left-hand side menu and choosing the elements to display under the “Landing page” heading.
# Concurrent edit protection
Kwanza uses a lamport clock to ensure that the order of updates to any stored entity is preserved and that you cannot overwrite an entity without having seen the latest version beforehand. This translates to the fact that if two people edit the same thing at the same time one of these may get an error saying that their changes cannot be saved as it would overwrite the changes made by the first person. It is a safety feature and it makes editing an item concurrently safe, but it does not make it very easy to do so.
# History of changes
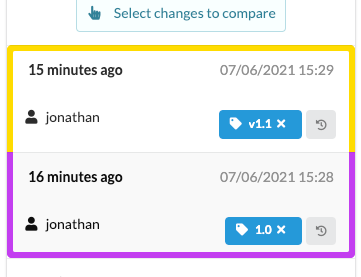
All changes are tracked in Kwanza meaning that its possible in Cuesta to see the history of changes made to e.g. a flow, and it is possible to revert to a previous version. For flows this feature can be accessed through the Changelog tab in the flow editor.
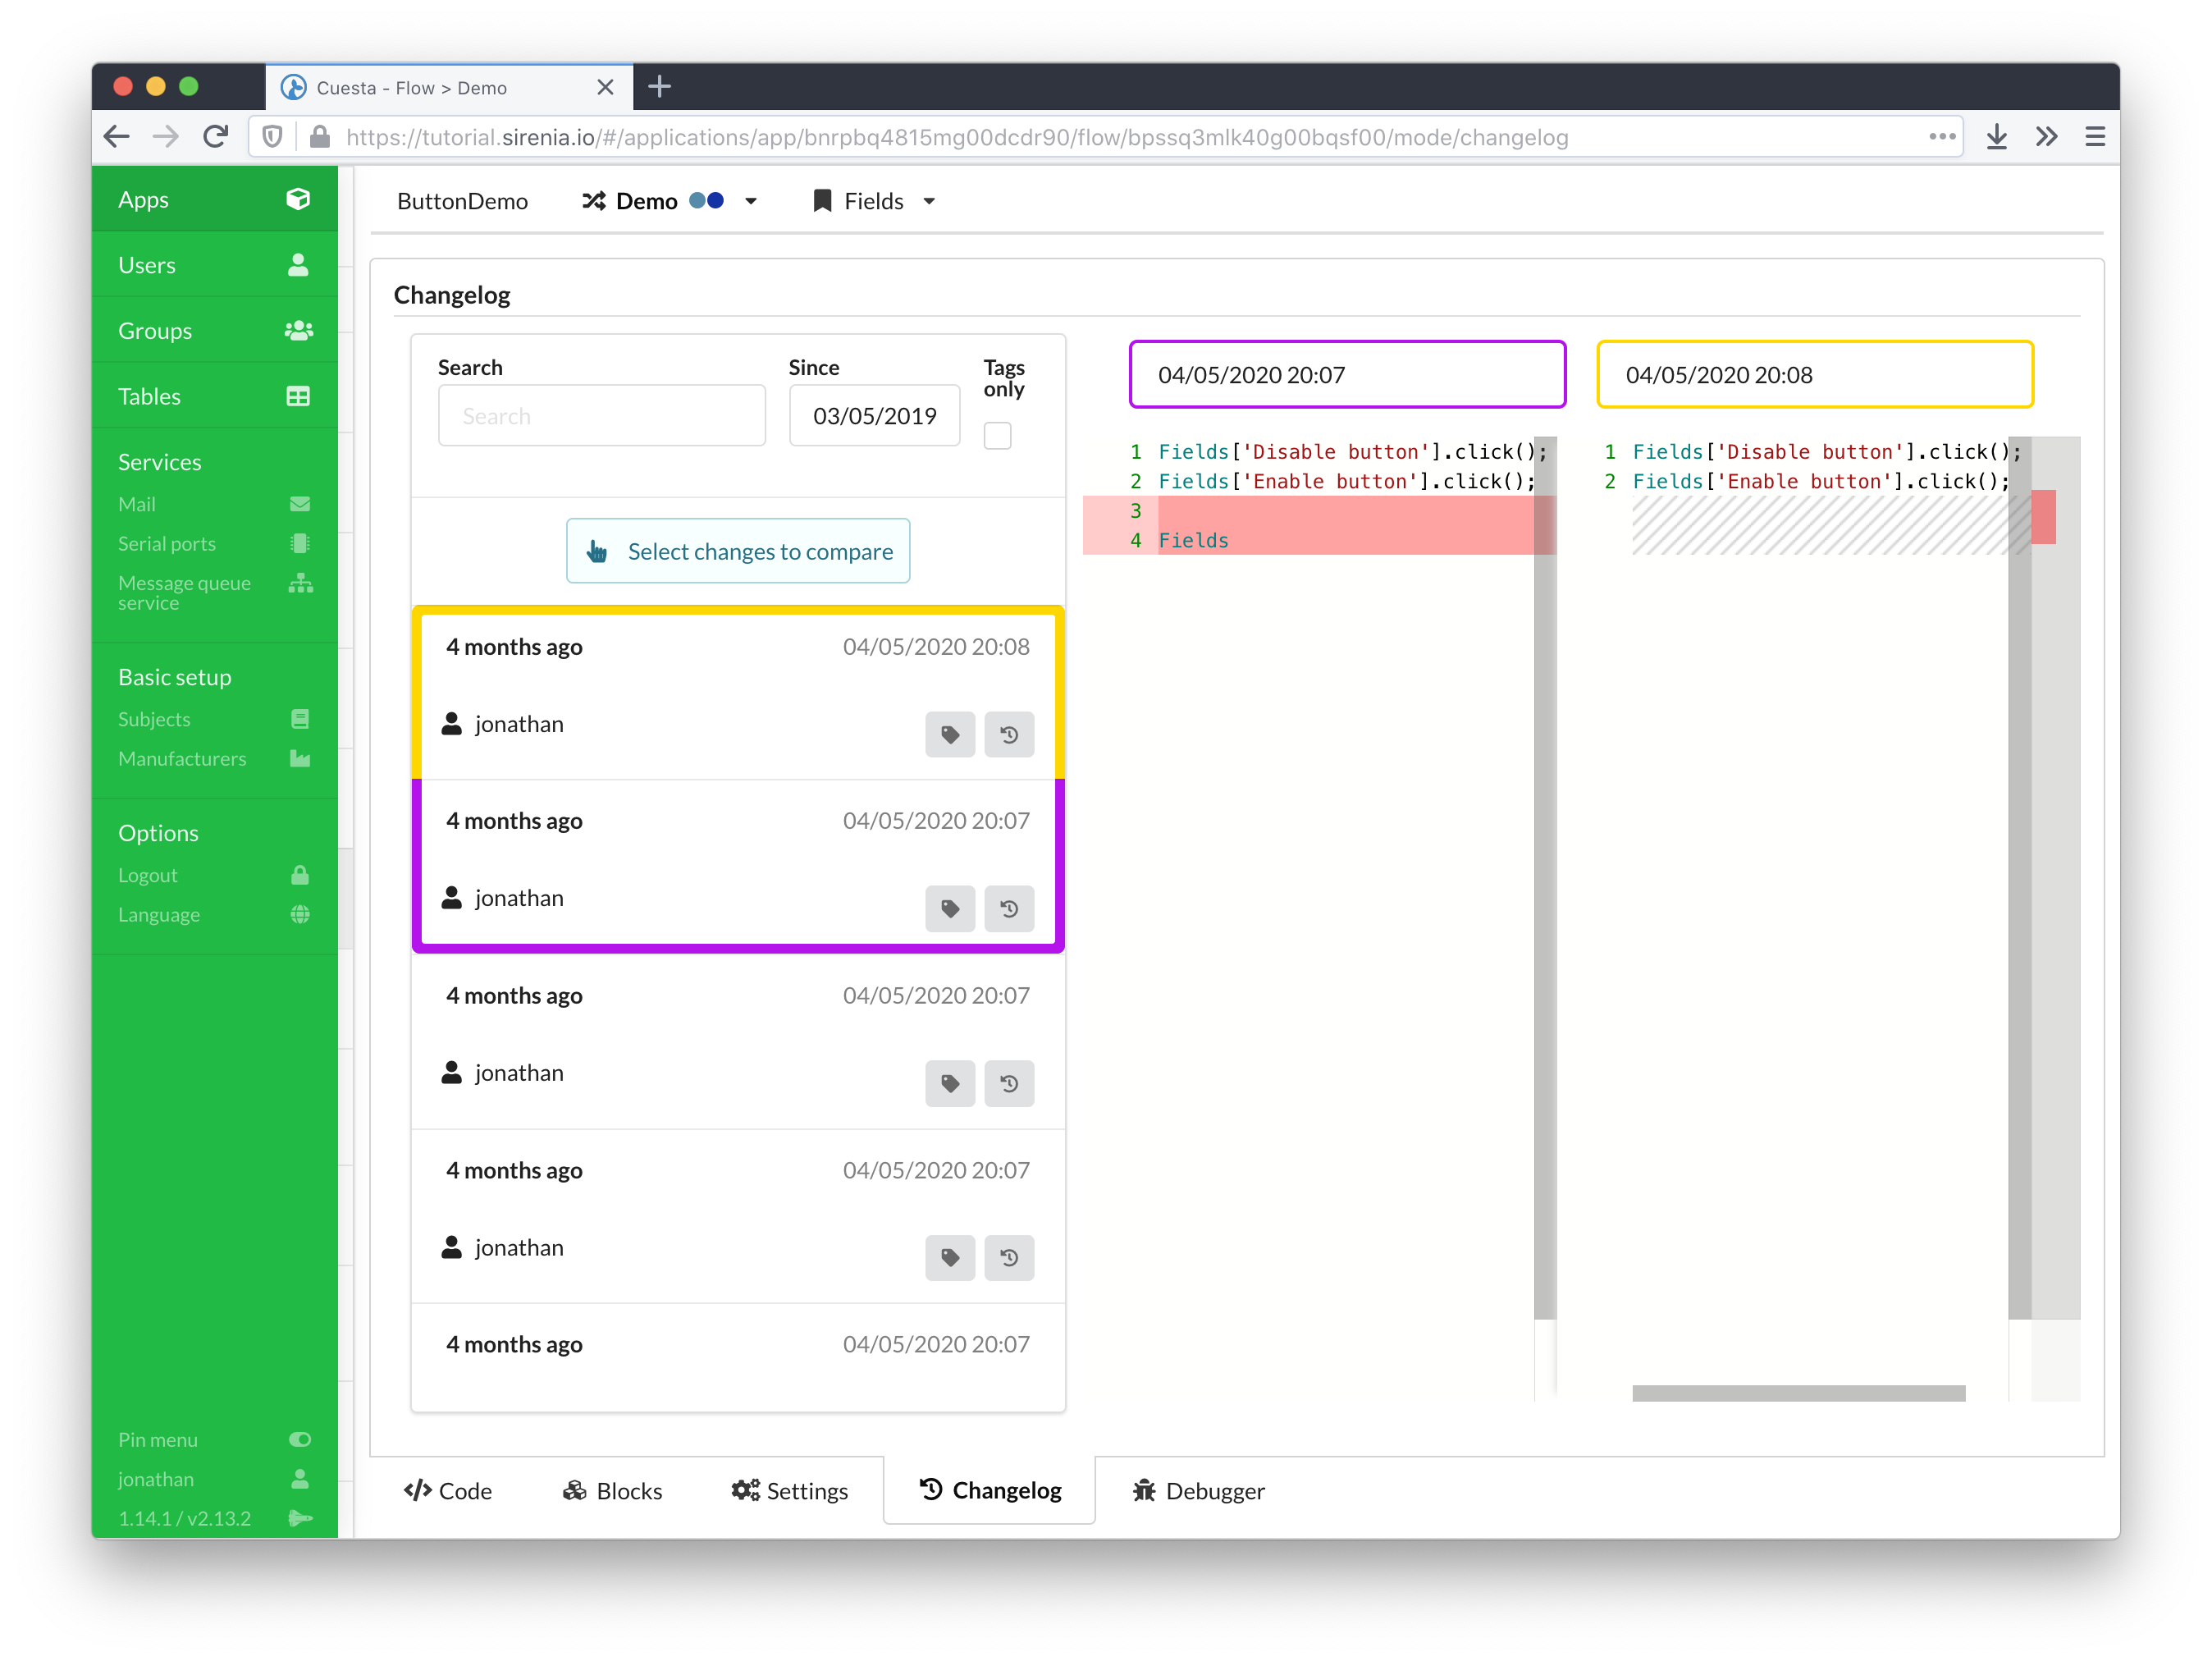
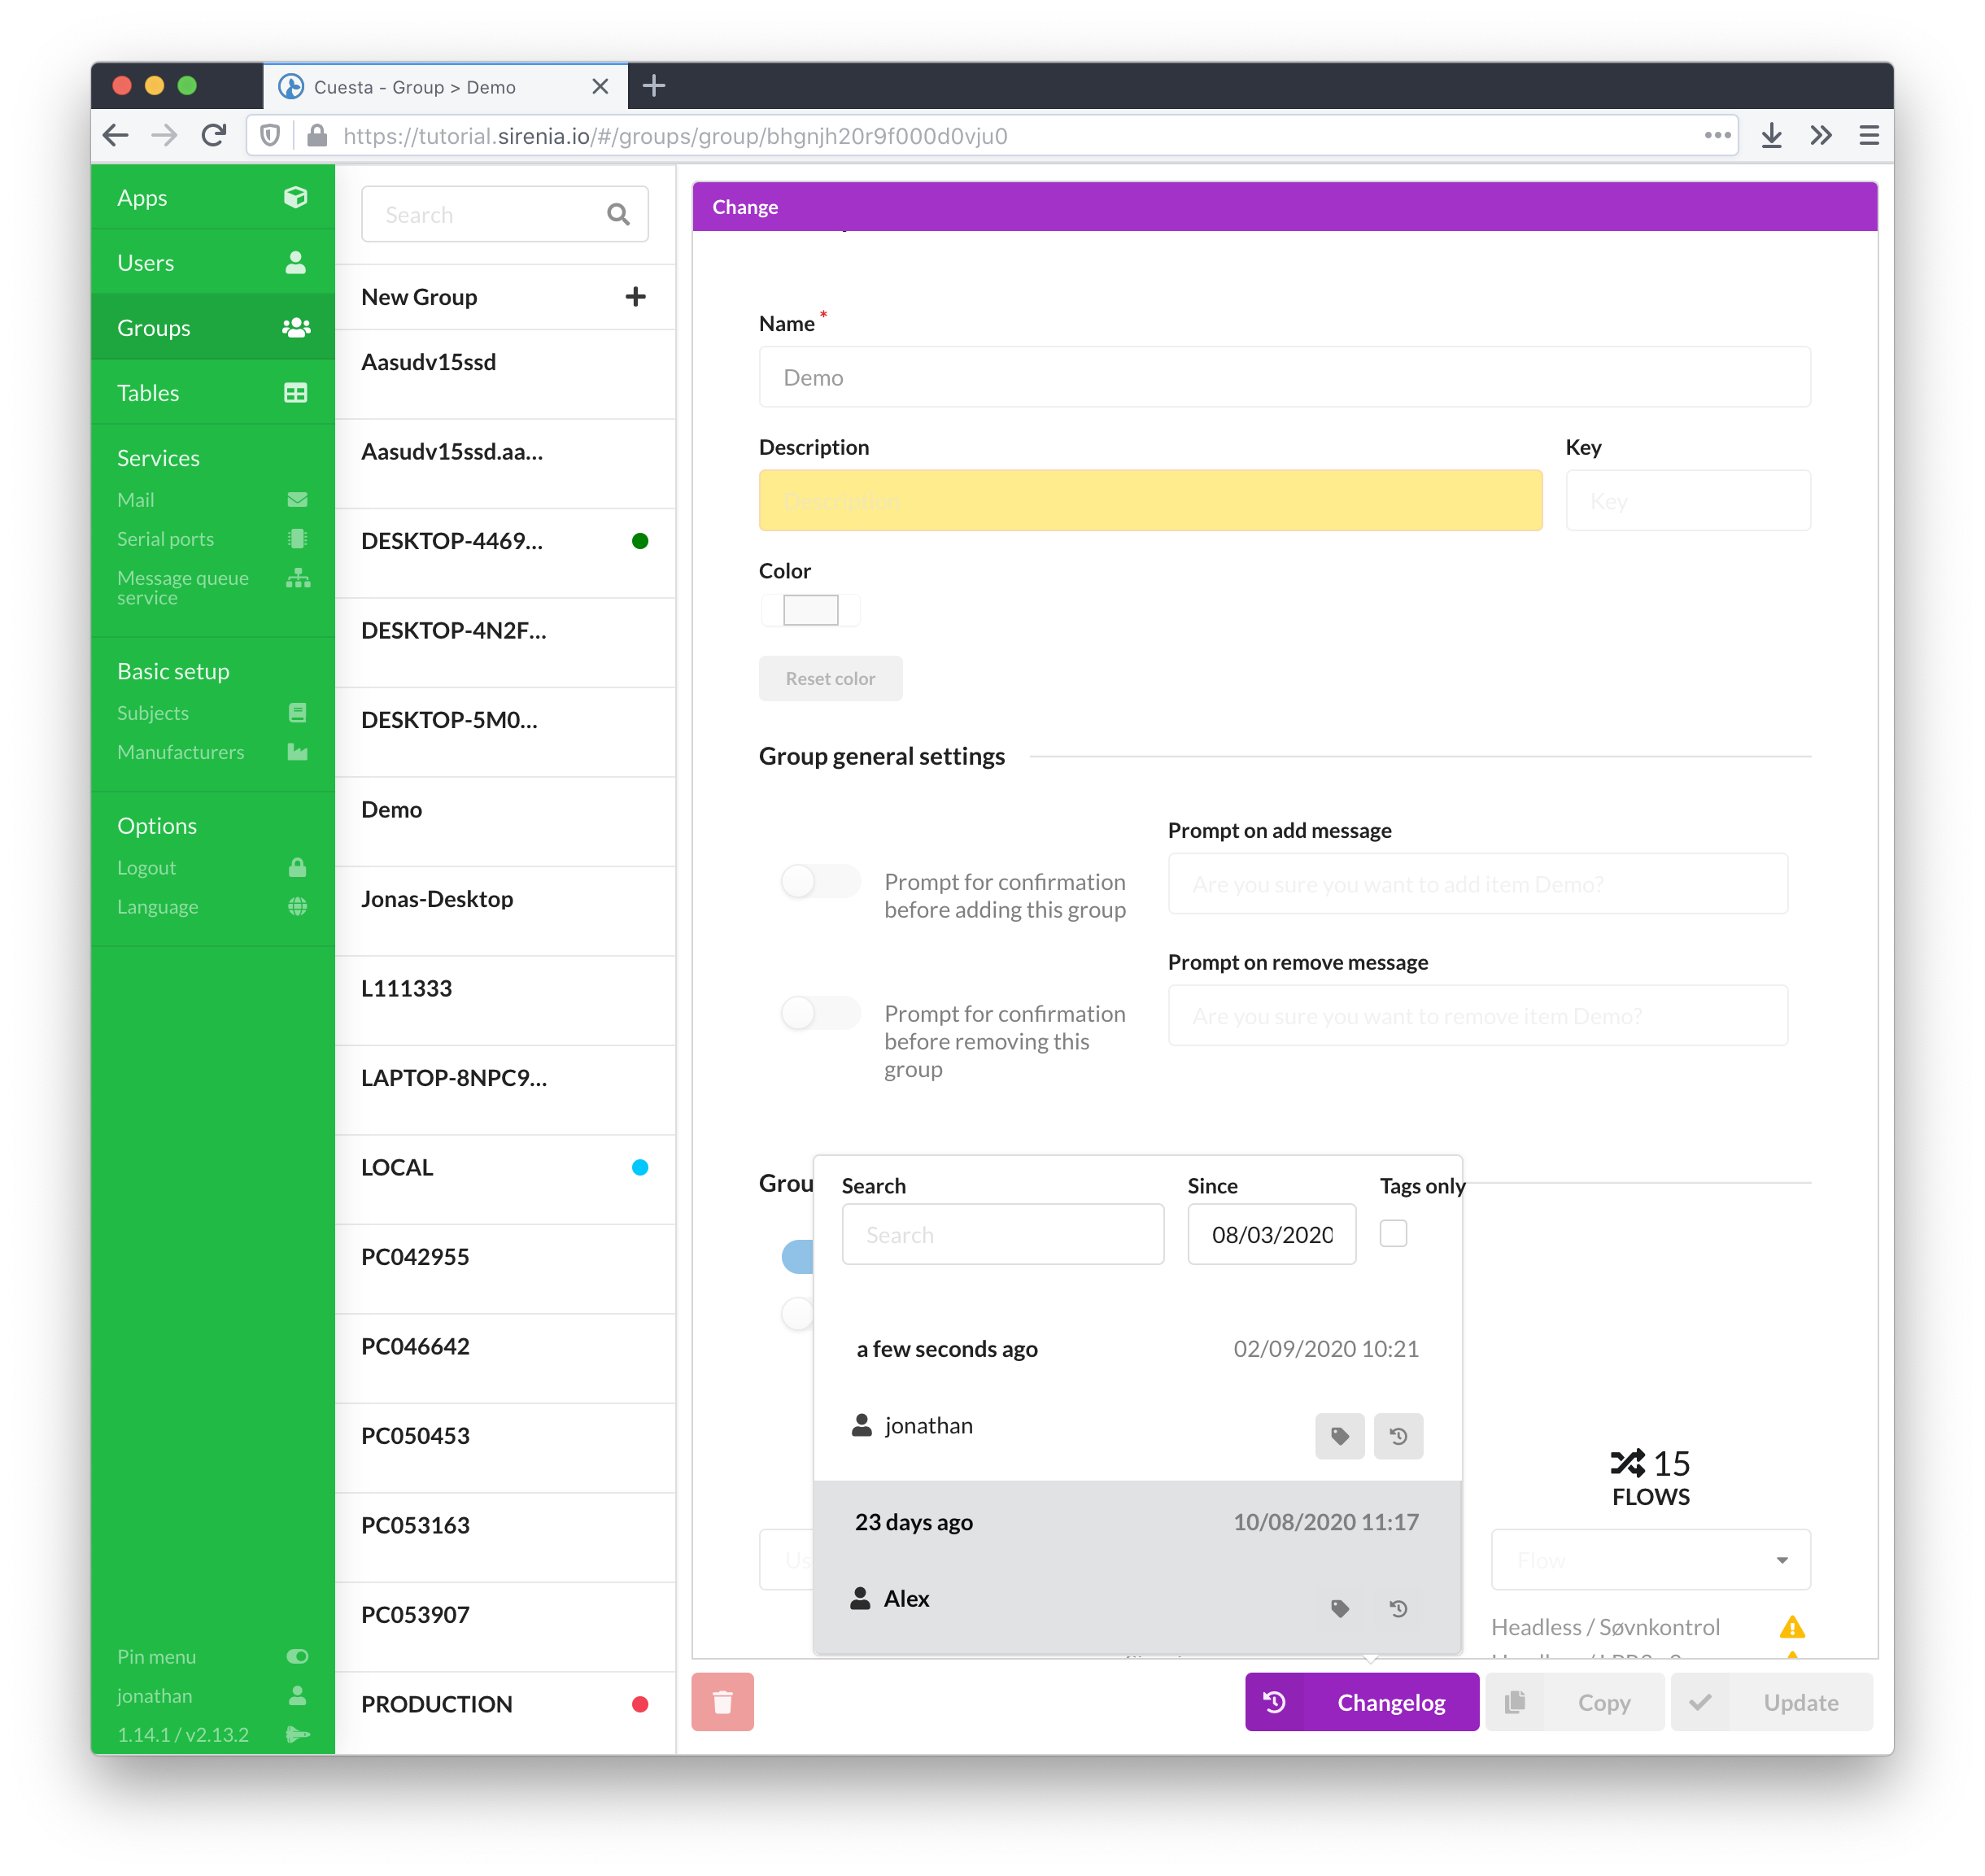
For the rest of the items such as users, groups, tables, subject, manufacturers and services the changelog is accessible throug a changelog button on the item’s edit page. The button provides a list of changes, and after selection of the specific change marks the fields which have been changed.
# Keyboard shortcuts
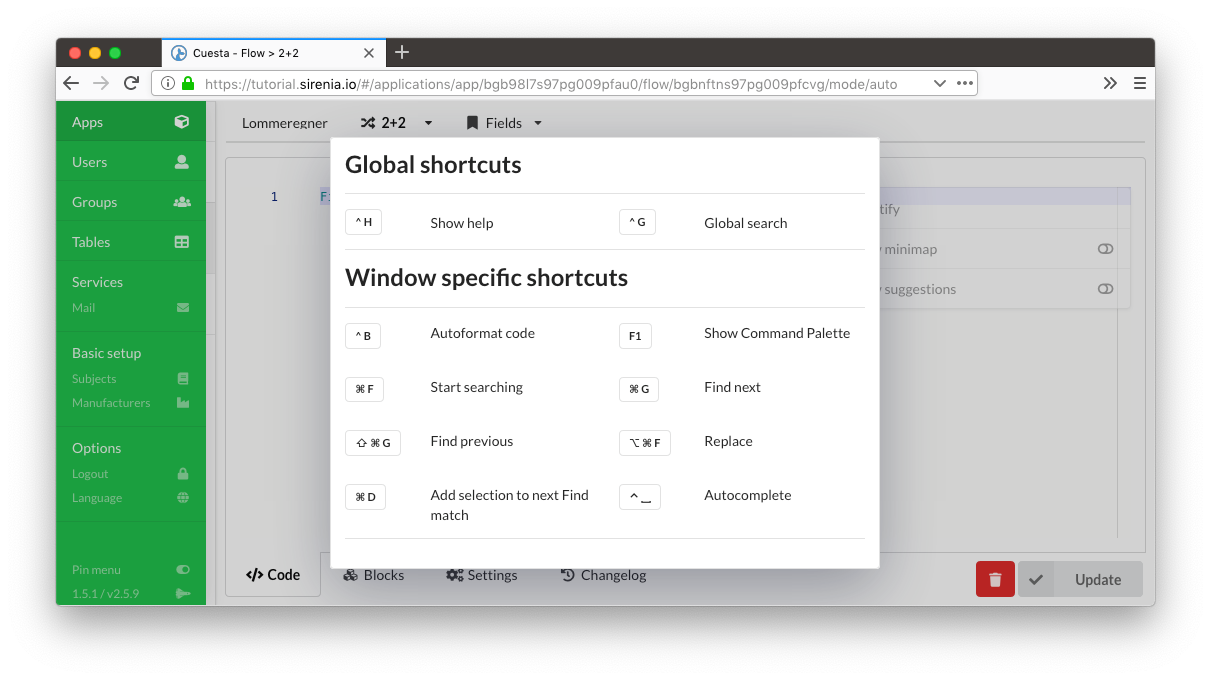
Keyboard shortcuts are available throughout Cuesta. On any screen you can hit the ctrl+h keyboard shortcut to show a window with applicable shortcut keys for this particular screen.
# Global search
Hit ctrl+g on any screen to bring up the global search feature. Then begin typing. This functionality lets you quickly jump to a group, application, flow etc. as long as you type all or part of its name.

# Subjects
The shared context in a CCOW session is in essence a key-value store where the keys are termed subjects and usually have a specific format indicating the origin, type etc. of the information stored for the key. The concept of a subject is re-used in Cuesta as a key for identifying both flows to execute and extracting structured information from the UI of an application.
Subjects are defined in terms of a name, a key (the actual subject) and a regular expression. The regular expression is used to determine whether the subject is present in a string extracted from e.g. the UI of an application.
# Creating subjects
Subjects are created by entering the name and key (use something suitably unique here, preferably a proper CCOW subject) and a regular expression.
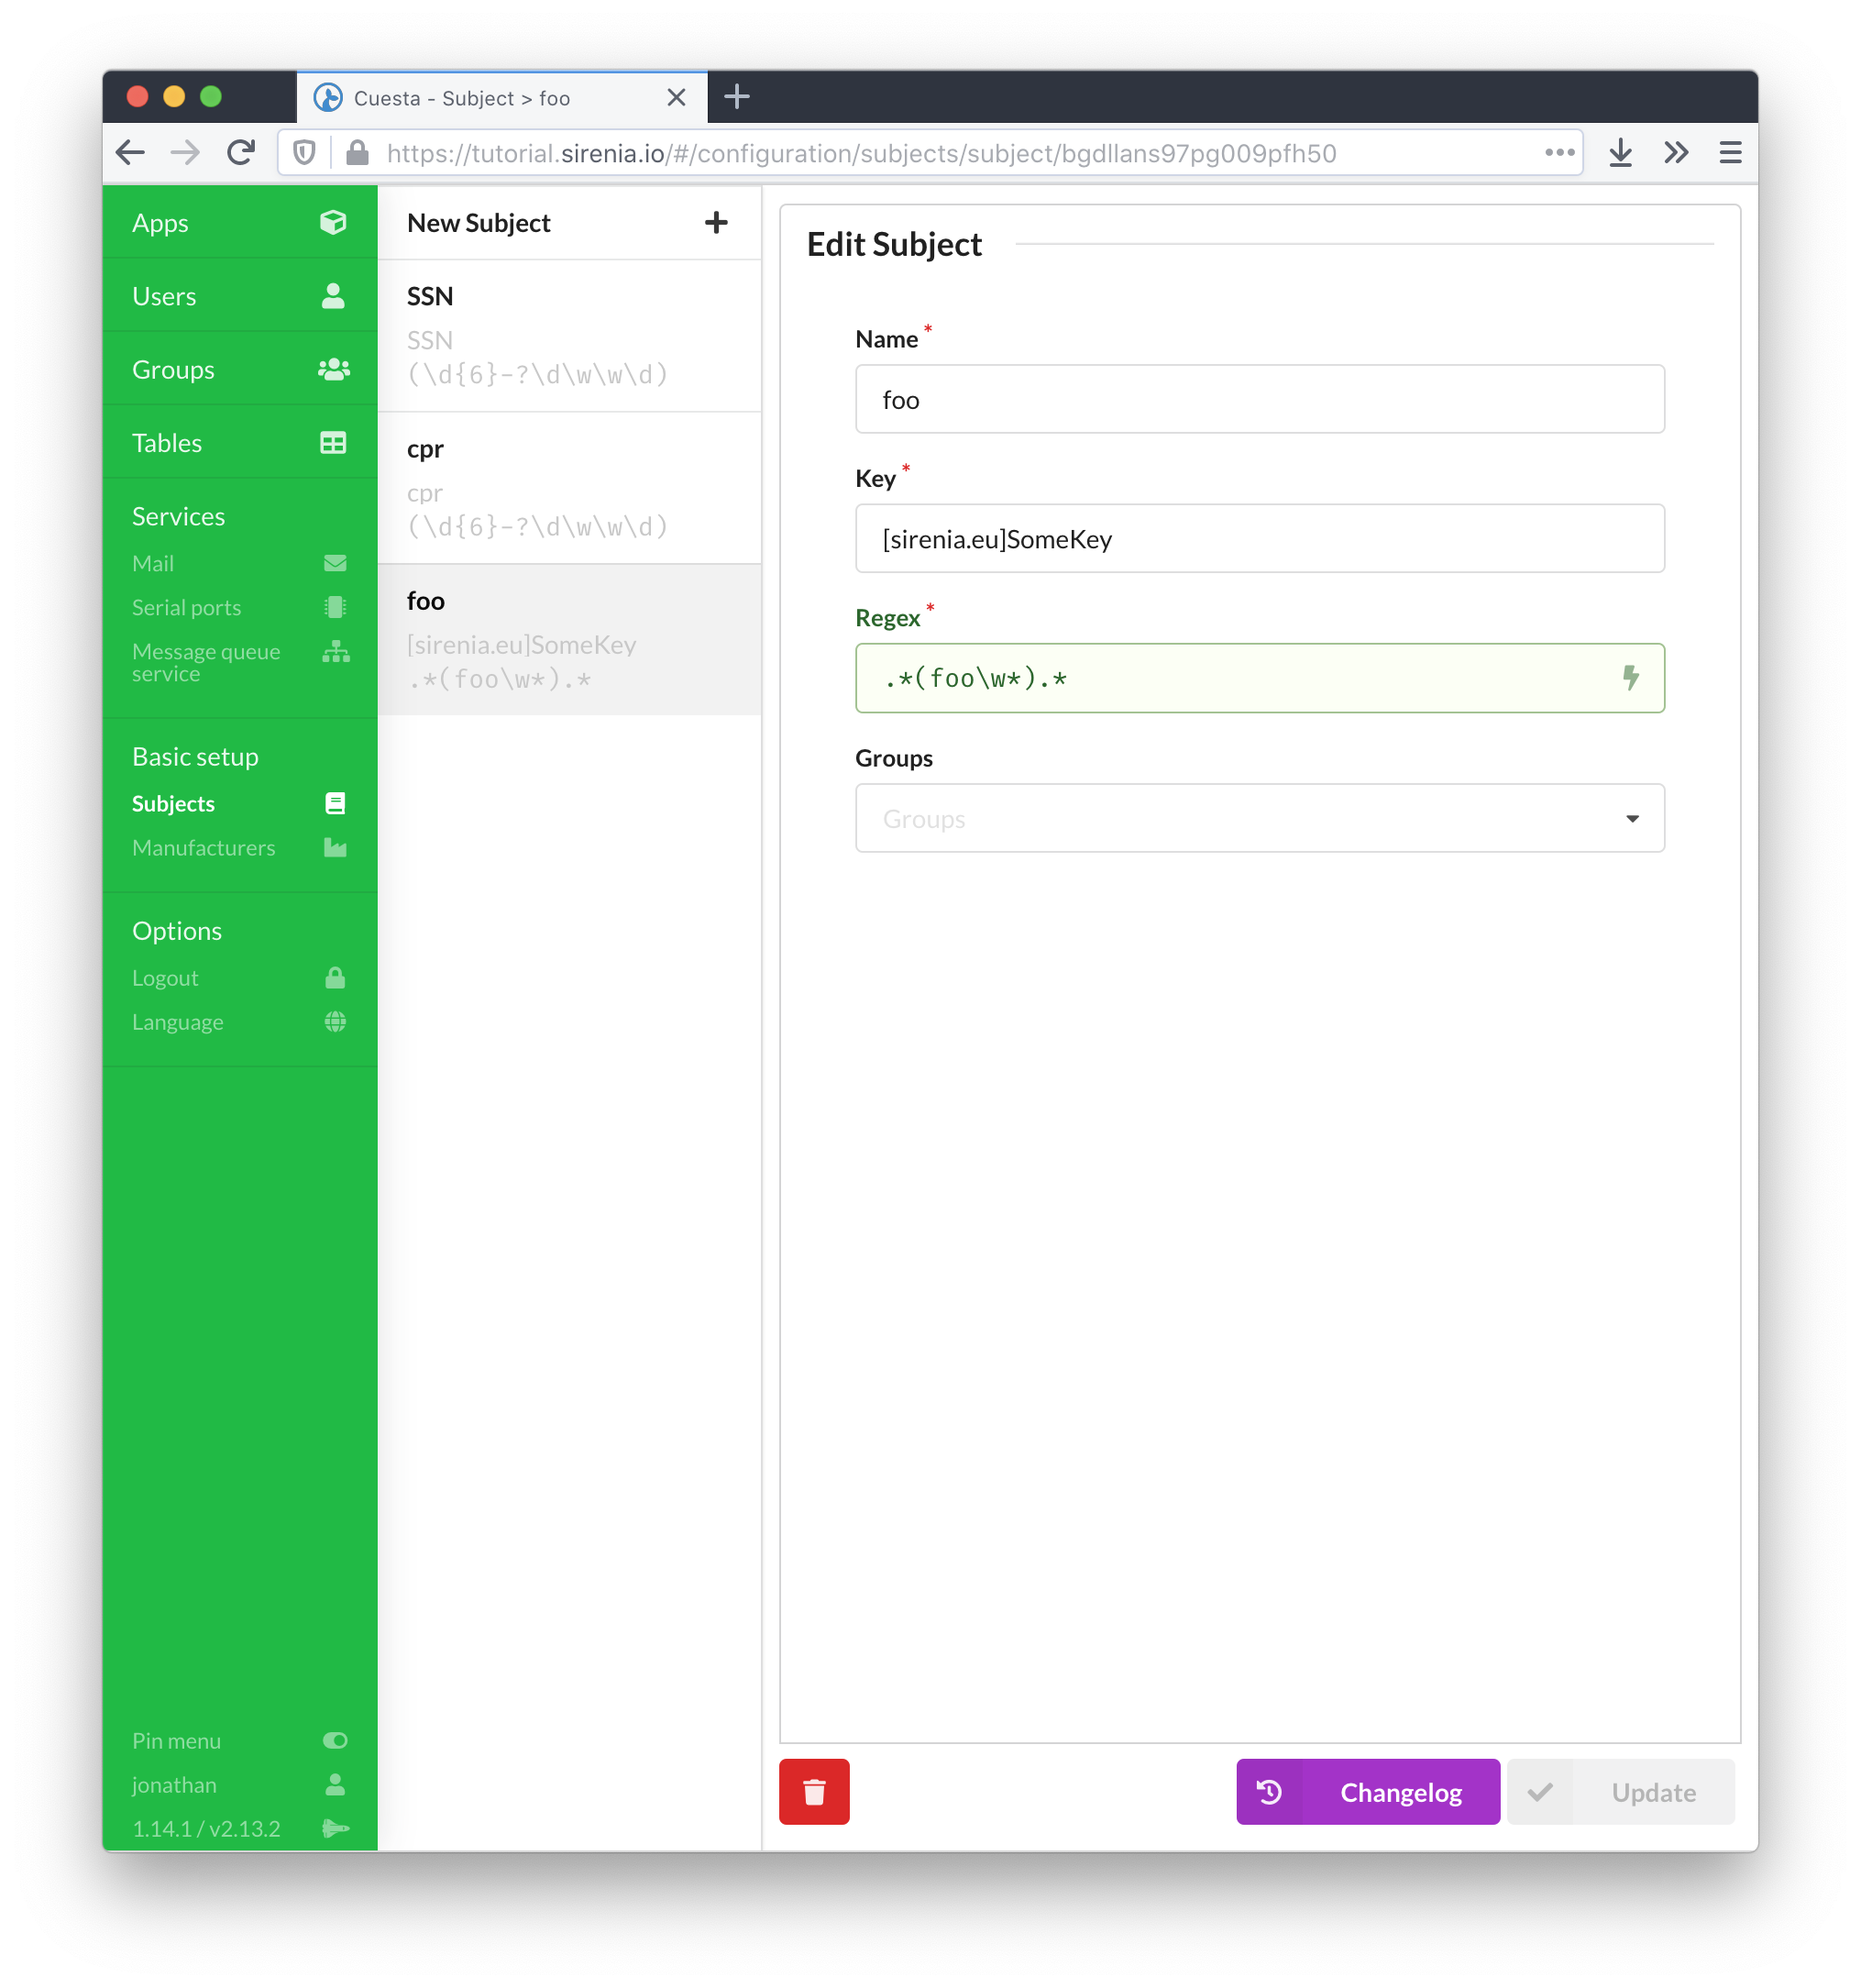
The regular expression should contain at least one group. The group is used to extract the actual value for the subject. A named group (with name value) can designate a single group of multiple groups are required in the regular expression. Multiple named groups can also be used in which case the extracted information is made avaible to a flow as a stringified json object with group names as key and group values as values.
# Applications
An application as defined in Cuesta corresponds to an actual application that the user wishes to include in a session. An application must be defined in Cuesta in order to be automated or take part in context synchronisation.
Applications are defined by a name, a type and information about how to recognise and possibly launch the application. The type determines which driver implementation Manatee will use to interact with the application.
The startup and contains parameters are used respectively to launch the application (if needed) and to recognise the application if it is already running.
# Types of applications
Manatee can drive both native, web and java-based applications as well as handle proxies for actual context particpants. Each type of application is handled by a specific driver and some requires extra components to be installed, e.g. a Chrome extension for the Chrome browser.
# Standalone
We have the following drivers available for standalone applications;
- The native driver which are able to drive Windows native applications. These are normally applications written specifically for Windows and are accessed using a native accessibility API.
- The Java driver uses Java accessibility APIs to interact with Java applications. It has support for Swing/AWT applications and JavaFx embedded in Swing/AWT.
# Web-based applications
For web-based applications we have support for the following browsers:
- The Chrome driver uses an extension to drive web-pages/applications shown in the Chrome browser. It is available at the Chrome store (opens new window).
- The Firefox driver does the same as the Chrome driver but for Firefox. It can be downloaded from here (opens new window).
- The Edge driver which again is a driver for the Edge browser - available from the Edge Add-ons store (opens new window).
- The IE driver interfaces with Internet Explorer to be able to automate web-pages shown here. It does not require any extensions/add-ons.
Manatee (the driver platform) also has some built-in browsers:
- The embedded IE browser runs an Internet Explorer browser-engine in a built-in window. It requires Internet Explorer to be installed on the host-machine and will use the version (depending on registry settings) and settings of IE installed but will display new window chrome with greater support for hiding the location bar etc.
- The embedded Chrome browser runs a Chrome (Chromium-based) browser engine. It does not require Chrome to be installed as Manatee includes the Chromium-runtime when installed. It can as with the embedded IE be configured to not display a location bar and will re-use cookies or other state between launches making it better suited than using a regular to some forms of automation.
Furthermore we also have;
- The headless driver which does not attach itself to any running applications and is mostly used for running flows outside of the context of any applications.
- The ContextParticipant driver which is used to integrate with CCOW-compatible (via our external APIs (opens new window)) applications.
It is possible to add more drivers by way of Manatee plugins, so if there is a special need we can deploy support for new application types dynamically.
# Creating and editing applications
An application is created by entering the required information in the new application input form. Each type of application has a specific set of fields that need to be filled out.
# Launching or attaching to an existing application
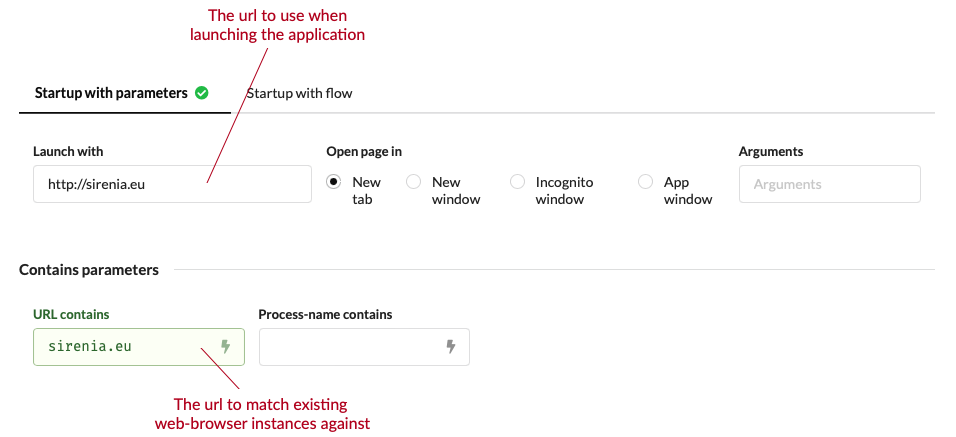
For a web-application the section containing the parameters for launching is simply the url and (in some cases) whether to open a new tab or a new window. Similarly the information needed to detect an already existing instance is the url (or title in some cases).
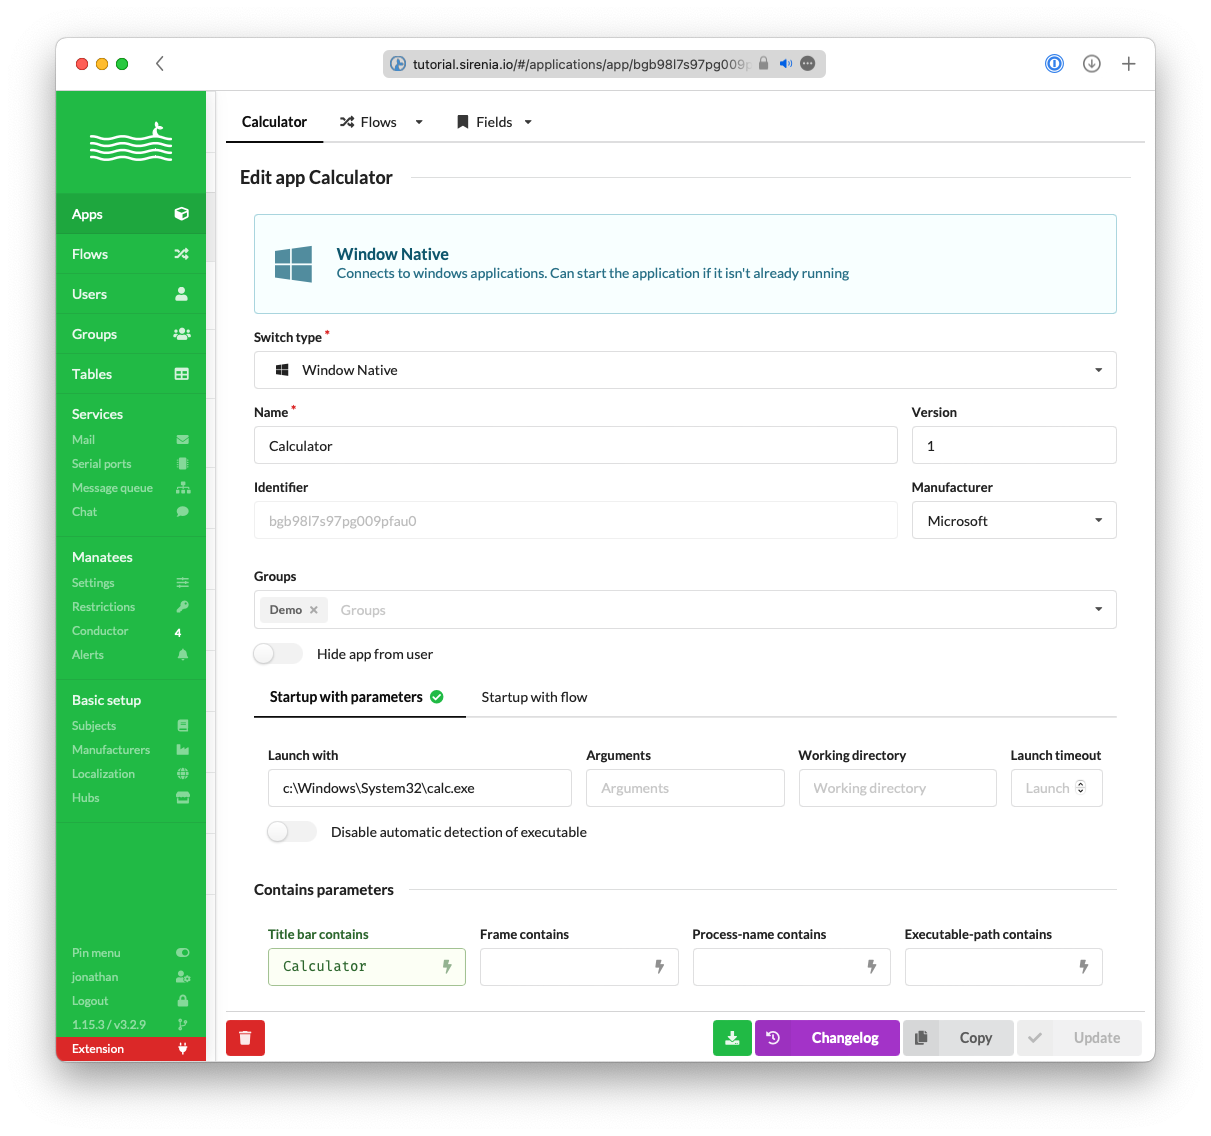
For a native- or java-based application more information is needed to launch the application as shown below. Detecting an existing instance can be done by different predicates:
- Title bar will match the current title of the application against the regular expression given, the same string as returned by
Window.title - Frame will match the class of the window frame, the same string as returned by
Processes.current.class - Process-name will match the name of process and may include arguments given to the process, the same string as returned by
Processes.current.commandLine - Executable-path will match the full path to the executable, the same string as returned by
Processes.current.fileName
The predicates are joined in a conjunction meaning that the more predicates / fields that have input the more specific the match is. All fields accept regular expressions.
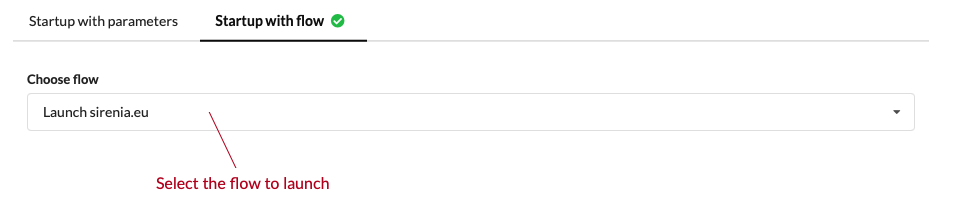
# Launching an application via a flow
You can also choose to start an application with a flow. This flow is run in headless mode meaning that no application is available so you cannot interact with fields etc.
In the flow you can write some code that produces an application by:
- Returning a
stringwhich will be interpreted as an url to launch (for web-applications) or a command to be executed for other types of applications - Launch the application in the flow and return an object containing the properties:
hwnda window handle for the main window for the processpida process identifier for the process you have launched
- Or return an object which will be used to launch the application. It should have the following properties:
commanda command to run andargumentsarguments to a command
- Return a
ProcessProxyobject designating the process launched. - Return an error indicating the launch failed.
- No return value is interpreted as a successful launch and Manatee will try and attach.
# Groups
You can add the application to as many groups as you would like. The more groups you add the greater number of Manatees will be able to use the application. The groups found on an application should be a super-set of the groups of all of its flows - in other words; do not add a group to a flow without its parent application also having this group.
# Fields
Fields are used for interacting with the UI of an application. A field represents an element in the UI, a button, a text-field, a panel etc. Each type of field can be interacted with similarly to how a user can interact with the field. A button can be clicked, a text-field can have text written into it and text extracted from it and so on.
Fields are identified either by a path or a screenshot of the field. The screenshot is simply used to identify the field visually and should only be used if the field cannot be identified by a path. Paths are more flexible and robust with regards to changes in the UI of the application.
A path is a string which identifies the given field by containing instructions on how to traverse the tree that is the structural model of the UI. UIs are normally hierarchical in nature and structurally composed like a tree (e.g. the DOM (opens new window) of a web-page). The window is normally the root of the tree and it will contain a few panels as its children which again will contain other panels or UI elements directly. A path is thus a way to navigate from the root of the application (the outermost window) to the field we are interested in. An example:
/OuterPanel1/OuterPanel2/OkButton
This path specifies that we are ultimately looking for an OkButton element which is contained in an OuterPanel2 which itself is contained in an OuterPanel1. The elements along the path are matched on multiple criteria e.g. OkButton might be the actual text shown on the button or the class/type of button used.
The path editor (the text field in which the path to your field can be seen and edited) applies some formatting to make it easier to parse what is going on in the individual path elements.
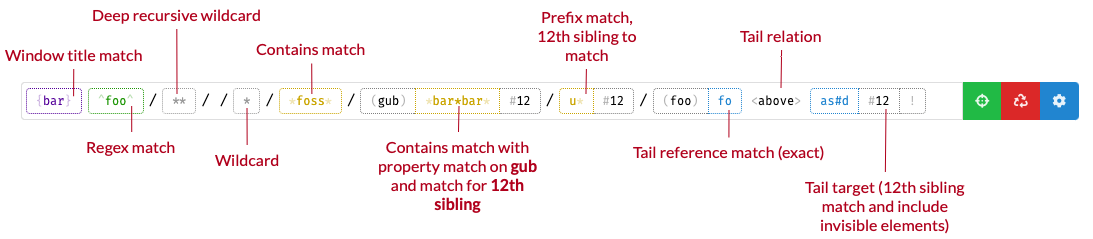
Hovering over an element of the path will display some information about how that particular element is matched as well. You can read more about fields and how the individual elements match the nodes in the UI tree in the Manatee manual (opens new window).
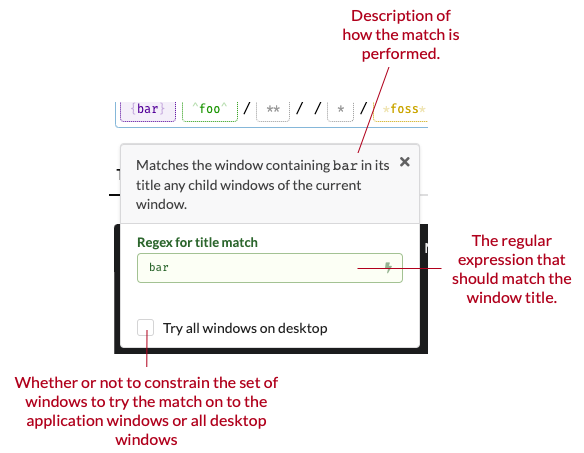
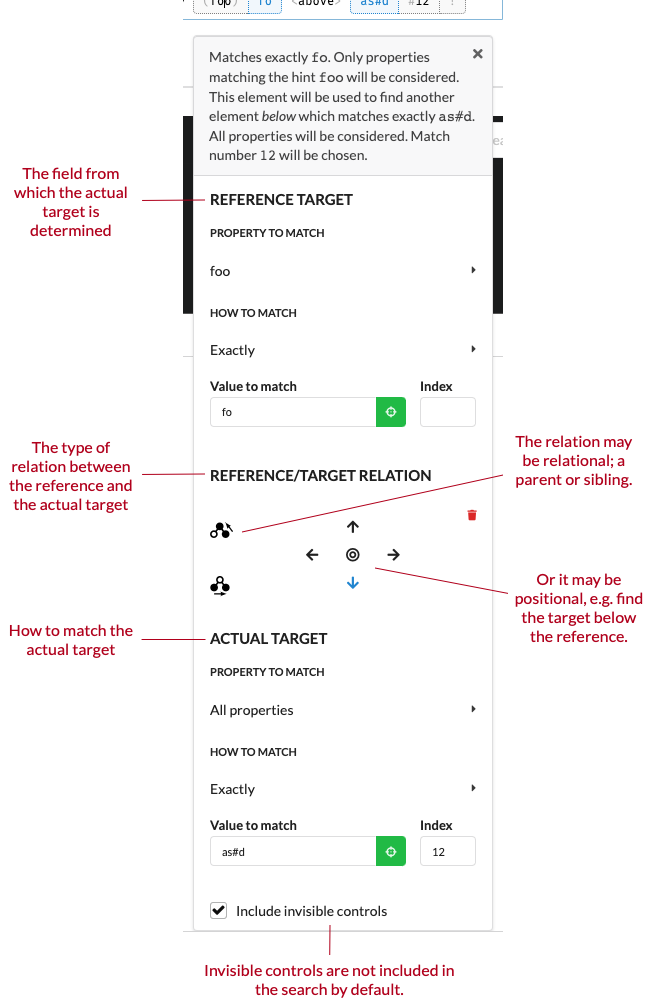
You can edit the path and its elements directly but if you right-click on an element you will get a menu in which you can edit an element using predefined controls. There are three distinct editors. The first one here is the editor for the window-match element (the first optional element in a field path).
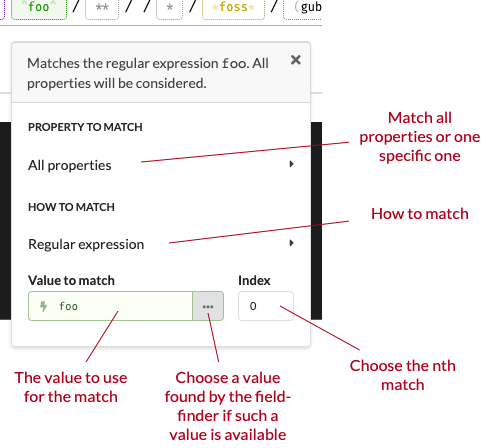
Secondly there is a menu for all the intermediate elements where you can choose how the match should proceed:
And lastly there is a menu for the “tail” path element. The last element may contain a relation between a reference and a target element so it is more complex:
# Creating fields
It is not normally necessary to manually construct these paths as Cuesta will connect to a locally running Manatee instance and try to figure out the path to a given field when you use the field-finder functionality in Cuesta.
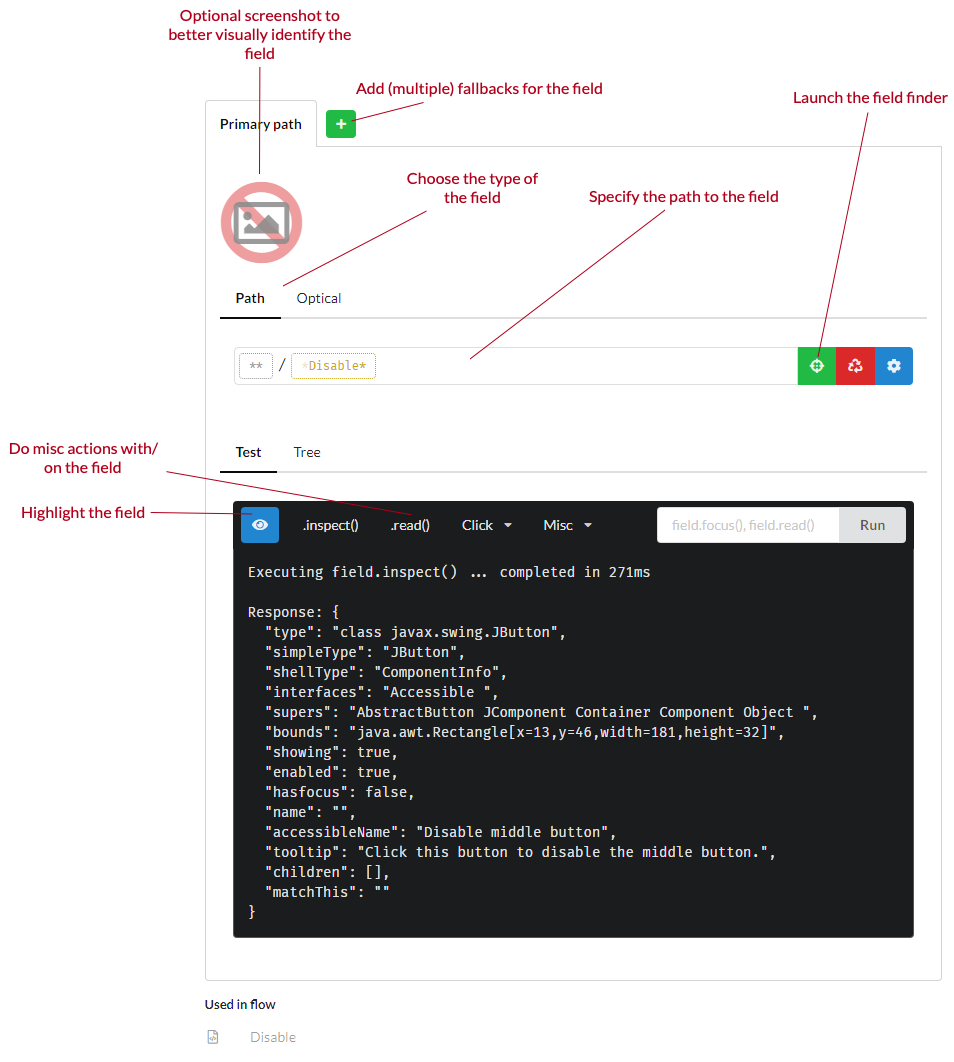
Then you will simply point at the element in question and Cuesta will input the path for you. If the element is in a dialog that needs to be activated after the field finder is activated, you can hold down ctrl, which will pause the field finder while you activate the dialog.
Instead of clicking on the app element, you can also press spacebar to select the currently highlighted element.
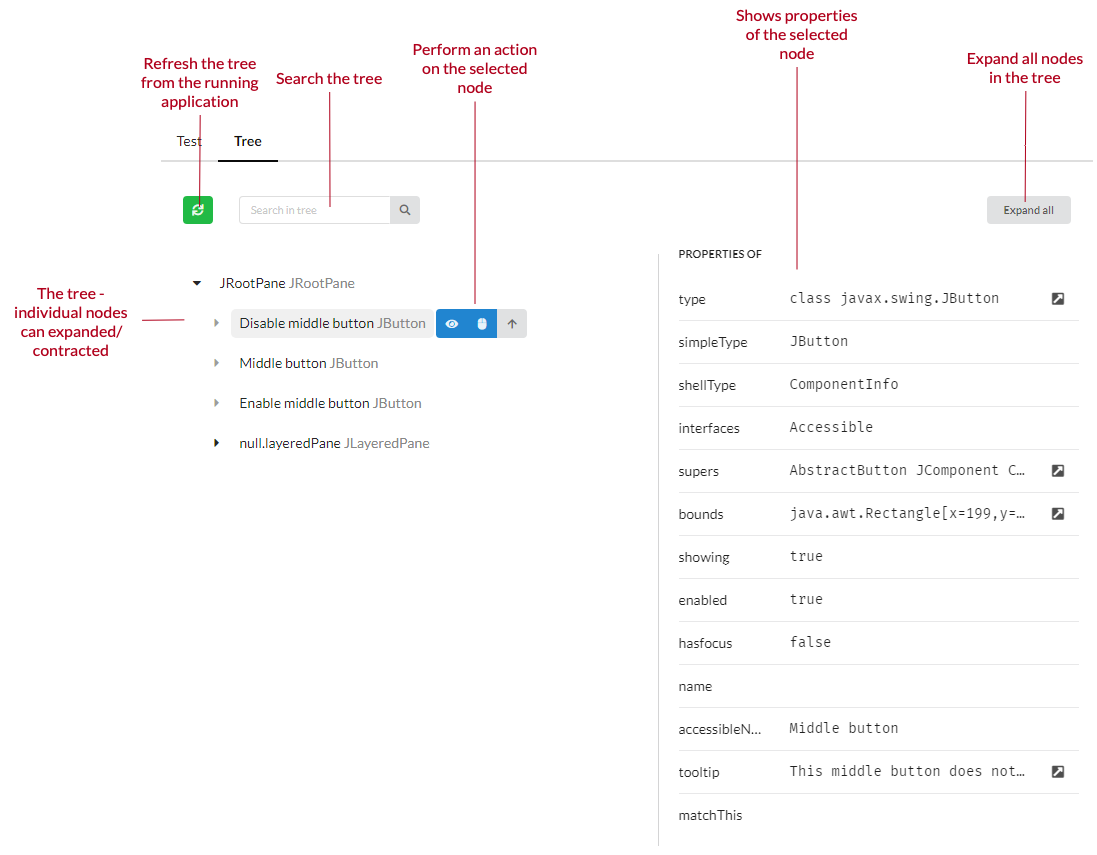
# Tree view
You can also use the tree view to explore the UI structure if the application and select an appropriate field to get a path for it.
# Using a field in a flow
Once defined the field may be used in one or more flows for the application. For example the following code snippet clicks the button designated by the field name “OkButton”.
Fields['OkButton'].click();
A more complex example could be a field which represents a table:
// Inspect (i.e. get a JSON serialized version of) the table
var table = Fields['MyTable'].inspect();
// The `table` variable is an object serialized according to
// the JSON serialization document
var rows = table.rows;
var someCell = table.rows[10]['Header1'];
// There is also functionality for clicking in a certain cell
table.clickCell('row1', 'Header1');
# Flows
A context manager can both facilitate synchronisation and support a form of RPC by letting participants in a context session expose actions which other participants can ask the context manager to run. Both state synchronisation and action invocation are central concepts for Manatee. A flow is a single executable script which can interact with UI of an application or perform other functionality as described in the modules documentation (opens new window). A flow can be either a state, an action or a module.
# State flows
A state flow represents functionality to set or get the state of an application for a given subject. Both a get and a set version for the same subject is required for the state synchronisation to take place.
An example: Getting an application A and application B to synchronize state using UI integration with the subject foo can be accomplished by creating two state flows for each application, one for getting the current value of foo and one for setting it. If the current value of foo in application A is stored in a textfield accessible with the name fooA then we’d perhaps simply write the get foo flow as follows:
Fields['fooA'].read();
and the set foo flow as:
Fields['fooA'].input(Value);
Similar flows may be applicable for application B.
Manatee will then take care of extracting the value and setting it when necessary. The state of foo will be extracted and stored in the context manager regardless of whether there are other applications that must be synchronised.
The shared state (the current value of all synchronised) subjects are available to all flows of type state and action in the Inputs map. The current value for the subject of state flow is also made availble in the special Value variable (as seen in the set foo flow above).
An application does not need to support all subjects made available in the shared context but may decide on supporting a subset only.
# Mapping flows
A mapping flow is used to map the existing values in the shared context to new values through a transformation performed in a flow. An example could be that you have a patient identifier in one format that needs to be translated into another format for another application. In this case you can utilise a mapping flow to do the mapping automatically. This is illustrated below.
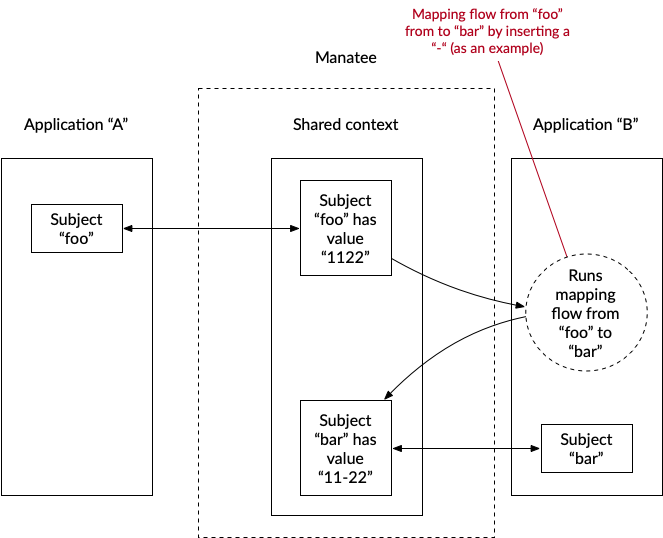
A mapping flow operates on one subject only so you need two mapping flows for a two-way mapping.
# Action flows
An action flow resembles an RPC invocation either internally in an application or between applications. A flow always belongs to an application and will be run in the context of that application. It cannot be run unless the application is running and attached to a session in Manatee, so Manatee will always attempt to connect to an existing application before starting a new instance when asked to run an action flow for a given application.
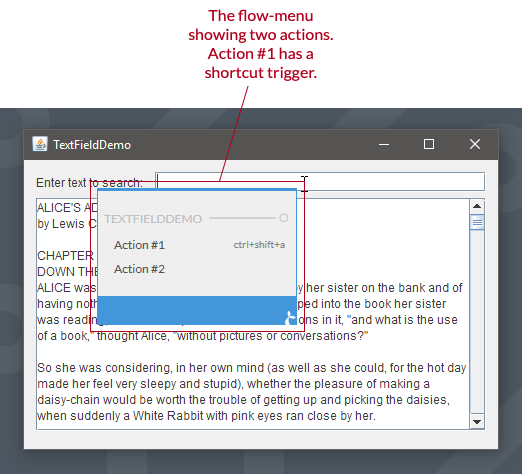
Action flows can be started in numerous ways. Two of them are either by a trigger or by using a flow-menu which appears in an application in a context session when the user right-clicks while holding the alt key down.
Action flows can be used for automation and for fire-and-forget frontend integrations. It is also possible to create action flows, which spans multiple-applications to transfer data or to automate multi-application workflows.
# Filtering flows shown in the flow-menu
The flow-menu displays flows, which are relevant for the application and location within the application in which it was invoked. It does this in two ways;
The first filtering is done by extracting values for any subject from whatever the user might have clicked. If the flow has inputs these must be matched with the subjects and values extracted from the context of the click. The purpose of this mechanism is to ensure that the flow has the correct inputs, but it also provides a neat mechanism for open-ended integration. If, for example, we’ve defined a subject for a patient identifier then for a flow which switches patient in an EHR we can define this as an input. Now this flow can be everywhere where we can extract patient identifiers, e.g. you’ll be able to switch the EHR to patient found in an Excel spreadsheet or any other type of application where a patient identifier can be extracted.
An example. If a subject is defined for a patient identifier, this subject can be used in a flow, which switches patient in an EHR. This flow can be initiated from everywhere where we can extract a patient identifier, e.g. to switch the EHR to a patient found in an Excel spreadsheet.
The second filtering is done such that anchored flows are only shown if they’re the anchor matches the location clicked.
# Module flows
Module flows are flows which contain some shared functionality which is made available to other (state and action flows). It is a mechanism by which functionality (code) can be shared between flows. A module flow should follow the following template:
// Define some functionality that can be useful for other flows
var isEven = function (n) {
  return n % 2 === 0;
}

// The `exports` object should be populated with the functions
// and variables that should be exported from the module flow
exports.isEven = isEven;
There are more details on module flows in the flow documentation.
# Built-in modules
A flow may interact with the user interface of the application in which it belongs by using any of the defined fields. A number of built-in modules are also made available for a flow. The details and exact nature of these are described in the Manatee v1.29 (opens new window) page for each version of Manatee.
The modules cover a wide range of functionality from inspecting and manipulating the OS windows to accessing external services through http and creating Excel documents. The flow documentation contains numerous examples of their usage.
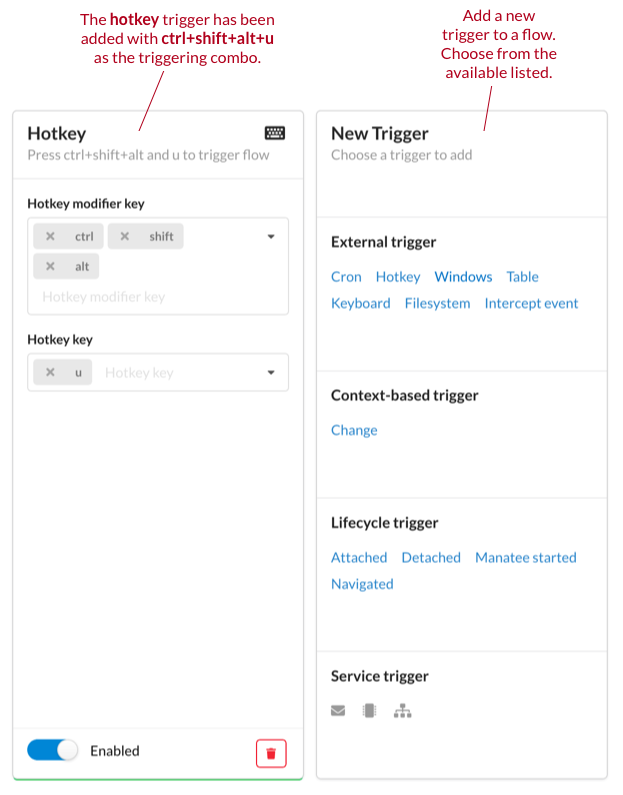
# Triggers
Triggers are hooks which determine when a flow is run (if not invoked manually). It is possible to have multiple triggers for a single action flow.
Once a trigger is added to a flow it will run the flow when the trigger conditions are met on the Manatee instances which the flow is made available to. It should be noted that adding a trigger can thus interrupt a user of s/he is using the machine running the triggered flow and is therefore recommended primarily for unattended machines. In some cases it will make sense to trigger a flow in an attended situation though.
Examples of triggers are;
- When a window with a certain title is opened.
- When a file in a certain folder is created.
- When the user presses a certain hot-key combination.
See more info in the triggering flows section as well as the documentation for each type of trigger (opens new window).
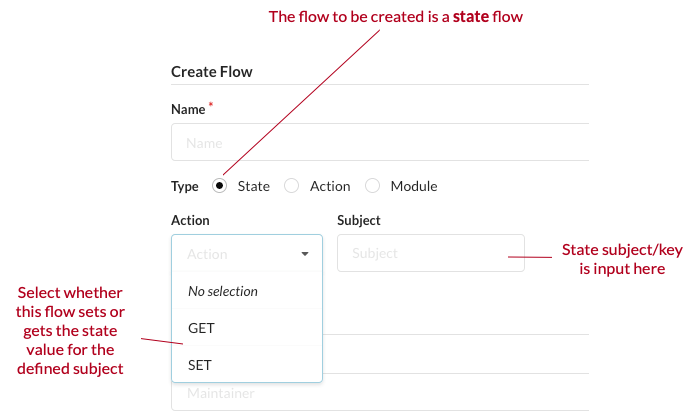
# Creating a flow
A flow must have a name, a type and some auxiliary information depending on the type of flow. For state flows you must specify its subject and whether the flow gets or sets the state for the subject.
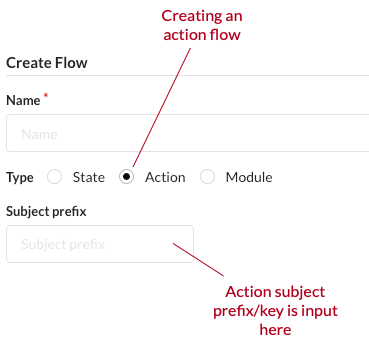
For an action flow the subject prefix should be set. This serves as an identifier for the flow.
For both state and action flows it is useful to set a maintainer as well. Cuesta can be configured, so only the maintainer can edit the flow.
# Groups
A flow will not be available for a Manatee unless it has at least two groups; one that is the same as the primary (production) group of the Manatee instance and one that is in the set of all the (AD) groups of the user (combined with the username and the name of the machine). Both of these groups must be applied to the application as well.
# Editing a flow
Once a flow is created the functionality or code of the flow can be edited as text or in the blockly editor. See the flow documentation for details of how to write flow code and examples as well as documentation on the available modules.
# Code
The code of a flow can be edited directly in the code editor. The language we support is Javascript.
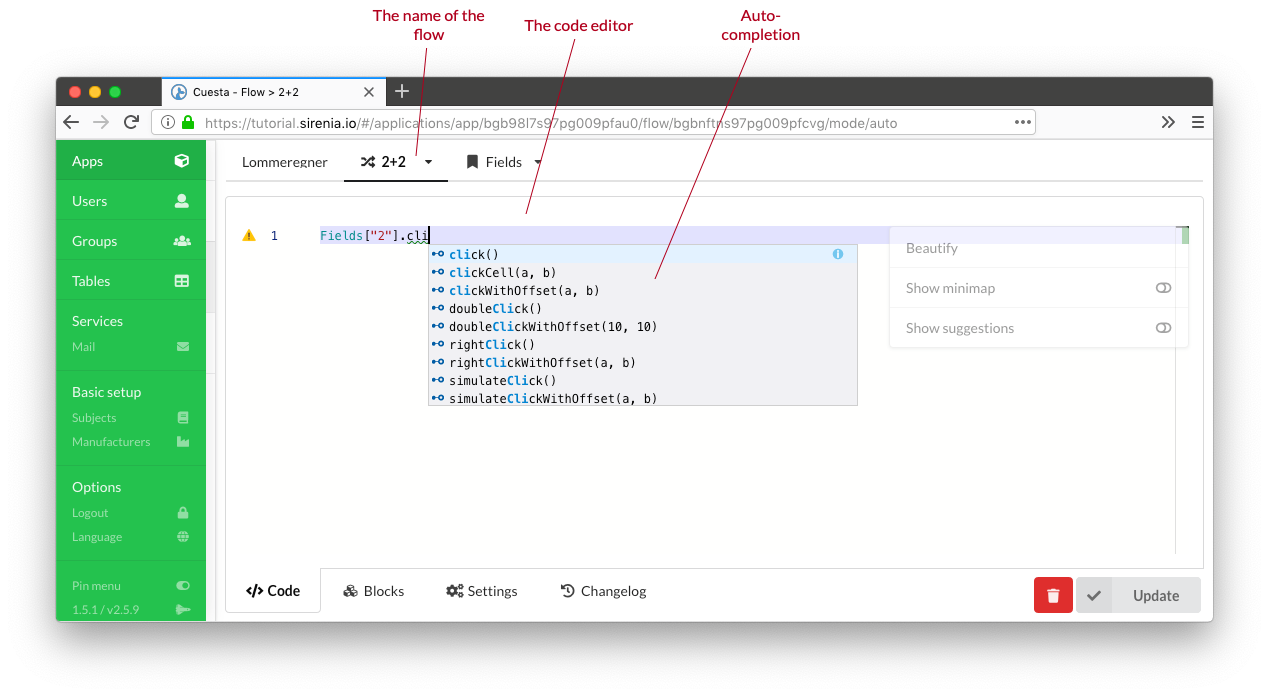
The code editor has auto-completion and other advanced features. Hit the F1 key to show a list of editor functions and their assigned keyboard shortcut (if any). The editor analyzes your code as you type and points out any problems it finds.
As can be seen in the video, detected problems that you are ok with can be ignored with the // disable-check comment.
If the editor is running in the manatee embedded browser or in an external browser with the Sirenia extension, the flow can be run with F10 or debugged with F11 straight from the editor. If any code is highlighted, only the highlighted code is run.
# Javascript
When the ‘modern’ javascript option is selected while creating a new flow, some additional modern language features become available. They include the following:
- Arrow functions
var sum = (a, b) => a + b
- Block scoped constant variable declarations. This expresses your intent to never change a value.
const fileName = 'user-list.csv';
- Block scoped mutable variable declarations. This expresses your intent that the value may change.
let fileName = 'user-list.csv';
- Template string literals. A powerful mechanism for formatting strings.
function formatFilename(x) { return `user-list-${x}.csv`; }
const multiLine = `Line 1
Line 2`
You can also check out this guide to ES6 (opens new window) for some idea of what has changed from ES5. Be aware that we don’t support all ES6 features.
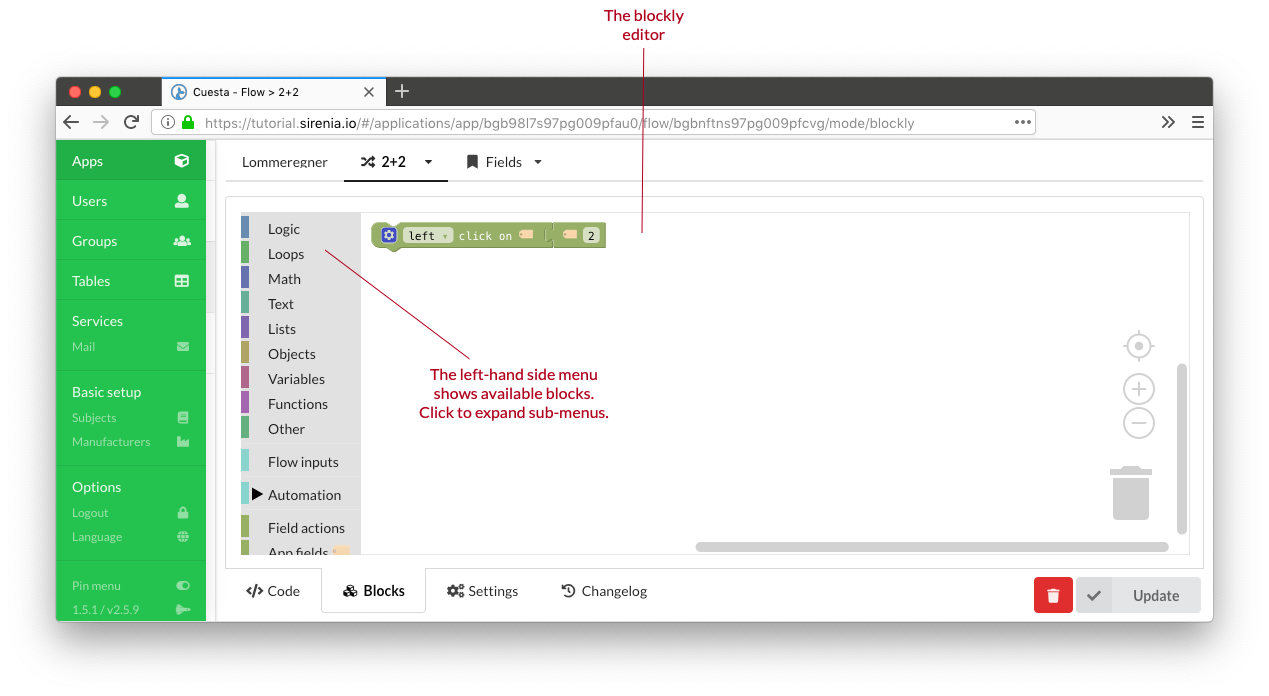
# Blockly
Blockly (opens new window) is a visual programming tool which uses blocks that combines like a puzzle to define complex functionality. Our modules, field interaction etc. is available as pre-defined blocks. Running a sub-flow (i.e. invoking a flow from another flow) is also possible. Blockly can be used to construct the same flows as done via the code-editor and it is possible (to a certain extent) to switch back and forth between the code editor and blockly.
The simplicity of blockly also makes it possible to setup a workflow where you have dedicated developers constructing the “building blocks” for your automation needs in the code editor while the domain specialists use blockly to piece together actual workflows without writing a single line of code.
# Importing flows
It is possible to drag Microsoft Steps Recorder (opens new window) or UiPath projects onto the code editor to import/convert the automations into an existing or new flow.
# Anchors
Anchors are used to filter where a flow can be activated using the flow-menu. Adding an anchor is simply done by selecting which field(s) to use as anchors. When added the flow will only show in the flow-menu when activated within one the fields given. Defining no anchors means that the flow will appear regardless of where the menu was activated.
# Inputs and outputs
A flow can accept inputs and produce outputs. Each input can be typed to any of the configured subjects. This is also used for deciding which flow to show in the flow-menu; only flows which can have their inputs matched with extracted content is shown. The value of the input can be accessed in the flow using the Inputs map, e.g.:
var myInput = Inputs['myInputSubject'];
Outputs from a flow can be any root scope defined variable. If we have the following flow;
var myValue = 'foo';
var myOtherValue = Windows.topMost.title;
then myValue and myOtherValue can be made outputs in the Settings tab of the flow.
# Triggering flows
A flow can be setup to run automatically by using a trigger. Triggers include:
- Cron which runs flows at certain pre-defined times.
- Window which runs flows when certain windows are shown or hidden.
- Filesystem which monitors a folder and runs a flow when files are added, removed or changed
- and several more …
The group filtering still applies to flows with triggers - thus it is only Manatees which match the groups of a flow that can be triggered.
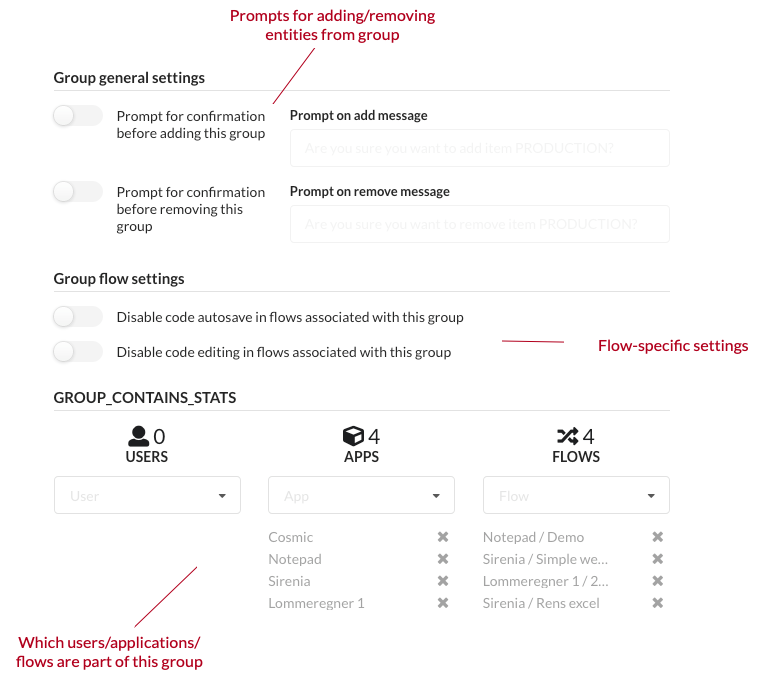
# Groups
In order to decide where a certain application or flow can be run we use the concept of a group. A group in Cuesta is simply a label which can be attached to e.g. an application or a flow. The group itself can contain a few properties which determines how the attached entities behave in Cuesta. An example is adding prompts to be displayed when you add e.g. a flow to a group. Or to disable editing of all flows in a certain group.
Manatee uses groups to determine which flows are applicable for the specific instance of Manatee. It uses a configurable primary (production) group and a list of secondary groups to do this. The primary group is configured and can be changed by the user. The secondary groups are a union of;
- the (AD) groups of the current user,
- the name of the current machine, and
- the username of the current user.
A flow must be in both the primary and at least one of the secondary groups to be available for a given Manatee instance.
The concept of groups thus makes it possible to control in which Manatee instances certain functionality (flows) are available.
# Tables
Tables is an internal datastore in Kwanza which can be accessed from Manatee. Typically tables are used for mapping tasks but they are in essence a general purpose data store.
# Creating and using tables
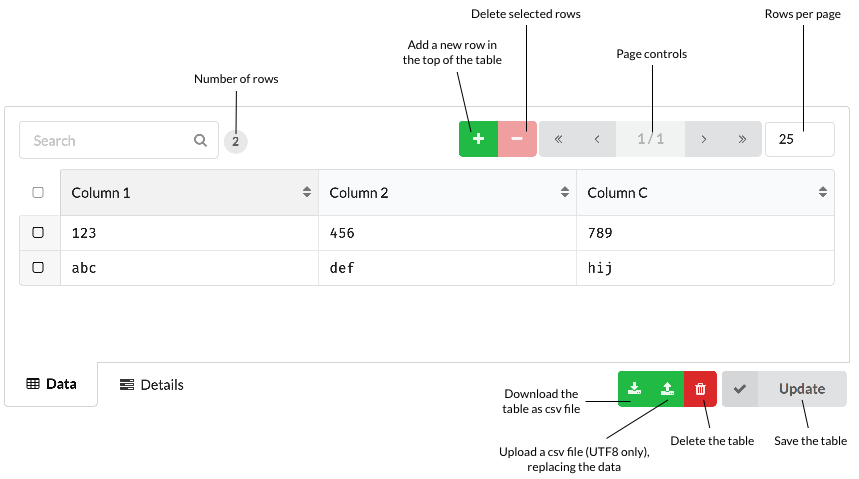
A table must be created in Cuesta before it can be accessed from Manatee. It requires a unique name. Once a table is created it has an interface like a spreadsheet in Cuesta. You can move around using the keyboard and change content of cells, add new rows or columns. Again, press ctrl+h for the relevant keyboard shortcuts.
You can also upload or drag-and-drop a CSV file onto a table and it will get uploaded and stored (once you press the update button).
It is also possible to search/filter using the controls at the top of the table.
# Services
External services are defined by adding their configuration to Cuesta. Currently we support an IMAP/SMTP and Exchange mail services, serial port services and message queue services. For details see the services document.
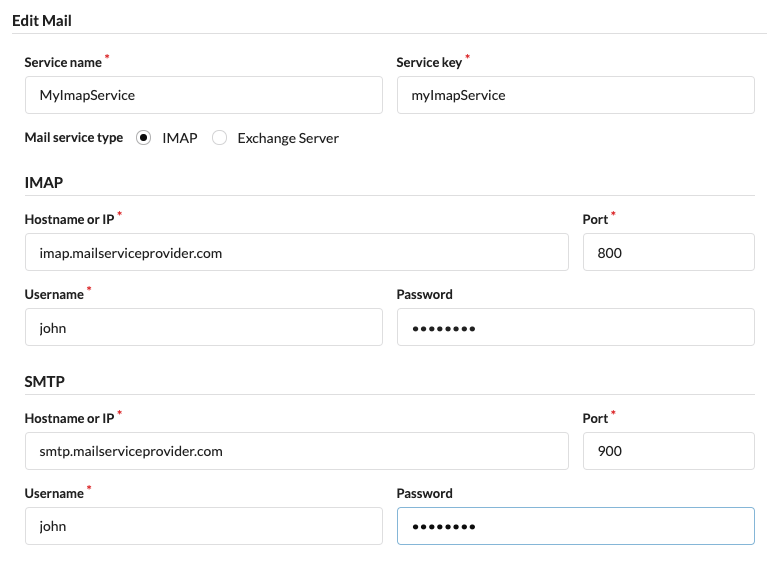
Creating a mail service is simply done by entering the details (e.g. IMAP or Exchange server and credentials) into the service details form. Once a mail service is created it can be used to trigger flows (when a mail matching certain paramaters is received) or for sending mail from a flow.
# IMAP
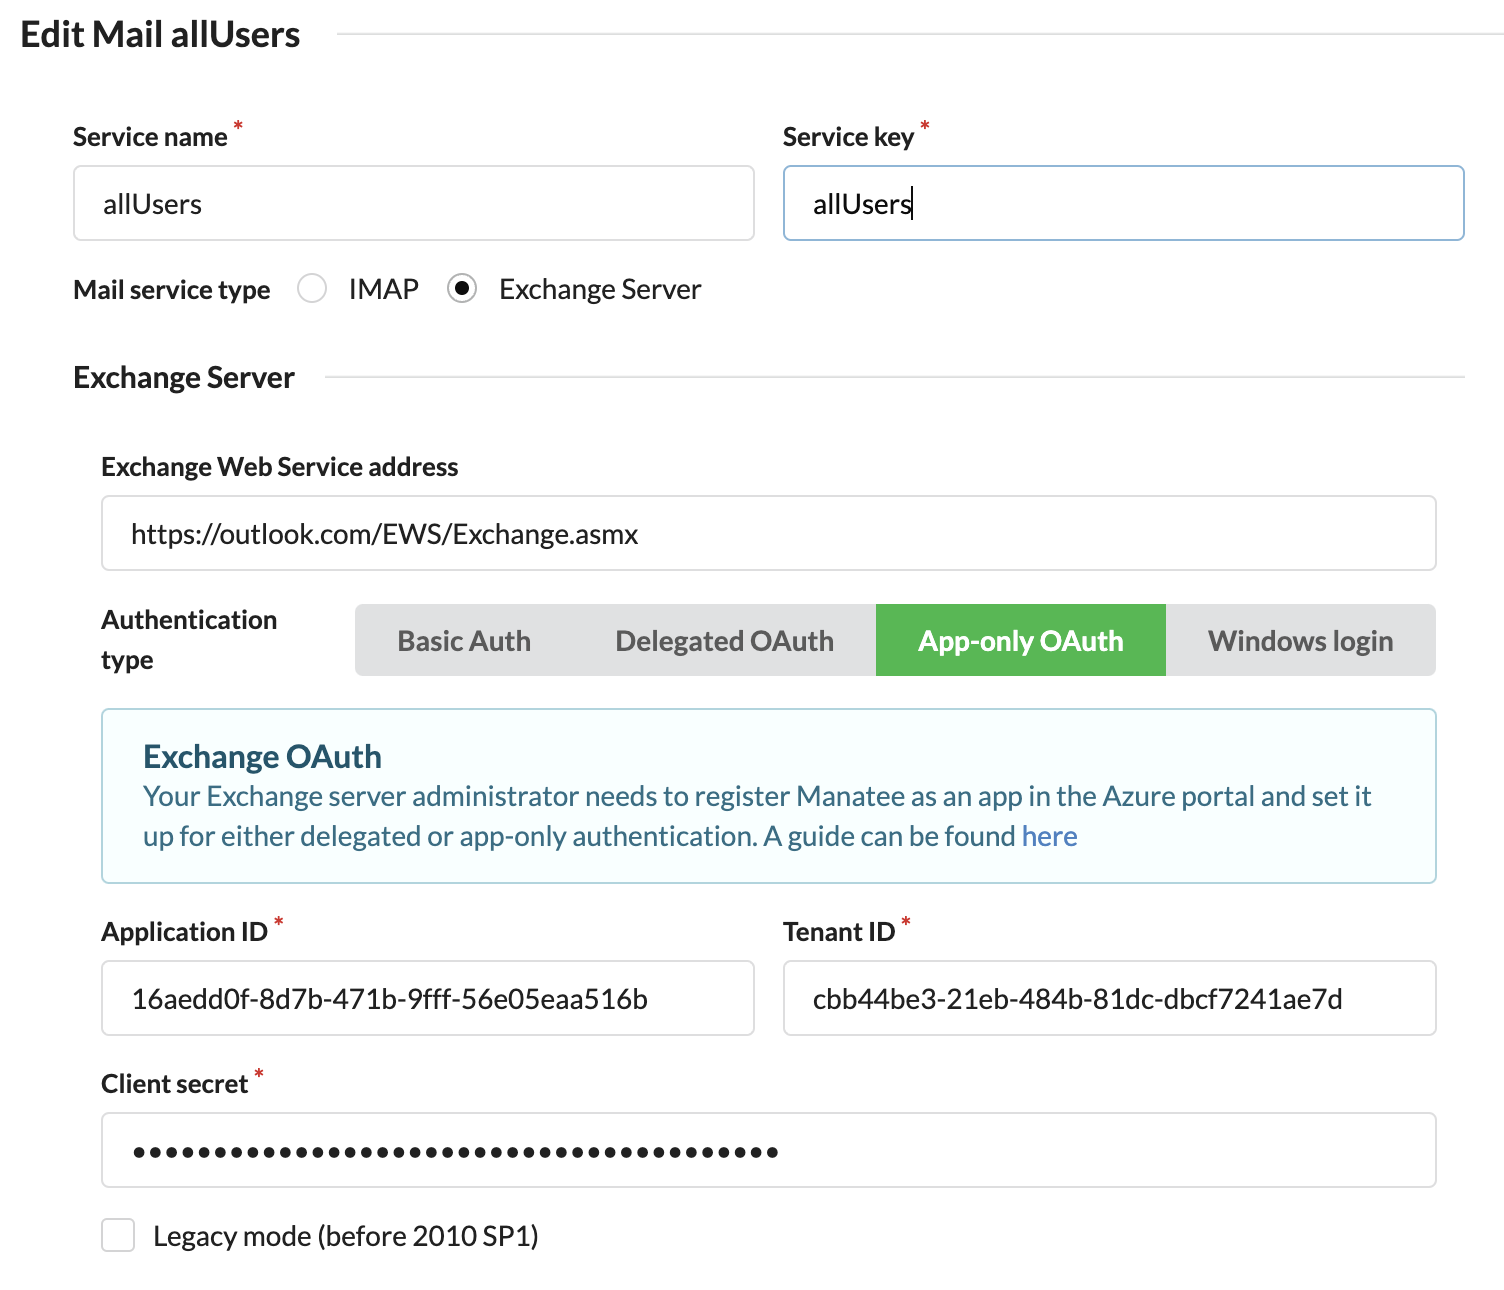
# Exchange
Four separate authentication modes are supported when integrating with exchange servers: basic, oauth delegated, oauth app-only and windows login.
# Serial port
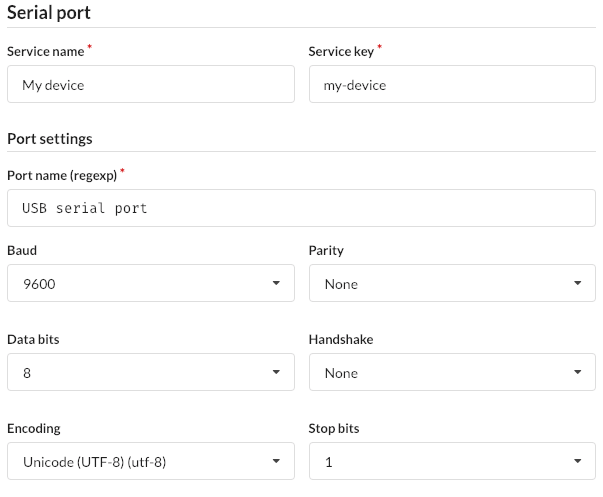
A serial port service specifies how to connect to a device attached to the local host through a serial port connection. To do this it needs to know how to choose the serial port to connect to as well as the various standard connection parameters.
# Port name
The hard part is helping manatee choose the right serial port to connect to. On different hosts running the manatee driver platform, the same type of device may be connected to different COM ports. If the ports are shown in windows with just COM1/COM2, this can be a challenge that requires some more fine grained configuration work.
If the device is connected to the computer through a usb-based serial port, there will often be extra text in the port description in windows, which can be used by manatee to identify the port to connect to. For this reason, the port name field in the configuration interface supports regular expressions.
# Encoding
The encoding setting does not need a value if the service is only going to be used for communicating binary data. It defaults to US-ASCII. Note that if the service is going to be used in a serial port trigger, the correct encoding must be provided as the trigger matches against the data in the form of decoded text.
# Chat
A chat service is defined by its connection parameters similarly to the mail service. For the current implementation using Slack two tokens must be provided:
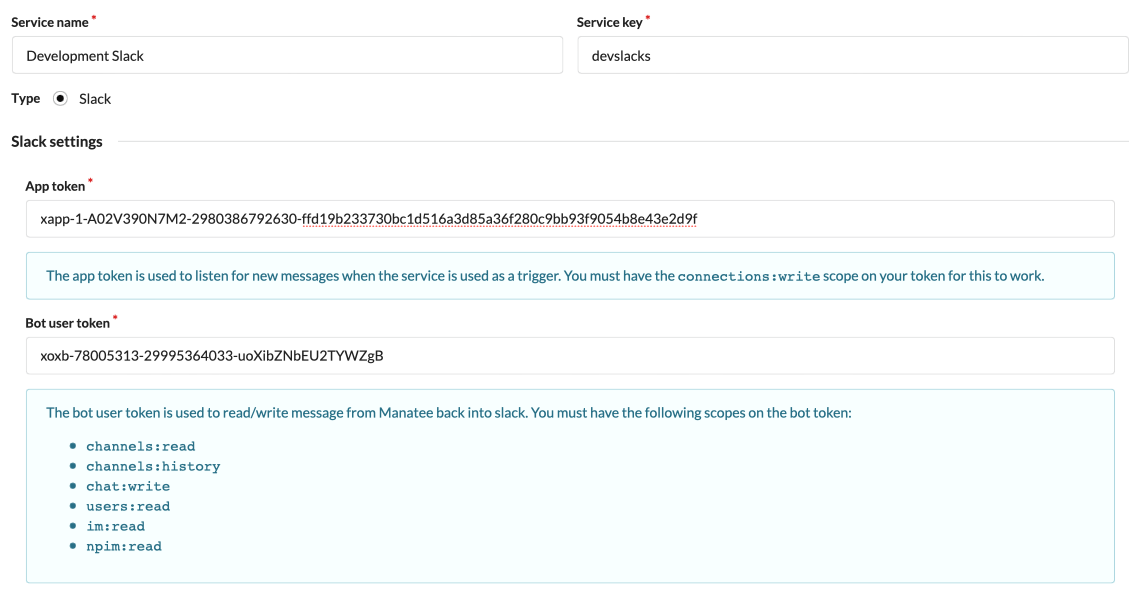
- an app token used for retrieving and listening for new messages in channels, and
- a bot user token used to send messages.
# Conductor
The Conductor is a server-side component that presents a live-view of running Manatees. You can use it to query running Manatees, see which flows are executed in real-time and to administer individual Manatees.
You use it to define filters and then a list of matching running Manatees is shown. The list will update as Manatee exit or are started and thus provides a real-time view of the current Manatee “population” matching your filter.
# Filtering Manatees
When you first go to the Conductor main page you’ll be presented with a list of all Manatees. In order to filter this view you can add filters in the “simple” view.
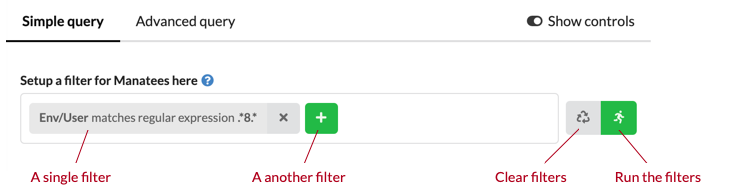
All filters must match in order for a Manatee to be displayed in the list below the filter definition. Simple filters consist of three parts:
- A property to match. Each Manatee reports its settings and misc environment information which can be selected.
- An operator. This can be equals, starts-with etc and determines how the value of the property is matched against the target value.
- A target value. This is the value that the property found on each Manatee must match in order to be included in the list shown.
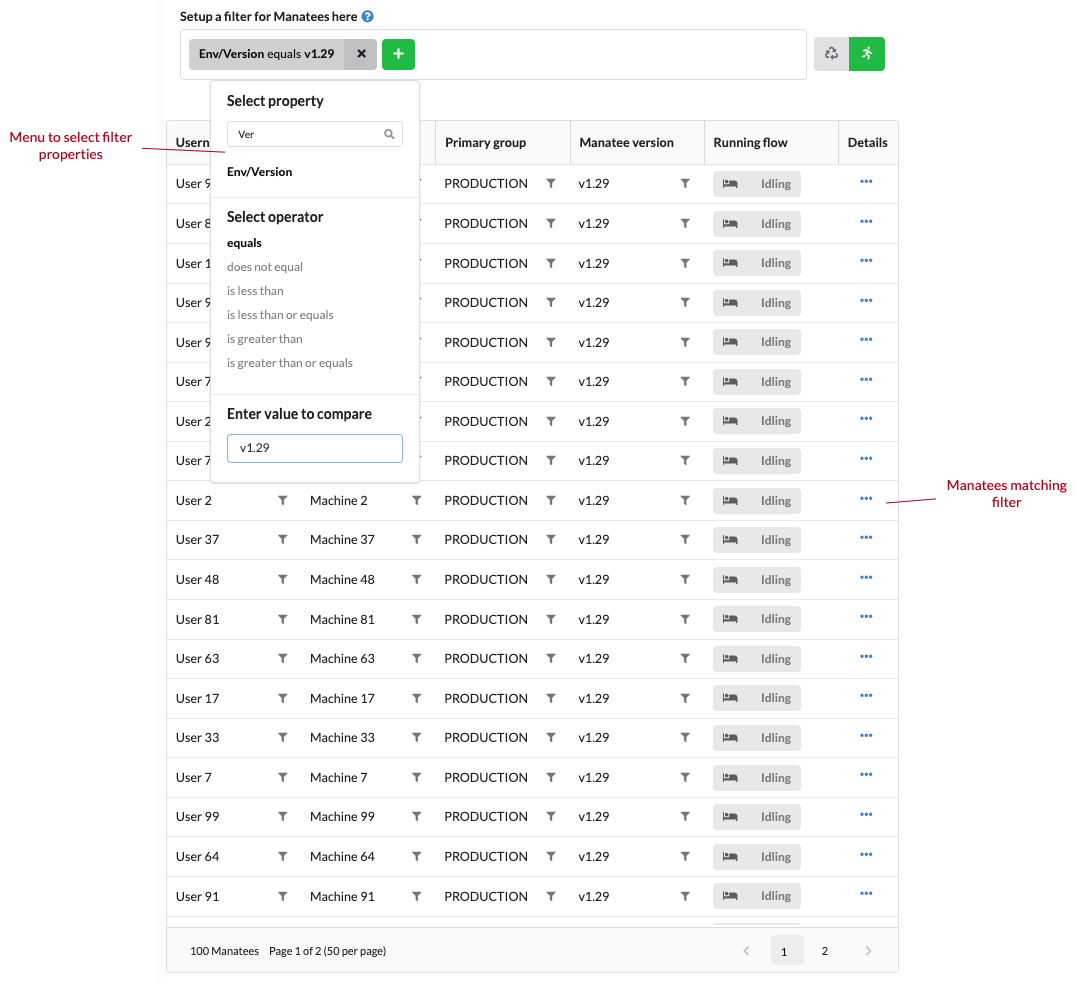
Each matching Manatee is displayed with;
- user name,
- machine name,
- primary group,
- version,
- running flow (display a flow if the Manatee is currently running it), and
- details.
You can use the details column to go a detailed view of a single Manatee.
If you want finer control over the filtering and display then you can go the “Advanced query” tab and enter queries in the Manatee query language (mql) directly.
# MQL
In the “Advanced query” tab you have access to edit the query directly. The language in which to do this is a very simple form of structured query language (opens new window). The interface looks as below:
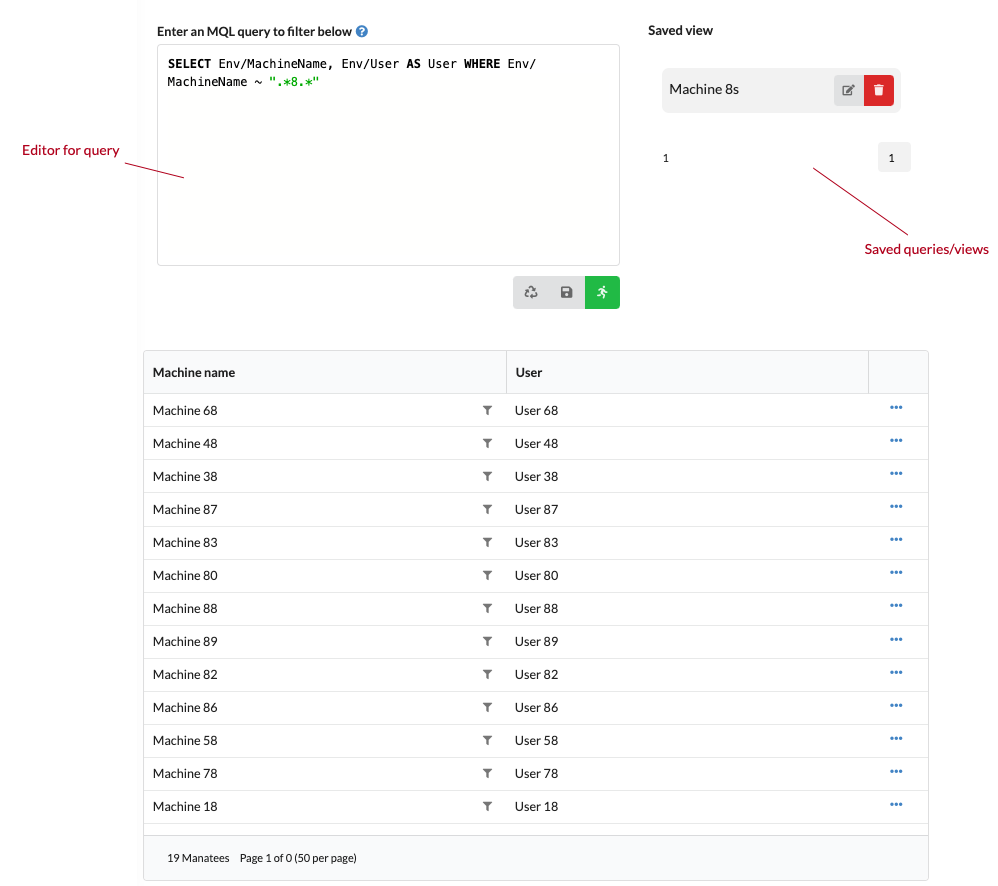
There is an editor to enter the query and then a list of saved views/queries. Once you enter a query, you can save it using the floppy disk iconed button below the editor. The other buttons works similar to what is available on the simple query interface.
An mql query can either take the form;
SELECT <projection> WHERE <filter>
or simply use <filter> to view the standard properties of the matched Manatees.
The <filter> consists of;
- a simple comparison;
<property> <comparator> <value>, e.g.A = 1. - a negation;
NOT (<filter>), e.g.NOT (A = 1) - a conjunction;
(<filter> AND <filter>)e.g.(A = 1 AND B = 2) - a disjunction;
(<filter> OR <filter>)e.g.(A = 1 OR A = 2)
Surround with "(" and ")"
You need to surround conjunctions (AND clauses) and disjunctions (OR clauses) with parenthesis always, i.e.:
(Something OR SomethingElse)
Properties are the information available on each Manatee, e.g. Env/MachineName.
Comparators are;
=to check for equality (has aliasEQUALS)>,<,>=,<=to compare numeric valuesSTARTSWITHto check for a prefixENDSWITHto check for a suffix~to match a regular expression
Values are integers, strings (sorround with ") or booleans (true and false).
The optional projection part of the query can be a ,-separated list of properties or you can provide an alias for each item. E.g.
SELECT Env/MachineName AS Machine, Env/Username AS User WHERE ...
# MQL examples
// show default properties for all v1.29 Manatees
Env/Version = "v1.29"

// show default properties for Manatees on machines whose name starts w "M" and is followed by 3 digits
Env/MachineName ~ "M\d{3}"

// all Manatees with both these settings matching
(Settings/KwanzaFlushStreamInterval = 0 AND Settings/ProductionGroup = "PRODUCTION")

// show version (with header "V") on all Manatees on machines whose name begins with "U" or where the username of the user ends with "n"
SELECT Env/Version AS V WHERE (Env/MachineName STARTSWITH "U" OR Env/Username ENDSWITH "n")
# Detailed view
The detailed view shows information about a single running Manatee instance.
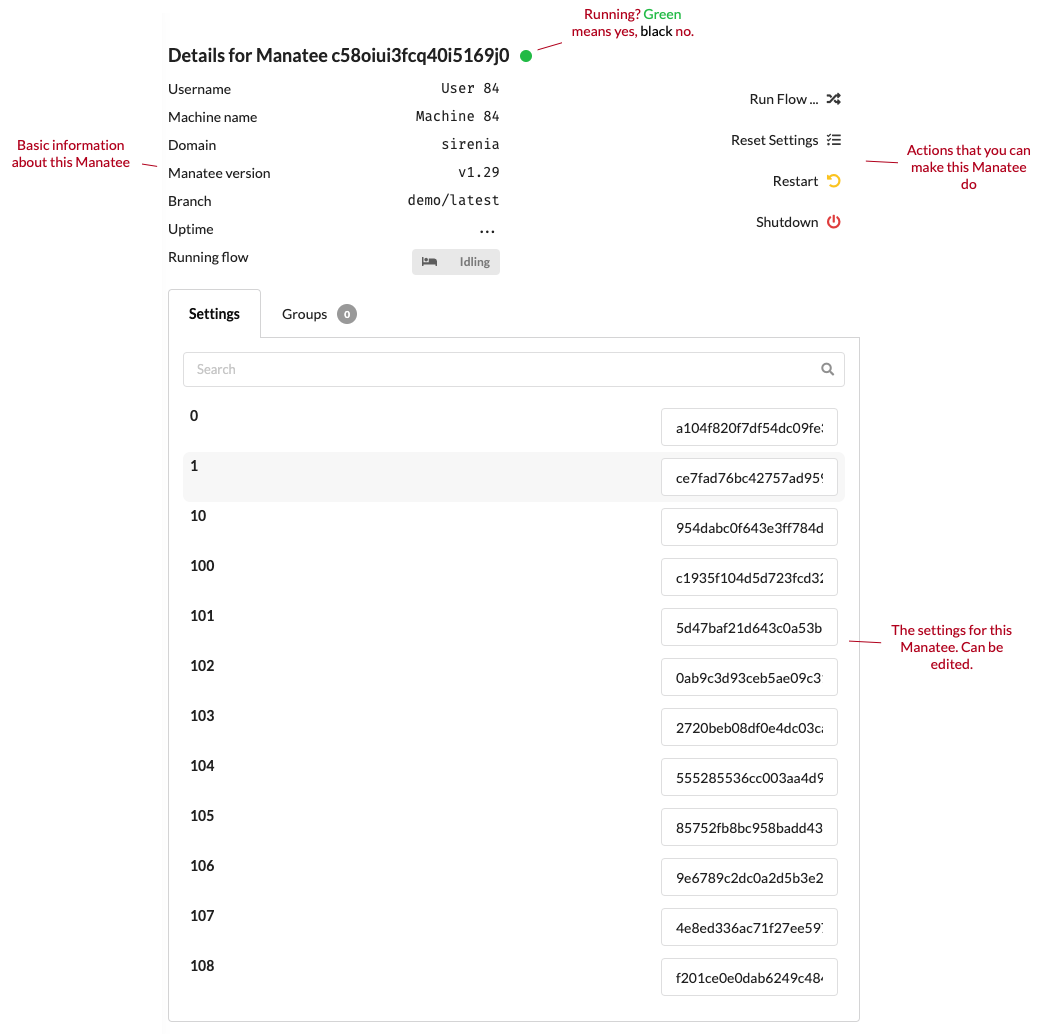
On this page you can see all settings and groups (AD and otherwise) and other basic details for the Manatee. You can also perform basic actions on the Manatee, e…g. make it run a flow, restart it or shut it down.
It is also possible to modify its settings.
# Alerting
Using the Conductor component it is possible to set up alerts for Manatee instances. This is primarily intended for unattended RPA i.e. where you want to monitor a Manatee instance for certain metrics or ensure it remains running. Alerts can be accessed from the årimary menu or from the targeted Manatee instance in the Conductor interface.
An alarm consists of:
- A target Manatee identified by a user and a machine.
- A name for the alert.
- An alert condition which determines when the alert should activate.
- A number of actions to execute when the alert is activated.
# Conditions
The condition sets up the parameters for when an alert should activate. The condition is checked periodically so you need to specify;
- interval at which to check the condition, and
- hits which is how many positive indications are needed to activate the alert.
The actual action to perform to figure out whether to activate an alert can take two forms.
# Query
Using a query to determine if alert should activate. We currently only support uptime and downtime properties. Clicking on the query element will enable you to specific e.g. that the alert should activate if the downtime of the Manatee instance exceeds 10 minutes.

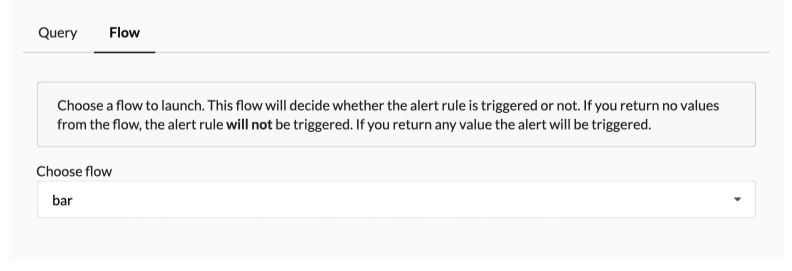
# Flow
You can also designate a flow to be run as a condition. The flow will be run at the given intervals and the return value of the flow indicates whether to activate the alert or not. If no return value is given then all is well, but any non-empty return value will activate the alert and furthermore serve as the alert message reported.
# Actions
As soon as the alert becomes active all the associated actions will be run. Currently we support:
- sending an email or
- sending a chat message
as actions to perform. Both of these can send a message to a recipient once the alert becomes active. An example of a configured action is here an email action:
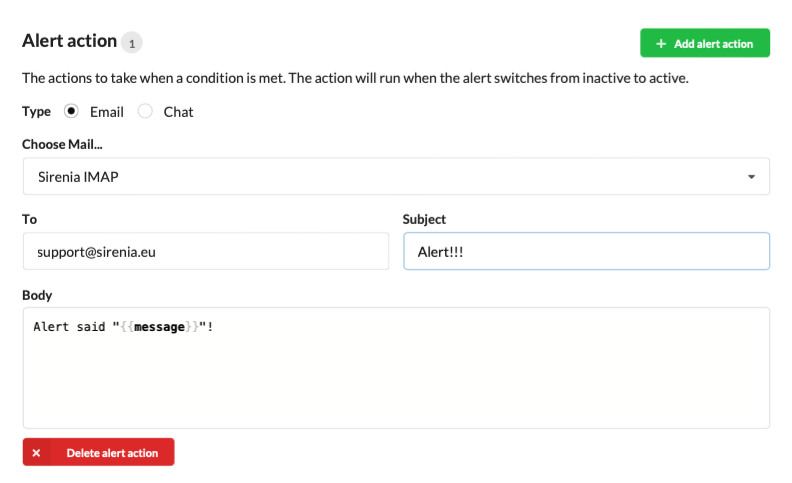
In the message field you can use the message string enclosed by {{ and }} to include the return value from e.g. the flow that triggered the action as seen above.
# Tracking alerts
Using the alert interface you can track the status of an alert. The list of alerts offers a minimal view of the state of the alert in the last 5 hours.

Each of the thin vertical bars represent an hour (from now) while the thicker bar is the current state of the alert. Red for an active alert, green for inactive.
Select the alert will take you to the configuration page for the alert where you will also see a chart that displays the state of the alert for the last 5 days.

Here you can also see the alert message if the alert is currently active.
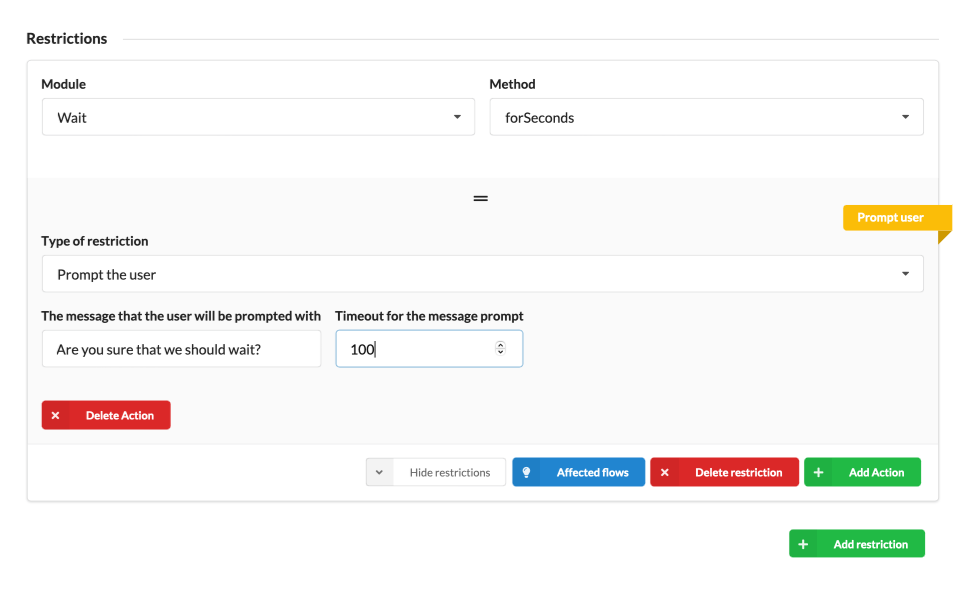
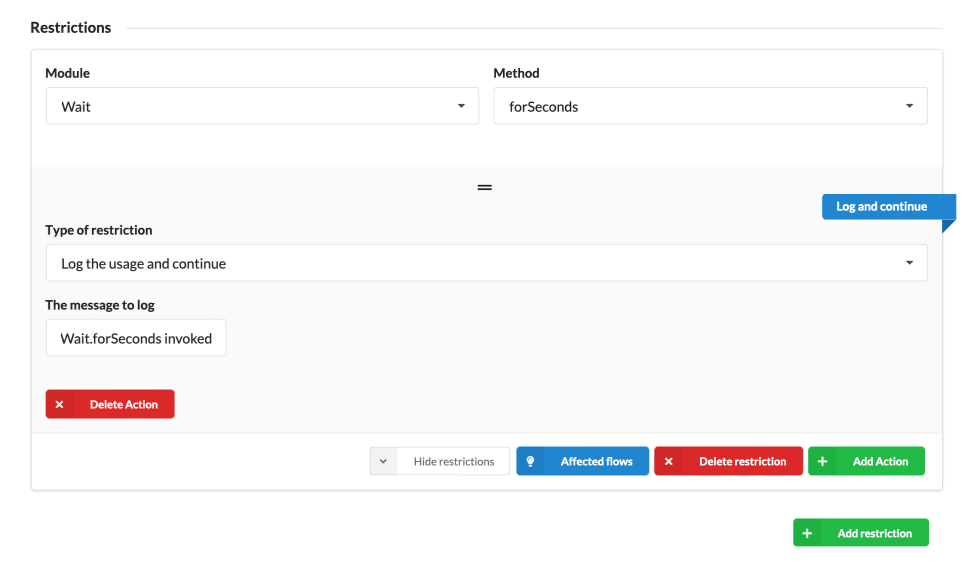
# Restrictions
Restrictions make it possible to centrally configure rules for and actions to take when selected API methods are invoked. As the name implies one of the usages of a restriction is to prohibit the use of an API but it that is just one of the actions to take. A restriction targets a selection of Manatee instances by a specified primary group and version.

Once you have selected the version you can begin to add restrictions. Each restriction consists of a module and a method to target and a list of actions to take when this method is invoked. Restriction actions can be reordered and will be applied in the order given. The available actions are:
# Deny
Simply deny access to the API. This will stop the flow once the API is invoked.

# Prompt the user
Manatee will prompt the user who should allow/deny the invocation. If the user denies the invocation the flow is stopped.
# Log the invocation
Log an entry in the remote/local log with a given message. This can be e.g. used for statistical analysis in our Analytics product.
# Check parameters
If you need more fine-grained control over when to perform a restriction you can use the check parameters restriction action.
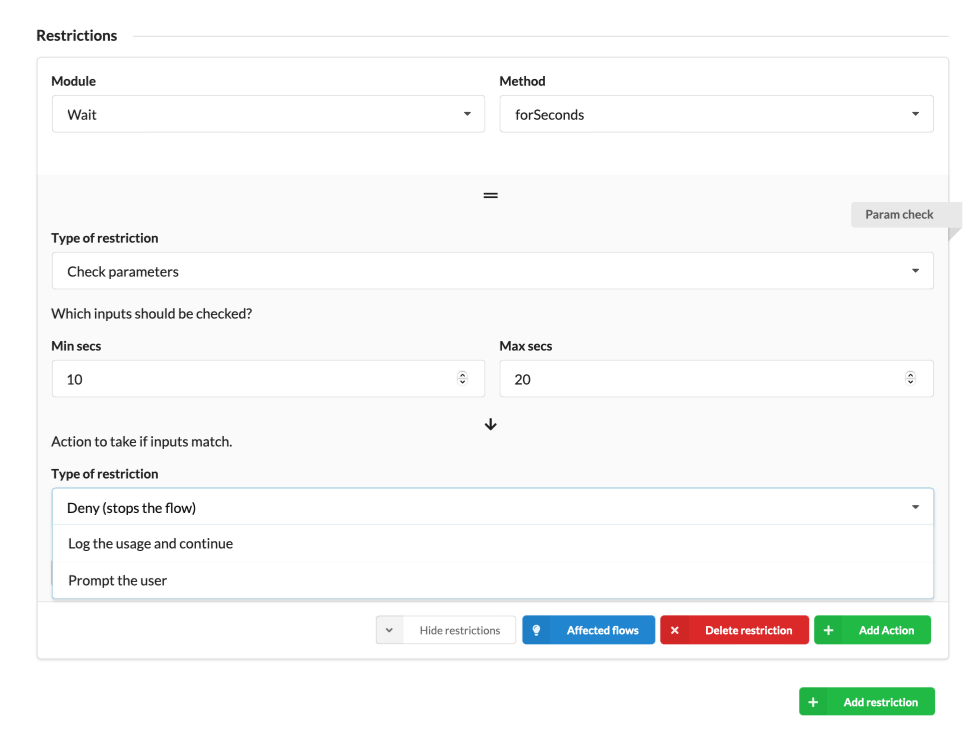
If the invocation is invoked with matching arguments then the configured actions will be run. You can add a deny, log and prompt action here.
# Affected flows
If you click the Affected rows button you can get an overview of the impact of the restriction i.e. in which flows it is invoked. Note that we only match on module and method not on argument so all results shown are not necessarily affected if your restriction checks parameters.
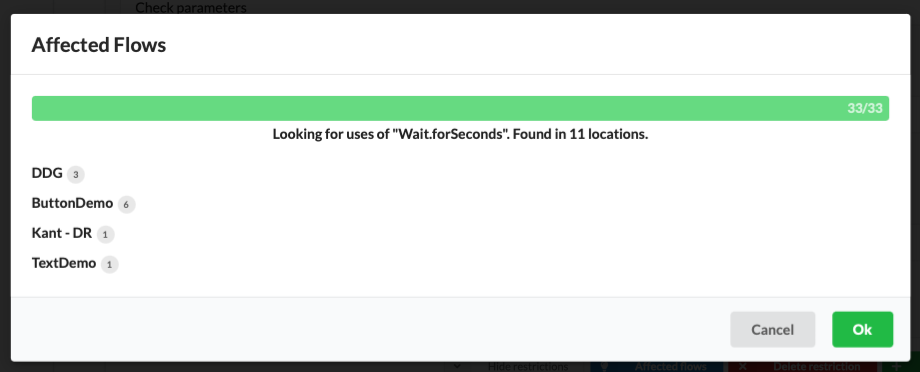
You can expand the results to show more information about each affected application and flow.
# Settings
You can override most of the default Manatee settings on a primary group and version basis centrally. This is done by selecting the target parameters (group and version) and then adding settings to override.
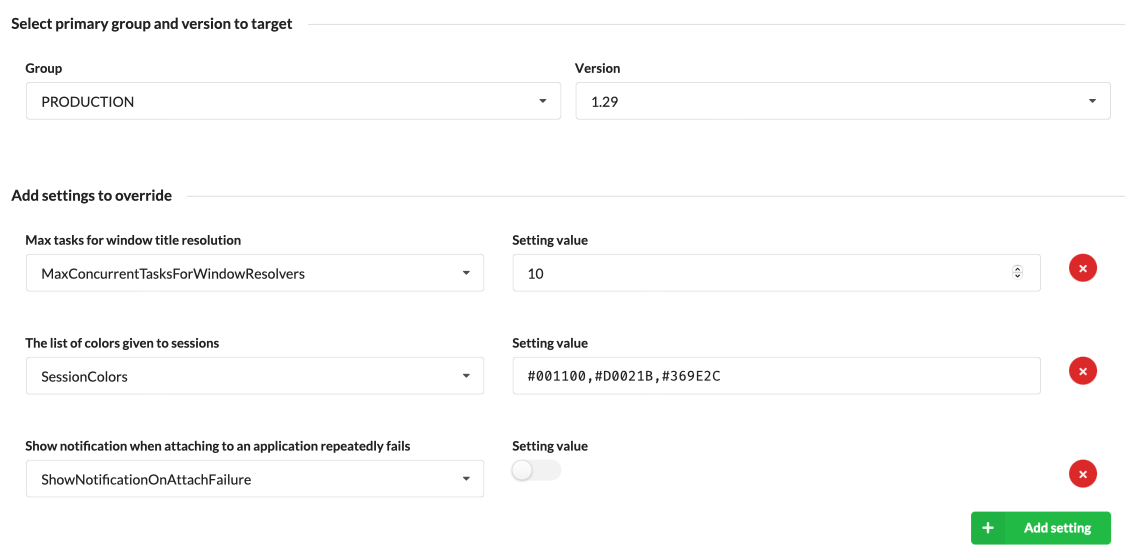
In the example above we have overridden three default settings. These will take effect either on restart or immediately depending on whether Manatee is able to dynamically apply the given setting change.
# Localization
Both Cuesta and Manatee store their localized strings and other resources in Kwanza and you can use Cuesta to edit these in a simple table view.
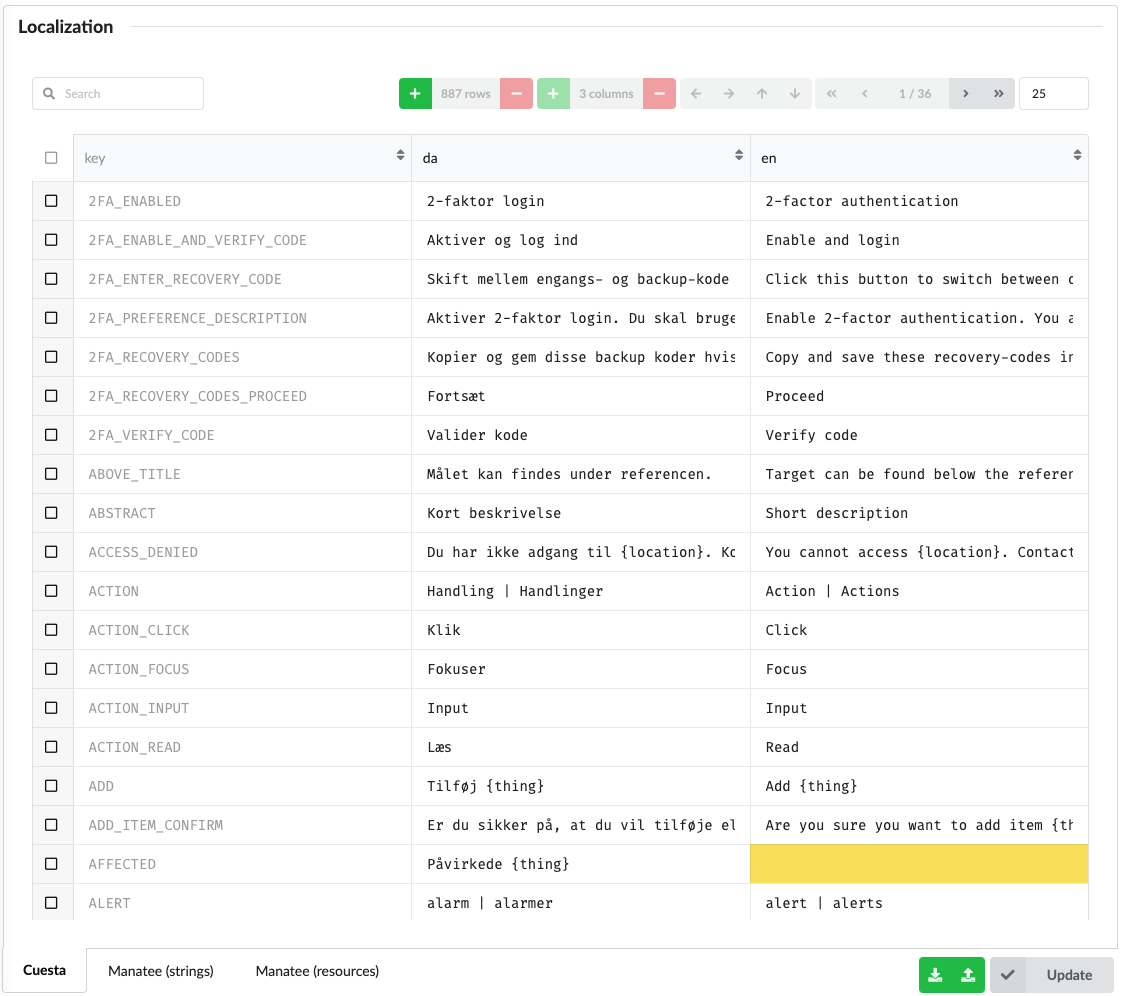
Each column represents the strings (or resources) for a given language and each row is then the translations for a given key. So if you want to change the text for the Danish translation of ACTION_CLICK you need to find the row and then edit the cell in the da column. Cells with a yellow background indicates that a translation is missing for that language.
Resources are base encoded binary blobs. Most resources are images, icons etc used in Manatee/Cuesta.
You can also download the localized strings/resources as a csv file, edit by hand or import into e.g. Excel and edit, then re-upload the edited version.
# Hub
The Hub is a place to share flows. It works similarly to an app store for flows where developers publish apps and users download and use them. In the Hub you publish and download flows.
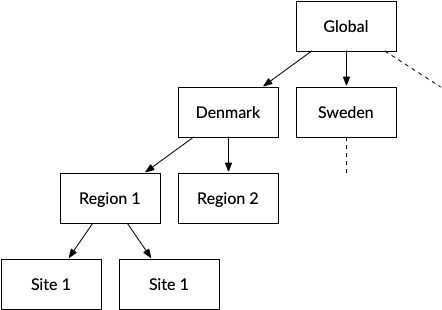
Hubs can also exchange flows internally by configuring them to pull flows from another hub. In this manner we can setup a global hub containing flows that everyone can access, then we can e.g. setup a nordic hub which gets all the global flows but also contain some nordic-only flows. Going further we can setup e.g. a Danish hub which pulls flows from the nordic hub (and thus also gets the global flows) but which also contains some flows exclusive to the Danish hub.
TIP
A public facing Hub is available at https://demo.hub.sirenia.io/ (opens new window) from which flows published from our demo Cuesta instance can be published.
In order to interface with a Hub instance from Cuesta you need to configure it with the location etc of the hub.
# Configuring hubs
Each hub is defined with a name, url and and an auth token. Once Cuesta knows about at least one hub you can start to both publish flows to and get published flows from the hub. There are multiple workflows involved as described below.
You can add, edit and delete hubs by selecting the hub icon in the persistent menu on the left-hand side of the UI.
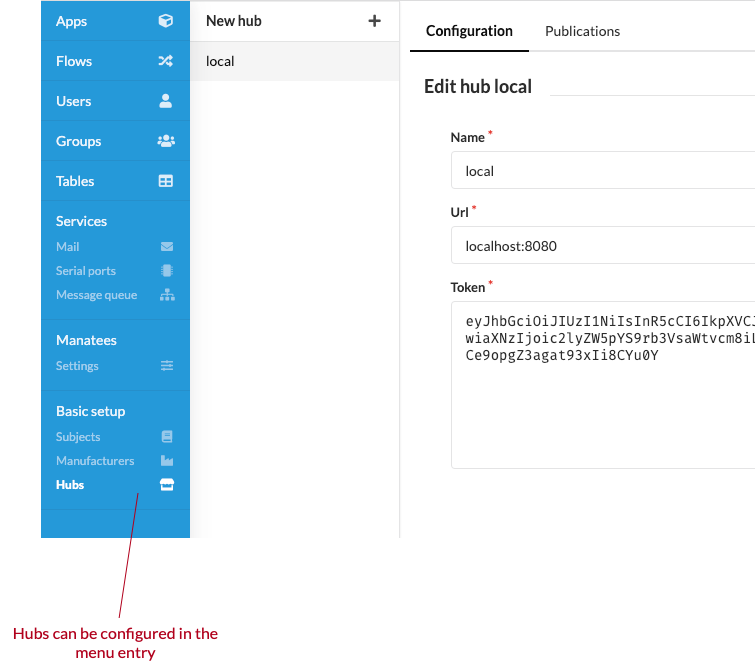
Each hub needs a name, a url designating the location of the hub and a token to authenticate itself. You can find/generate the token by logging into a hub with administrative access.
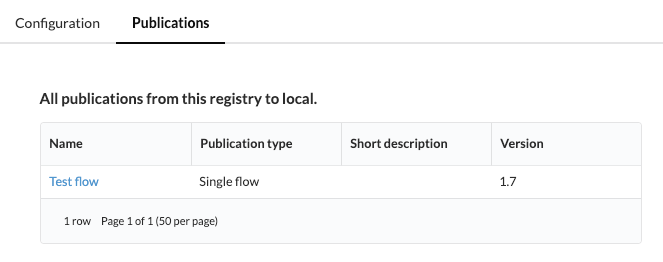
# Publications
To see which flows from the registry has been published to a particular hub, you select the “Publications” tab.
# Publish flows
You can publish any flow once or multiple times to the same hub. Use “hub” tab in the bottom flow menu.

This will bring you to a page on which you can publish the current flow.
# Publish a new flow
After selecting the “Hub tab” you will be presented with options for publishing a new flow.
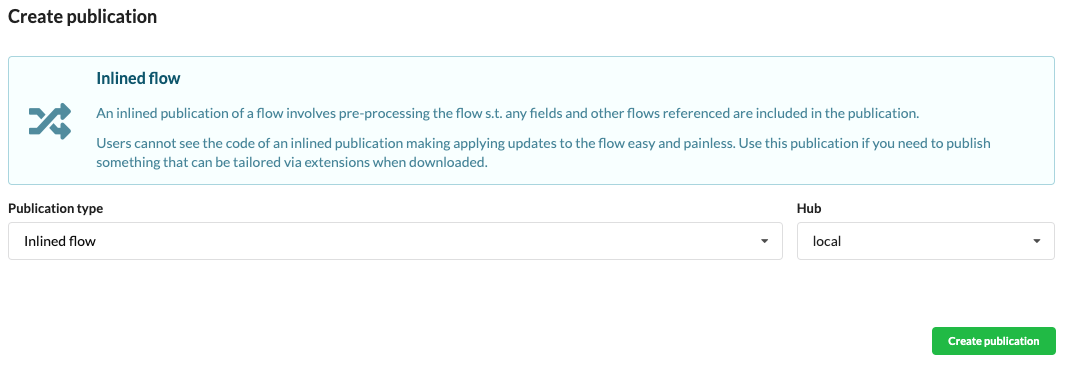
Here you can choose between publishing a single flow, or an inlined flow. Then you choose the hub to publish to and click create-new-publication and proceed to fill out the details for the publication.
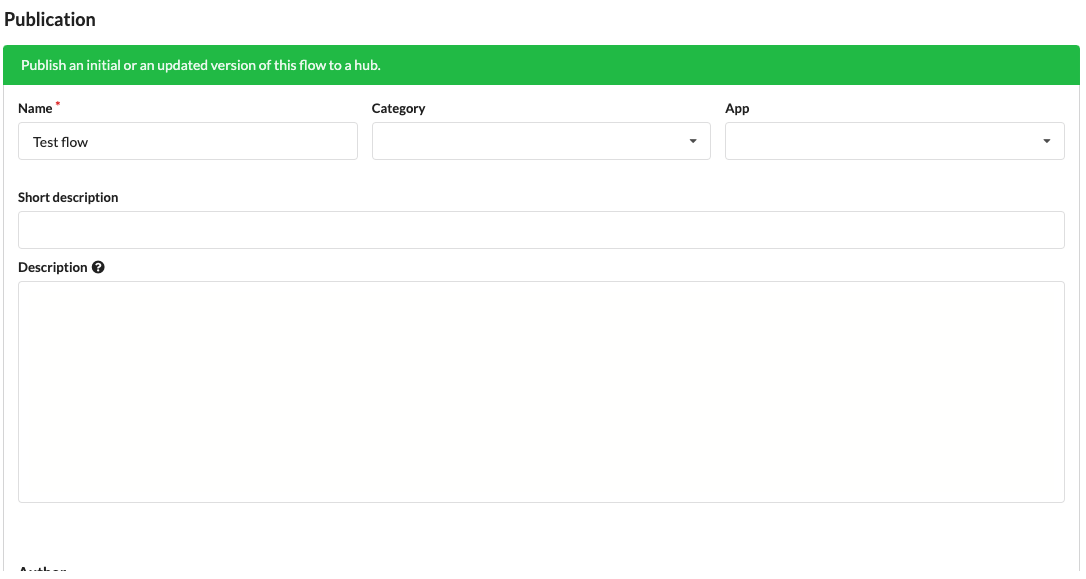
When all looks good you need to press the “save” button in the bottom of the form.
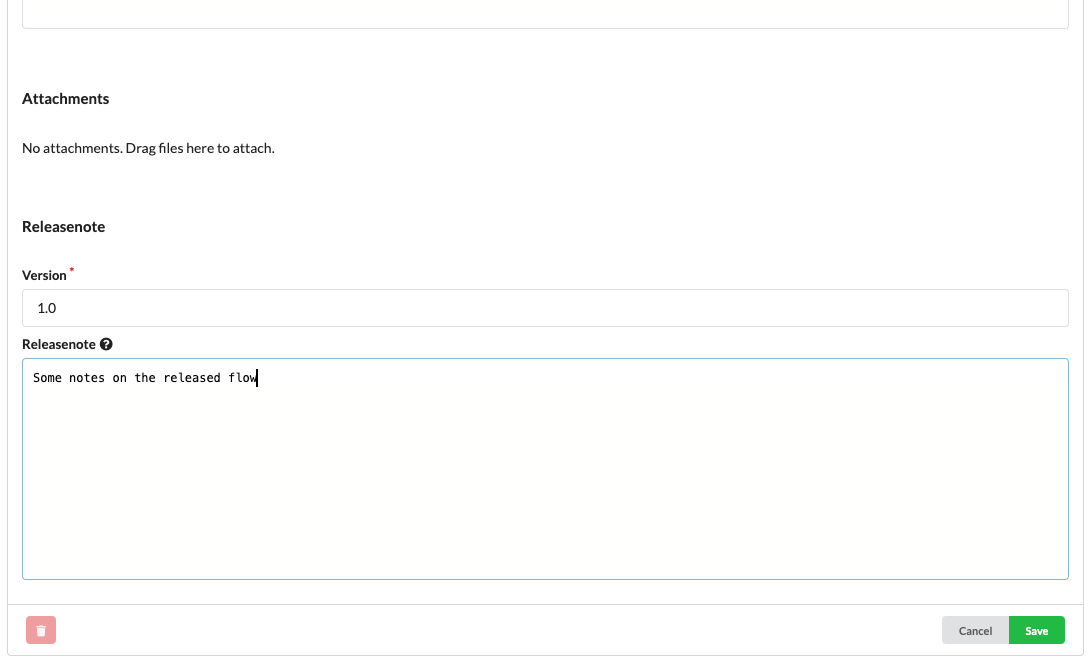
You can use markdown (opens new window) and attach files to the publication by dragging them either to the description editor or the list of attachments.
Once you click publish, the flow will get packaged and sent to the hub for others to see and download.
# Publish an update to an already published flow
If you’ve updated the source flow and you want to publish a new version, then you again go to the hub tab and an option to publish an update to the flow.
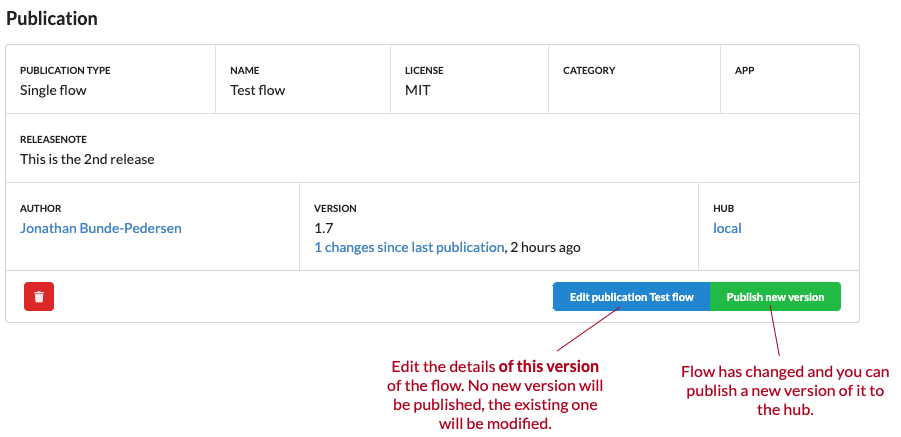
You must change the release version to publish an update and it is very, very much recommended to also add a new release note describing the changes from the latest published version. You can click the “N changes since …” link to see which changes you’ve made to the code since the flow was last published.
Clicking “save” will then publish a new version for others (or yourself to get). The change to be published will be tagged with the latest name and version published of this flow.
# Errors when publishing
We validate that the published flow is given a name as well as a version.
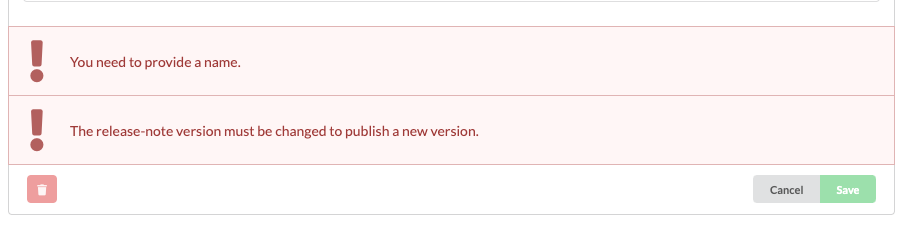
When publishing a new version you also need to update the version (and optionally, but please do, the release note).
If you’re publishing an inlined flow then we also do a number of validations on the flow code itself. These will also be shown in the publication view:
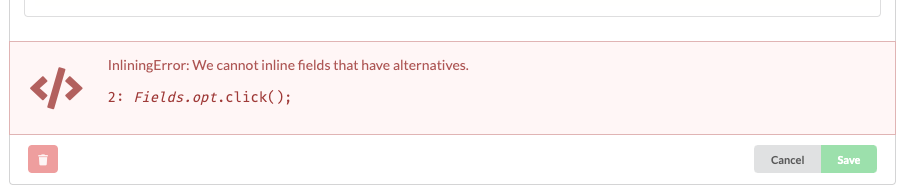
Here, we are using a field opt (in line 2 of the flow) that is defined with alternative matches and that cannot currently be handled by the inlining engine.
# Get flows from a hub
You can get flows from a hub to via any connected Cuesta. This means that you can get a flow to the same Cuesta as the one that originally published it (as long as you change the name of the publication to not match the original flow). The idea behind this is that you can use the hub as a staging platform for production flows, i.e. publish flows when they are ready for prod while keeping a develop/test version that you can update independently of the production version.
There are multiple ways to get flows from hub.
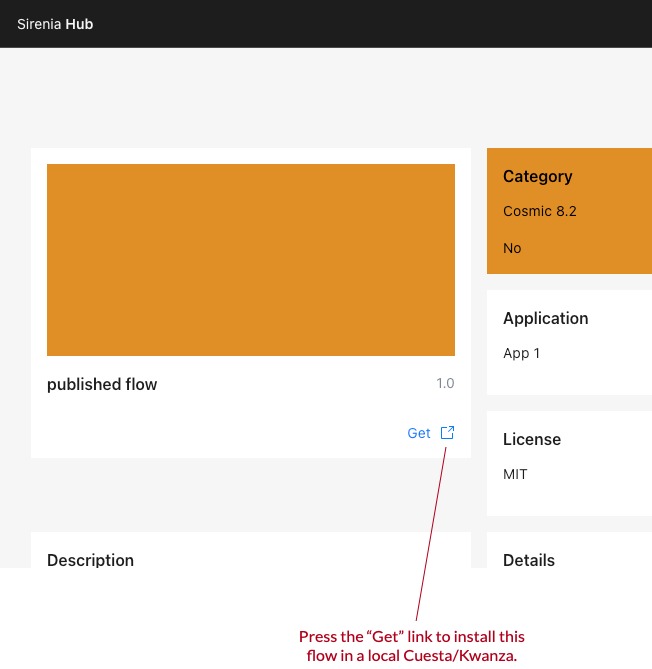
# Via links in the hub
The first will work if you’ve let Cuesta register itself as a handler for hub-links. In Chrome you do this by clicking the icon shown below and allowing the registration to take place.
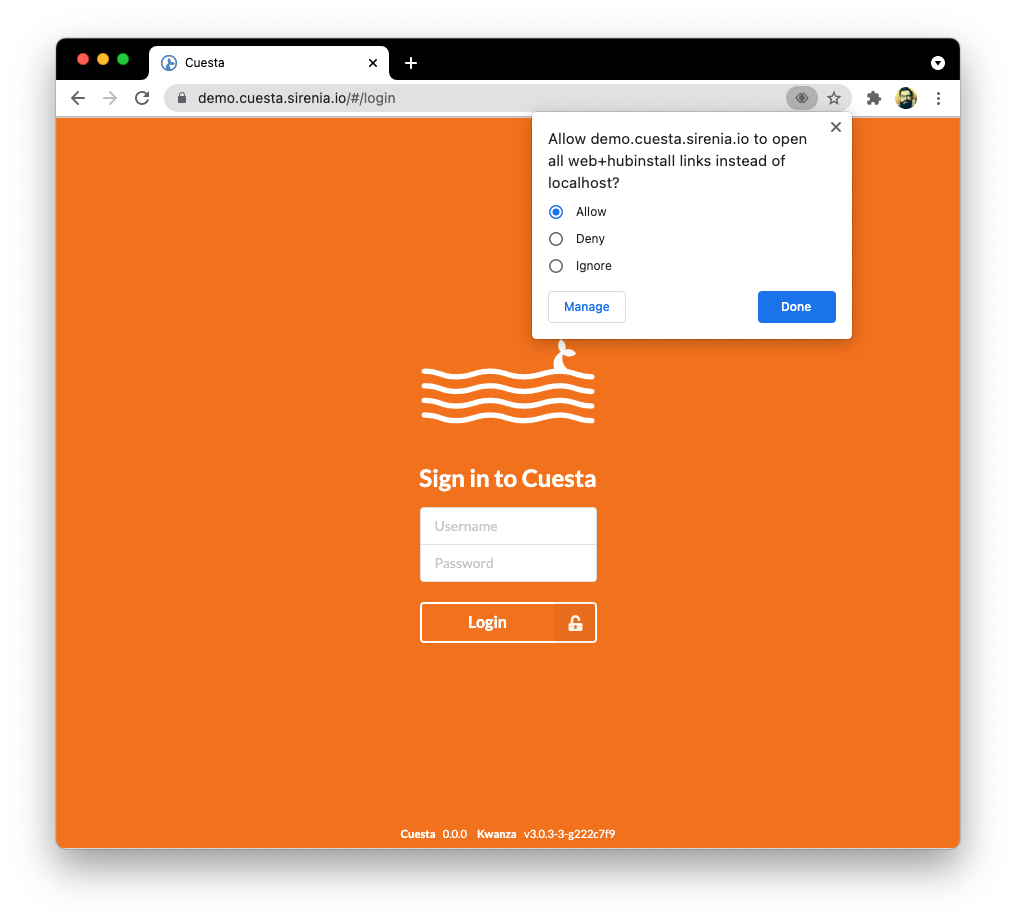
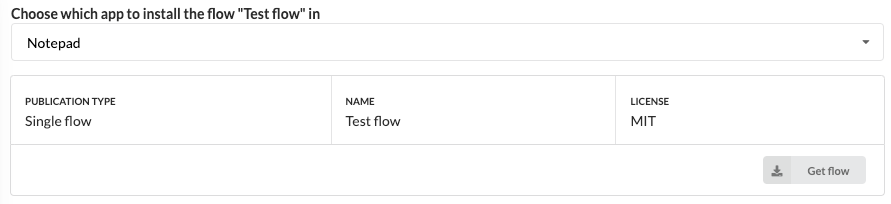
Once this is done you can use the GET links from the hub to open an install page in Cuesta from where you can get the flow.
You will then be taken to a location in Cuesta where you can select the app in which to place the flow.
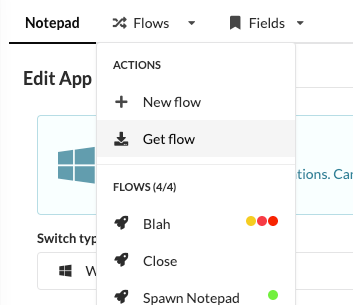
# Via searching for the flow in Cuesta
If you want to get a published flow directly in Cuesta, then you can select the GET flow in the flow menu.
This will take you to a page where you can search for a flow to get.
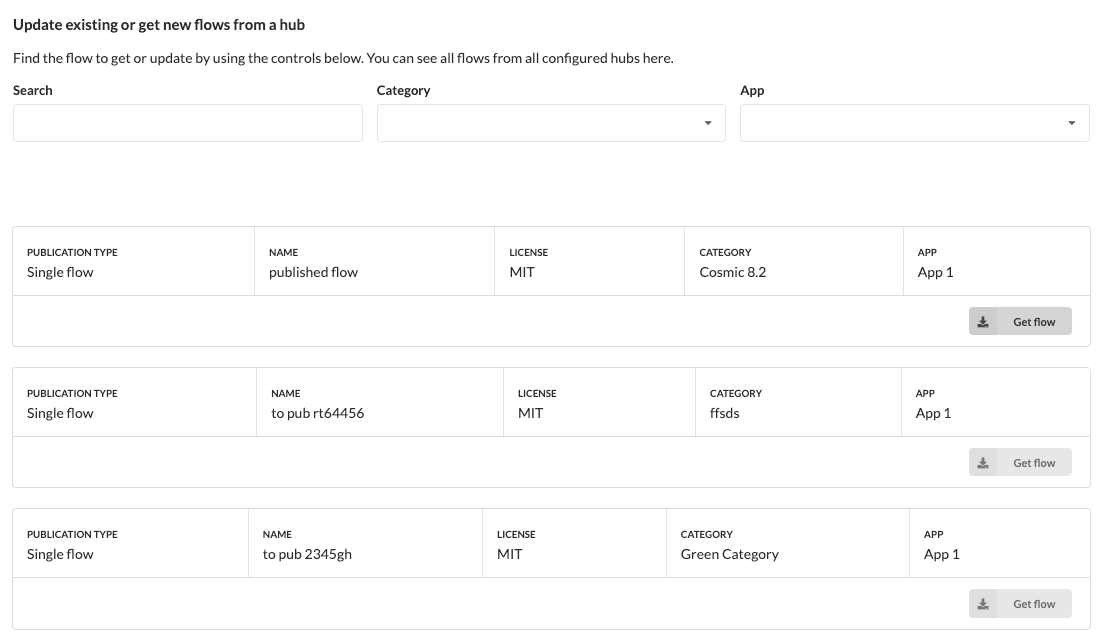
This list will also display already downloaded flows s.t. you can update to new versions for existing flows.

Once you click “get flow” then the flow is downloaded to the local registry and you can start to make it available to users by assigning it groups etc
# Updating a published flow to a new version
If you already have a version of published flow and a new version has been published, then you can update to this version by finding the published flow in the list of hub published flows (same as when you initially get the flow) or by going to the settings page for the flow. You’ll see information about the new version and controls to update in the top of the page.
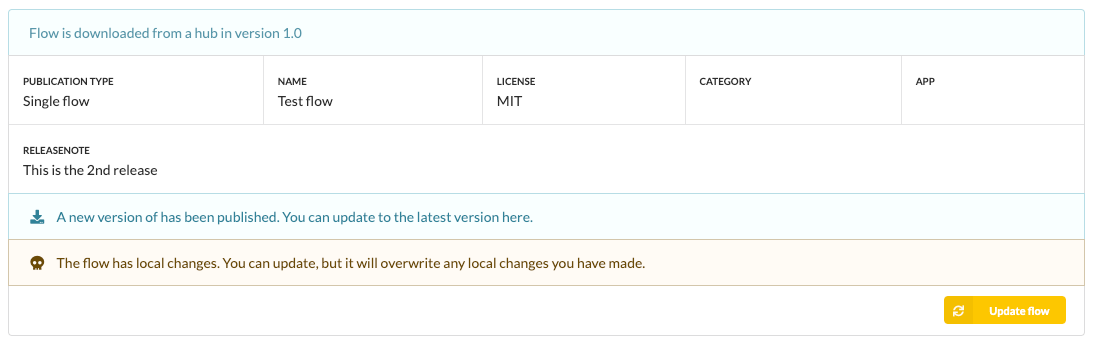
A warning will also be shown (as you can see here) if you’ve modified your flow locally. By updating the flow, these modifications will get merged into the resulting flow or be overwritten by the new version depending on what you’ve changed. You can always revert to a previous version of a flow in the changes tab.
Whenever you get a new version of a flow, we’ll automatically tag the change to make it easier to rollback to a previously downloaded version.