
When configuring an application for automation purposes it is often necessary to interact with the user-interface of the application in some manner. A field as concept in Cuesta represents an element in the user-interface which can be interacted with.
This can be a button, a dropdown, a table or any other type of user-interface element. Once defined a field can be manipulated in a flow, e.g. clicking a button named Ok would look like the following in a flow:
Fields.Ok.click();
What happens in that statement is that we get the Ok field from the Field object. If the field name is not a valid Javascript variable name, then use the object indexing scheme instead, e.g.:
Fields['Ok'].click();
# Defining a field
A field can be identified from its path or using a screenshot of the field. The path approach utilizes structural information in the user-interface while the screenshot is purely visual making it more brittle wrt changes in application appearance. The Cuesta form for defining a field is given below:

# Paths to fields
A user-interface has a structure like a tree with the root of the tree being the window and the elements the branching structure. For instance the following application layout:
+------------------------------------------------+
|+----------------------------------------------+|
||+--------------------------------------------+||
|||Hello, I'm a text-field.                    |||
|||                                            |||
|||                                            |||
|||                                            |||
|||                                            |||
|||                                            |||
|||                                            |||
|||                                            |||
||+--------------------------------------------+||
||                  +-----------+ +-----------+ ||
||                  |  Cancel   | |    OK     | ||
||                  +-----------+ +-----------+ ||
|+----------------------------------------------+|
+------------------------------------------------+
The structure of the user-interface above can be mapped to a tree like so:
                           Window
                              |
                              |
                              |
                              v
                            Panel
                              |
                              |
            +-----------------+----------------+
            |                 |                |
            |                 |                |
            v                 v                v
 TextField - Hello ...  Button - OK    Button - Cancel
To identify e.g. the Cancel button we use a scheme where you provide the path from the root of the application to the element to be identified. In the example above an identifying could be (marked with *):
                          *Window*
                              |
                              |
                              |
                              v
                           *Panel*
                              |
                              |
            +-----------------+----------------+
            |                 |                |
            |                 |                |
            v                 v                v
 TextField - Hello ...  Button - OK    *Button - Cancel*
And in a textual form this translates to:
Panel/Button - Cancel
# Path segments
Paths are compromised of a number of segments; one for each step down in the tree structure. Each segment matches itself against a user-interface element, checking a set of predefined properties on the element. These are commonly:
- The type of the element (e.g.
TextField,Label) - The automation-id if present
- The textual content of the element
- The given name of the element
- and more …
Thus the path in the previous example can be shortened to:
Panel/Cancel
The default matching algorithm for each segment simply checks if the given string is a substring of the extracted element property. Using a few simple operatorswe provide more flexibility and greater accuracy:
*ancelmatches any string ending with “ancel”Can*matches any string starting with “Can”*an*matches any string containing “an”^.+an.+^matches the string against the regular expression.+an.+
Furthermore the segment ** can be used to match deep into the structure, e.g. the path:
**/Cancel
Will match the first element matching Cancel anywhere in the structure. This can also be used like so:
Panel/**/Cancel
Which matches any Cancel element with a Panel ancestor.
# Special and advanced techniques
The following is a list of semi-rarely used techniques which can prove useful in tricky and non-accessible user-interfaces.
# Locating via relative position
If it is not possible to locate a field directly then it may be possible to use another more easily locatable field as a sort of anchor and then using the relative (according to the anchor) position of the desired field as a guide. This is often the case with fields that have easily locatable labels. Using the label as the anchor and then specifying e.g. that the desired field is the textfield below the anchor is then possible. A positional path looks like:
**/Panel/AnchorElement<above>DesiredElement
This path will cause the AnchorElement to be found and then a search for the nearest DesiredElement below the anchor. It should be read as “look for a Panel element somewhere in the tree, then find a child AnchorElement which is positioned above a DesiredElement which is our target”.
The possible positional hints are:
<above>the anchor element must be found above the target<below>the anchor element must be found below the target<left-of>the anchor element must be found left of the target<right-of>the anchor element must be found right of the target<nearest>the nearest matching element to the anchor is selected
The closest match is the one selected if there are more matching elements in all the above cases.
Another possibility is to define a field based on the path to an element and an offset in pixels from that element to find a second element. The syntax looks as follows: **/OkButton<offset-with>@-10|200. This will locate an element 10 pixels to the left and 200 pixels below the upper left corner of some Ok button.
# Locating via structural hints
For fields that can best be identified by their placement in the UI tree, we can use structural hints. These allow an element to be identified by a unique child or sibling it may have. An example could be an input with no unique features, which has an easily identifiable label as its sibling. The path syntax is like the positional hints:
**/Panel/AnchorElement<sibling-of>DesiredElement
The available structural hints are:
<child-of>the anchor element must be a child of the target<sibling-of>the anchor element must be a sibling of the target
# Skipping matches
In case the user-interface contains “twins” i.e. undistinguishable elements in the same level of the tree then then the skip operator (#) can be used to select the i’th matching sibling. Consider the following tree:
Panel
  |- Button
  |- Button
  `- Button
In order to target the 2nd button we might use the following path:
Panel/Button#1
The skip operator can only be used with the last element in the path and will thus only apply to the siblings of the targeted element.
# Restricting path property types (native applications only)
To increase path resolution speed in native applications you can specify which property on the UI element should be used for matching each path segment by prefixing the segment with (<type-goes-here>). A button with the text “Ok” can then be specified with **/(text)Ok. The type can appear on all segments e.g.
**/(type)Panel/(text)Ok
Which resolves any UI element with the text “Ok” directly inside a panel.
The available property-types are:
idthe (automation)id of the elementtextthe text representation of the element (normally the text you can see in the UI)classthe class of the UI elementtypethe type of the UI elementnamethe name of the UI element
The type can be “button”, “panel”, “menu”, “textbox” etc.
# Backtracking (in web-applications only)
Another rarely occurring case is when the target can only be uniquely matched by targeting one of its descendents. In the following example we have a clearly locatable Ok Button but we are really only interested in an anonymous Panel locate two levels up in the tree.
Panel                  <- this is our target
  `- Panel
       `- Button - Ok  <- this is the Button we can locate
Here we can target the desired panel by way of the following path:
[Panel]/Panel/Ok
The [ and ] effectively tells the path targeting mechanism to do the full path resolution but return the element contained within.
# Using CSS selectors (in web-applications only)
An alternative path format for use in web-applications is using CSS selectors (opens new window). In some cases using CSS selectors is easier and faster. E.g. for finding an element with a specific id:
#the-id
vs the normal path format:
**/the-id
The latter being faster.
# Searching a specific embedded window
Given a multi-window application or an application with many embedded “windows”, it is sometimes useful to limit the search for a given element to a specific window. This is done by prefixing the path with {title-of-window} and thus limiting the search to any windows whose title matches the given. E.g.:
{MyWindow}**/Panel/Ok
# Searching in all windows on the desktop
It is possible to break out of the current application when searching for a window by prepending the window-matching part of the field with !.
{!Foo}**/Ok
Will search all windows matching Foo and return the first match on the rest of the path.
# Optical fields
Optical fields are simply small screenshots of the user-interface element with an optional offset which Manatee will try to find visually and translate to a proper element. The offset is used e.g. when clicking s.t. the actual click is offset from the found location of the element.
# Using the built-in screenshot-taker
If the field can only be identified by a screenshot press the Grab screenshot button. A red square will appear which can be move and resized to fit the field. When the red square fits the field click on the square once. The square turns green and is now fixed to the field. In order to be able to click on the field (if applicable) click on the position on the screen where the click must be done. A red dot will show where the click will be done.
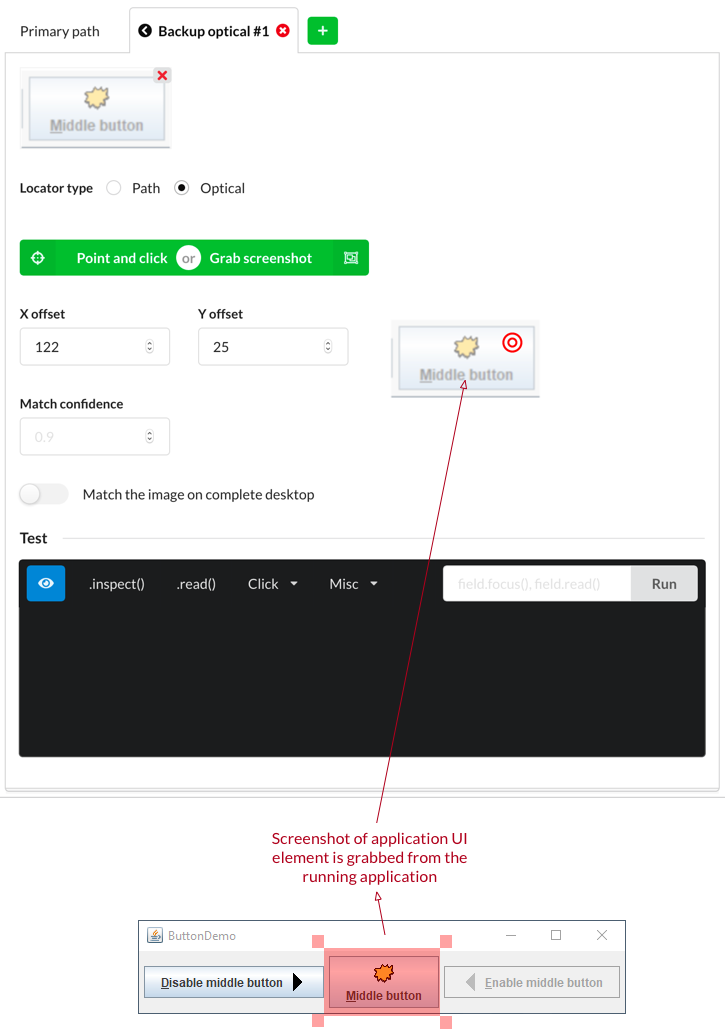
The screenshot is shown in Cuesta. The click position can be adjusted in the X and Y offset fields. Match confidence can be set to reduce how acurately the screenshot should match the graphics on the screen in the application in order to have a match on the field. It can typically be set to 0.7.
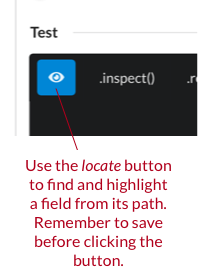
# Testing a path
Given a path it is useful to be able to see that the element found when the path resolution is done in Manatee is the correct element found. This can be done directly from Cuesta or by using the field in a flow.
# Using Cuesta
Activating the locate button in Cuesta will cause a local Manatee to highlight the field found. This is a quick and easy way to check whether the path is correct or not.
# Using a flow or the debugger
It is also possible to use a flow or the REPL in the Debug.ger() to highlight, inspect or otherwise manipulate and test a path. Fields can be created on-the-fly in a flow meaning that the following code is a quick way to try out a path:
var f = new Field('**/Panel/Ok');
f.highlight(); // to try and highlight the element
f.click(); // to try and click the element
f.inspect(); // to gain more info about the element
// and other field methods
# Fields API
Once a field has been defined it can be used in a flow. Depending on the type of field (i.e. whether it represents a button, a panel or something else) the following methods are available.
# Click
Will click on the given field.
# Parameters
optionsan optional options object, supports;deadlinethe time in ms to wait for the click to fail/succeed. If the click takes longer than the deadline to fail or succeed it will be reported as succeeding to the caller. The use-case for thedeadlineparameter is for example if the click launches a dialog which blocks the thread, then setting a deadline allows the flow to continue even though the click is technically not done.useCachedUIboolean indicating if UI component lookup should use the UI itself or the underlying model. Defaults tofalse(underlying model traversal).useFieldCacheboolean indicating whether to use a cache to lookup the field - may be significantly faster in some cases - defaultfalsefieldCacheExpiryint indicating the useable age in seconds of the field retrieved from the cache (only relevant ifuseFieldCacheistrue) - default is configurable as a global option
# Example
Fields["mybutton"].click();

// With an optional 500 ms deadline and try to retrieve the field from the cached fields
Fiels["mybutton"].click({ deadline: 500, useFieldCache: true });
# Click with offset
Will click on the given field offset by the amount given. It allows you to e.g. click in the middle of a table row or the corner of a button.
# Parameters
xthe number of pixels from the left of the element to clickythe number of pixels from the top of the element to clickoptionsan optional options object, supports;deadlinethe time in ms to wait for the click to fail/succeed. If the click takes longer than the deadline to fail or succeed it will be reported as succeeding to the caller. The use-case for thedeadlineparameter is for example if the click launches a dialog which blocks the thread, then setting a deadline allows the flow to continue even though the click is technically not done.useFieldCacheboolean indicating whether to use a cache to lookup the field - may be significantly faster in some cases - defaultfalsefieldCacheExpiryint indicating the useable age in seconds of the field retrieved from the cache (only relevant ifuseFieldCacheistrue) - default is configurable as a global option
# Example
// Click myButton 20px from left and 10px from top
Fields["mybutton"].clickWithOffset(20, 10);
# Simulated Click
Will simulate a mouse-click on the given field. The difference between simulate-click and click is only relevant for Java applications where mouse-events can be generated directly (click) or as a series of injected events - mousedown, mouseclicked, mouseup (simulateClick).
# Example
Fields["mybutton"].simulateClick();
# Simulated click with offset
Will click on the given field offset by the amount given. It allows you to e.g. click in the middle of a table row or the corner of a button.
# Example
// Click myButton 20px from left and 10px from top
Fields["mybutton"].simulateClickWithOffset(20, 10);
# Right click
Will right-click on the given field.
# Parameters
xthe number of pixels from the left of the element to clickythe number of pixels from the top of the element to clickoptionsan optional options object, supports;deadlinethe time in ms to wait for the click to fail/succeed. If the click takes longer than the deadline to fail or succeed it will be reported as succeeding to the caller. The use-case for thedeadlineparameter is for example if the click launches a dialog which blocks the thread, then setting a deadline allows the flow to continue even though the click is technically not done.useFieldCacheboolean indicating whether to use a cache to lookup the field - may be significantly faster in some cases - defaultfalsefieldCacheExpiryint indicating the useable age in seconds of the field retrieved from the cache (only relevant ifuseFieldCacheistrue) - default is configurable as a global option
# Example
Fields["mybutton"].rightClick();
# Right-click with offset
Will click on the given field offset by the amount given. It allows you to e.g. click in the middle of a table row or the corner of a button.
# Parameters
optionsan optional options object, supports;deadlinethe time in ms to wait for the click to fail/succeed. If the click takes longer than the deadline to fail or succeed it will be reported as succeeding to the caller. The use-case for thedeadlineparameter is for example if the click launches a dialog which blocks the thread, then setting a deadline allows the flow to continue even though the click is technically not done.useFieldCacheboolean indicating whether to use a cache to lookup the field - may be significantly faster in some cases - defaultfalsefieldCacheExpiryint indicating the useable age in seconds of the field retrieved from the cache (only relevant ifuseFieldCacheistrue) - default is configurable as a global option
# Example
// Click myButton 20px from left and 10px from top
Fields["mybutton"].rightClickWithOffset(20, 10);
# Double click
Will double-click on the given field.
# Parameters
optionsan optional options object, supports;deadlinethe time in ms to wait for the click to fail/succeed. If the click takes longer than the deadline to fail or succeed it will be reported as succeeding to the caller. The use-case for thedeadlineparameter is for example if the click launches a dialog which blocks the thread, then setting a deadline allows the flow to continue even though the click is technically not done.useFieldCacheboolean indicating whether to use a cache to lookup the field - may be significantly faster in some cases - defaultfalsefieldCacheExpiryint indicating the useable age in seconds of the field retrieved from the cache (only relevant ifuseFieldCacheistrue) - default is configurable as a global option
# Example
Fields["mybutton"].doubleClick();
# Double-click with offset
Will click on the given field offset by the amount given. It allows you to e.g. click in the middle of a table row or the corner of a button.
# Parameters
xthe number of pixels from the left of the element to clickythe number of pixels from the top of the element to clickoptionsan optional options object, supports;deadlinethe time in ms to wait for the click to fail/succeed. If the click takes longer than the deadline to fail or succeed it will be reported as succeeding to the caller. The use-case for thedeadlineparameter is for example if the click launches a dialog which blocks the thread, then setting a deadline allows the flow to continue even though the click is technically not done.useFieldCacheboolean indicating whether to use a cache to lookup the field - may be significantly faster in some cases - defaultfalsefieldCacheExpiryint indicating the useable age in seconds of the field retrieved from the cache (only relevant ifuseFieldCacheistrue) - default is configurable as a global option
# Example
// Click myButton 20px from left and 10px from top
Fields["mybutton"].doubleClickWithOffset(20, 10);
# Click cell
Click in a cell in table (only applicable for tables). Clicking a cell has the following variants:
clickCell(...)left-click a cell,rightClickCell(...), anddoubleClickCell(...).
All with the following parameters:
# Parameters
rowMatcha text to match in the row - if anintegeris supplied then that is used to select the row indexcolMatcha text to match in a column header - also use anintegerhere to use the column with that indexoptionsan options object on which the follow properties can be set;deadlinethe time in ms to wait for the click to fail/succeed. If the click takes longer than the deadline to fail or succeed it will be reported as succeeding to the caller.reflectionDepthindicates how deep to do the search for therowMatchvalue (also see Reflection depth)useCachedUIboolean indicating if UI component lookup should use the UI itself or the underlying model. Defaults tofalse(underlying model traversal).useFieldCacheboolean indicating whether to use a cache to lookup the field - may be significantly faster in some cases - defaultfalsefieldCacheExpiryint indicating the useable age in seconds of the field retrieved from the cache (only relevant ifuseFieldCacheistrue) - default is configurable as a global option
# Example
// Click in the cell defined by its row containing 'A' and its column (header) containing 'B'
Fields["myTable"].clickCell('A', 'B');
// The same command but use reflection depth to do a deeper search
Fields["myTable"].clickCell('A', 'B', { reflectionDepth: 2 });
// Click row 10 in column with header 'B'
Fields["myTable"].clickCell(10, 'B', { reflectionDepth: 2 });
// Click row 10 in column 1
Fields["myTable"].clickCell(10, 1, { reflectionDepth: 2 });
# Read
Will read the value of the field. Depending on the type of the field the behavior will differ, e.g. on a label it will return the text content of the label, for a text-field it will return the contents of the text-field. For a more complex container type it will return a JSON representation of the control (which can be natively accessed in the flow as an object). See JSON serialisation for details on how different types are serialised.
# Parameters
optionsan optional options object with details regarding the inspection.useCachedUIboolean indicating if UI component lookup should use the UI itself or the underlying model. Defaults tofalse(underlying model traversal).useFieldCacheboolean indicating whether to use a cache to lookup the field - may be significantly faster in some cases - defaultfalsethrowsboolean indicating whether to throw an error if the field cannot be found. Defaults to true. Native, java and IE drivers do not support this option. They always throw when the field cannot be found.fieldCacheExpiryint indicating the useable age in seconds of the field retrieved from the cache (only relevant ifuseFieldCacheistrue) - default is configurable as a global option
# Example
var contents = Fields["mytextfield"].read();
# Bounds
This can be used to get the bounds (location and size) of the field.
var b = Field["OK"].bounds();
// b is now an object e.g.
// { width: 100, height: 100, x: 10, y: }
# Exists
Returns true if the field could be found.
# Example
if(Fields["mytextfield"].exists()) {
  ...
}
# Inspect
Inspect a given field. The returned object will contain misc information about the field - the type of information depends on the type of the field.
# Reflection depth
You can optionally obtain more detailed information about the data in eg treeviews. To do this, pass a positive reflectionDepth value as shown in the examples below.
As an example, reflectionDepth: 3 means the result includes fields such as arrival.date.day (3 steps) but not eg patient.eyes.left.tla (4 steps).
The reflectionDepth paramater affects the data available in the output under the objects in the control in question (eg treeview nodes). The main use of
this feature is to determine which patterns to use with Field['field'].select() when simply selecting the rendered text doesn’t work.
# Parameters
optionsan optional options object with details regarding the inspection.useCachedUIboolean indicating if UI component lookup should use the UI itself or the underlying model. Defaults tofalse(underlying model traversal).includeChildrenboolean indicating if the children of the targeted element should be included in the result. Defaults totrue. Set to false when targeting a high level container as the result may otherwise be a bit unwieldy.reflectionDepth(see below)useFieldCacheboolean indicating whether to use a cache to lookup the field - may be significantly faster in some cases - defaultfalsefieldCacheExpiryint indicating the useable age in seconds of the field retrieved from the cache (only relevant ifuseFieldCacheistrue) - default is configurable as a global option
# Example
var info = Fields["mytextfield"].inspect();
// See which information was returned
Debug.showDialog(JSON.stringify(info));
// If info has a `text` property, then this will show the text
Debug.showDialog(info.text);

var detailedInfo = Fields["myTreeView"].inspect({ reflectionDepth: 2});
// This object includes extra data under the nodes of 'myTreeView'.
Debug.showDialog(JSON.stringify(detailedInfo));
# Input
Input a text value into a textfield/textbox/etc.
# Parameters
textthe text to inputoptionsan optional options object.useCachedUIan optional boolean indicating if UI component lookup should use the UI itself or the underlying model. Defaults tofalse(underlying model traversal).filean optional boolean indicating if the field is an html file input (opens new window), which requires special treatment. If this is set to true, then the value must be a valid path that points to a file or an exception may be thrown. Only applicable to web apps.useFieldCacheboolean indicating whether to use a cache to lookup the field - may be significantly faster in some cases - defaultfalsefieldCacheExpiryint indicating the useable age in seconds of the field retrieved from the cache (only relevant ifuseFieldCacheistrue) - default is configurable as a global option
# Example
Fields["mytextfield"].input("some text");

Fields["myFileField"].input("C:\\some\\file.txt", { file: true });
# Native input
Inputs text into a field using native events, i.e. simulating keyboard input. This is useful for fields which does validation (e.g. date-fields or similar). Use only if the input method does not work.
# Parameters
textthe text to input - you can use<backspace>to indicate a backspace/delete action, as well as<enter>and<tab>.
# Example
Fields["mydatefield"].inputNative("11112011");
Fields["mydatefield"].inputNative("123<backspace>"); // field will contain '12'
# Native input with delay
Inputs text into a field using native events with a given delay between each keystroke simulating keyboard input. This is useful for fields which does validation (e.g. date-fields or similar). Use only if the input method does not work.
# Parameters
textthe text to inputdelaythe number of milliseconds to wait between each “keystroke”
# Example
Fields["mydatefield"].inputNativeWithDelay("some text", 100);
# Select
Select a value. This only works for dropdowns, listboxes, tabs and tree-views.
Note that for tree-views the value given to this function may be an expression which matches the path to a leaf. E.g. for the following tree:
tree
├── a
│   └── b
│       └── c
├── d
└── x
    └── y
The node c may be selected by:
Fields["tree"].select("a/b/c");
# Parameters
valuethe value to select. By defaultvalueis treated as a regular expression, where characters like.,*and(have special meaning. If you want a literal match you need to surroundvaluewith<<and>>, e.g.select('<<'+v+'>>')wherevis the literal value find in the select options - it will match if the select option contains the given value. To do an exact match use<<<and>>>instead.optionsan optional options object with details regarding the selection.deadlinethe time in ms to wait for the select to fail/succeed. If the select takes longer than the deadline to fail or succeed it will be reported as succeeding to the caller.reflectionDepthan option indicating how far the select matching should dive into java objects (eg treeview nodes). Setting this too high may negatively affect performance. Defaults to 0. Use theinspectmethod to determine how to match against this information and what an appropriate (minimal) reflection depth is.useCachedUIboolean indicating if UI component lookup should use the UI itself or the underlying model. Defaults tofalse(underlying model traversal).useFieldCacheboolean indicating whether to use a cache to lookup the field - may be significantly faster in some cases - defaultfalsefieldCacheExpiryint indicating the useable age in seconds of the field retrieved from the cache (only relevant ifuseFieldCacheistrue) - default is configurable as a global optionexpandboolean indicating if the targeted collapsed tree node should be expanded after selection. Only supported in java apps.
# Example
// Select "option1" and use reflectionDepth to to try and find "option1"
Fields["mytree"].select("option1", { reflectionDepth: 2 });
# Select with index
Select a value based in an index. This only works for dropdowns, tabs, listboxes and tree-views.
# Parameters
indexis the index in the combo, listbox or tree to select.optionsan optional options object with details regarding the selection.useCachedUIboolean indicating if UI component lookup should use the UI itself or the underlying model. Defaults tofalse(underlying model traversal).useFieldCacheboolean indicating whether to use a cache to lookup the field - may be significantly faster in some cases - defaultfalsefieldCacheExpiryint indicating the useable age in seconds of the field retrieved from the cache (only relevant ifuseFieldCacheistrue) - default is configurable as a global option
# Example
Fields["mycombo"].selectIndex(5);
# Select with offset
Select a value (with an offset). This only works for dropdowns, tabs, listboxes and tree-views.
# Parameters
valuethe value to base selection on. The value needs only to partially match the shown option to be selected, e.g. using “utte” in a list containing the item “butter” will select it.offset(int) the offset which will be used to do actual selection. E.g. if “1” then the next element (which was found using value will be selected).
# Example
Fields["mytree"].selectWithOffset("option1", 1);
# Select with offset and skip
Select a value (with an offset and skip). This only works for dropdowns, tabs, listboxes and tree-views.
# Parameters
valuethe value to base selection on. The value needs only to partially match the shown option to be selected, e.g. using “utte” in a list containing the item “butter” will select it.offset(int) the offset which will be used to do actual selection. E.g. if “1” then the next element (which was found using value will be selected).skipwill select the N’th match to start from. E.g.1will skip the first match and select the 2nd.
# Example
Fields["mytree"].selectWithOffsetAndSkip("option1", 1, 1);
If used on e.g. a combobox with options; [“option1”, “option2”, “option1”, “option3”] the code-fragment above will select “option3”. This is done by first looking for all "option1"s. Then skip 1 this will get you the 2nd “option1”, then offset by 1 which will get you “option3”.
# Edit cell
Can be used in a table to edit a given cell.
# Parameters
rowthe row in which to find the cell (match any cell in the row) or use anintegerto denote the row index to editcolumnthe column in which to find the cell (must match a single column) or use anintegerto denote the column index to editvaluethe value to put into the cell (works with textfield and dropdowns)optionsis an optional argument, which can contain:reflectionDepthused to finding the value if there is e.g. a combobox in the cell to edit (also see Reflection depth)useCachedUIboolean indicating if UI component lookup should use the UI itself or the underlying model. Defaults tofalse(underlying model traversal).useFieldCacheboolean indicating whether to use a cache to lookup the field - may be significantly faster in some cases - defaultfalsefieldCacheExpiryint indicating the useable age in seconds of the field retrieved from the cache (only relevant ifuseFieldCacheistrue) - default is configurable as a global option
# Example
Given the following table:
| header 1 | header 2 |
|---|---|
| cell 1 | cell 2 |
| cell 3 | cell 4 |
This command:
Fields["mytable"].editcell("cell 3", "header 2", "boom");
Will result in this table:
| header 1 | header 2 |
|---|---|
| cell 1 | cell 2 |
| cell 3 | boom |
The same thing can be accomplished if the indices are known:
Fields["mytable"].editcell(1, 1, "boom");
# Highlight
Highlight the given field with the default color.
# Example
Fields["myfield"].highlight();
# Highlight with color
Highlight the given field with the given color. Available colors are red, green and blue.
# Parameters
colorthe highlighting color -red,greenorblue.
# Example
Fields["myfield"].highlightWithColor("blue");
# Lowlight
Cancel a highlight on a field.
# Example
Fields["myfield"].lowlight();