In order to better understand how the driver platform (Manatee) operates and how the configuration interface (Cuesta) is structured it is helpful to know a bit about the history of the system.
# It began with context management
The CCOW standard specifies an arhcitecture for keeping multiple applications synchronized within a shared context. Typically this context could be a patient and when one application decides to switch patient all participating applications are made to follow the switch by a context manager (CM).
Originally Manatee was built to support our CCOW context manager (Seacow) since very few applications actually implement the HL7 CCOW protocol needed to interoperate with Seacow. Manatee then provides a layer which operated on the UI or API of an application to make it CCOW compliant. Gradually Manatee outgrew the Seacow and began to support regular UI automation as well, i.e. a sort of virtual machine for scripting steps to be performed on the UI of a given application.
The concepts from the CCOW standard is still prevalent in the configuration interface and in the engine which schedules automation as well as context synchronisation is still a true CCOW context manager.
# Cuesta and Kwanza
Cuesta is the name of the configuration interface in which Manatee can be configured and the subject of this manual. All configurations are stored in our Context Management Registry, CMR in shorthand, which we have called Kwanza. Kwanza is a fairly simple infrastructure element - it has a couple of features which are worth noting though.
# Concurrent edit protection
Kwanza uses a lamport clock to ensure that the order of updates to any stored entity is preserved and that you cannot overwrite an entity without having seen the latest version beforehand. This translates to the fact that if two people edit the same thing at the same time one of these may get an error saying that their changes cannot be saved as it would overwrite the changes made by the first person. It is a safety feature and it makes editing an item concurrently safe, but it does not make it very easy to do so.
# History of changes
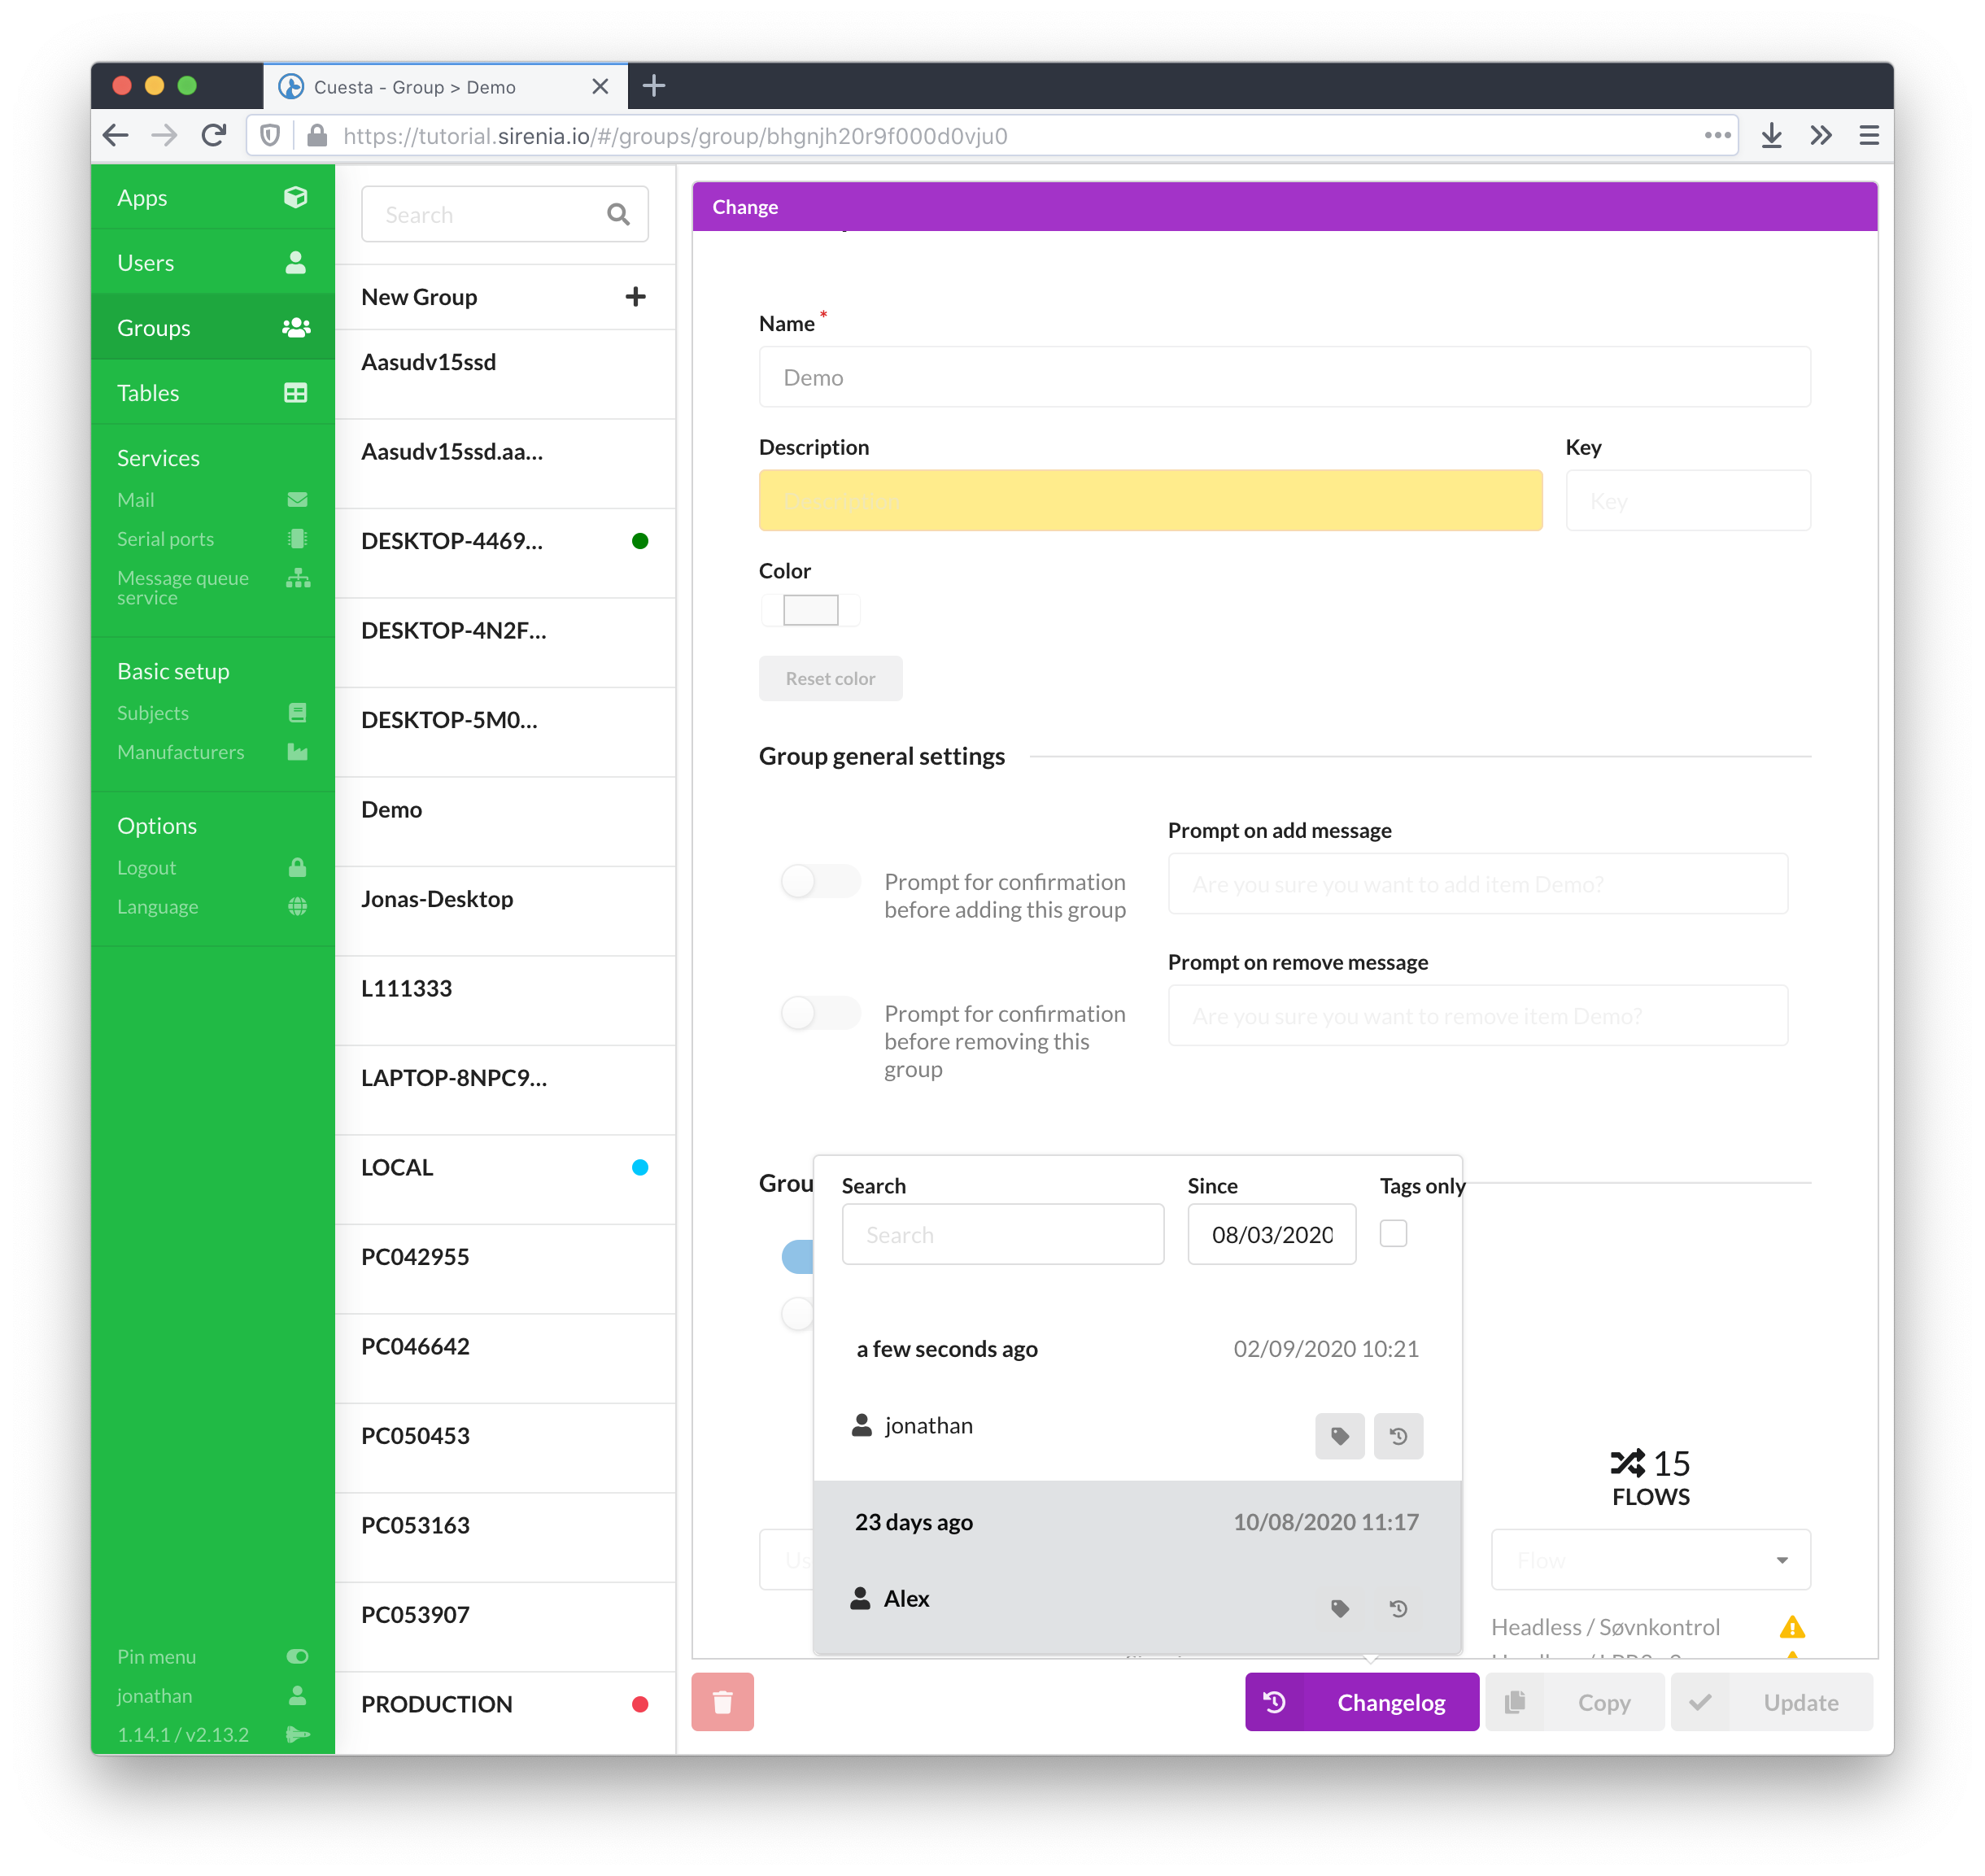
All changes are tracked in Kwanza meaning that its possible in Cuesta to see the history of changes made to e.g. a flow, and it is possible to revert to a previous version. For flows this feature can be accessed through the Changelog tab in the flow editor.
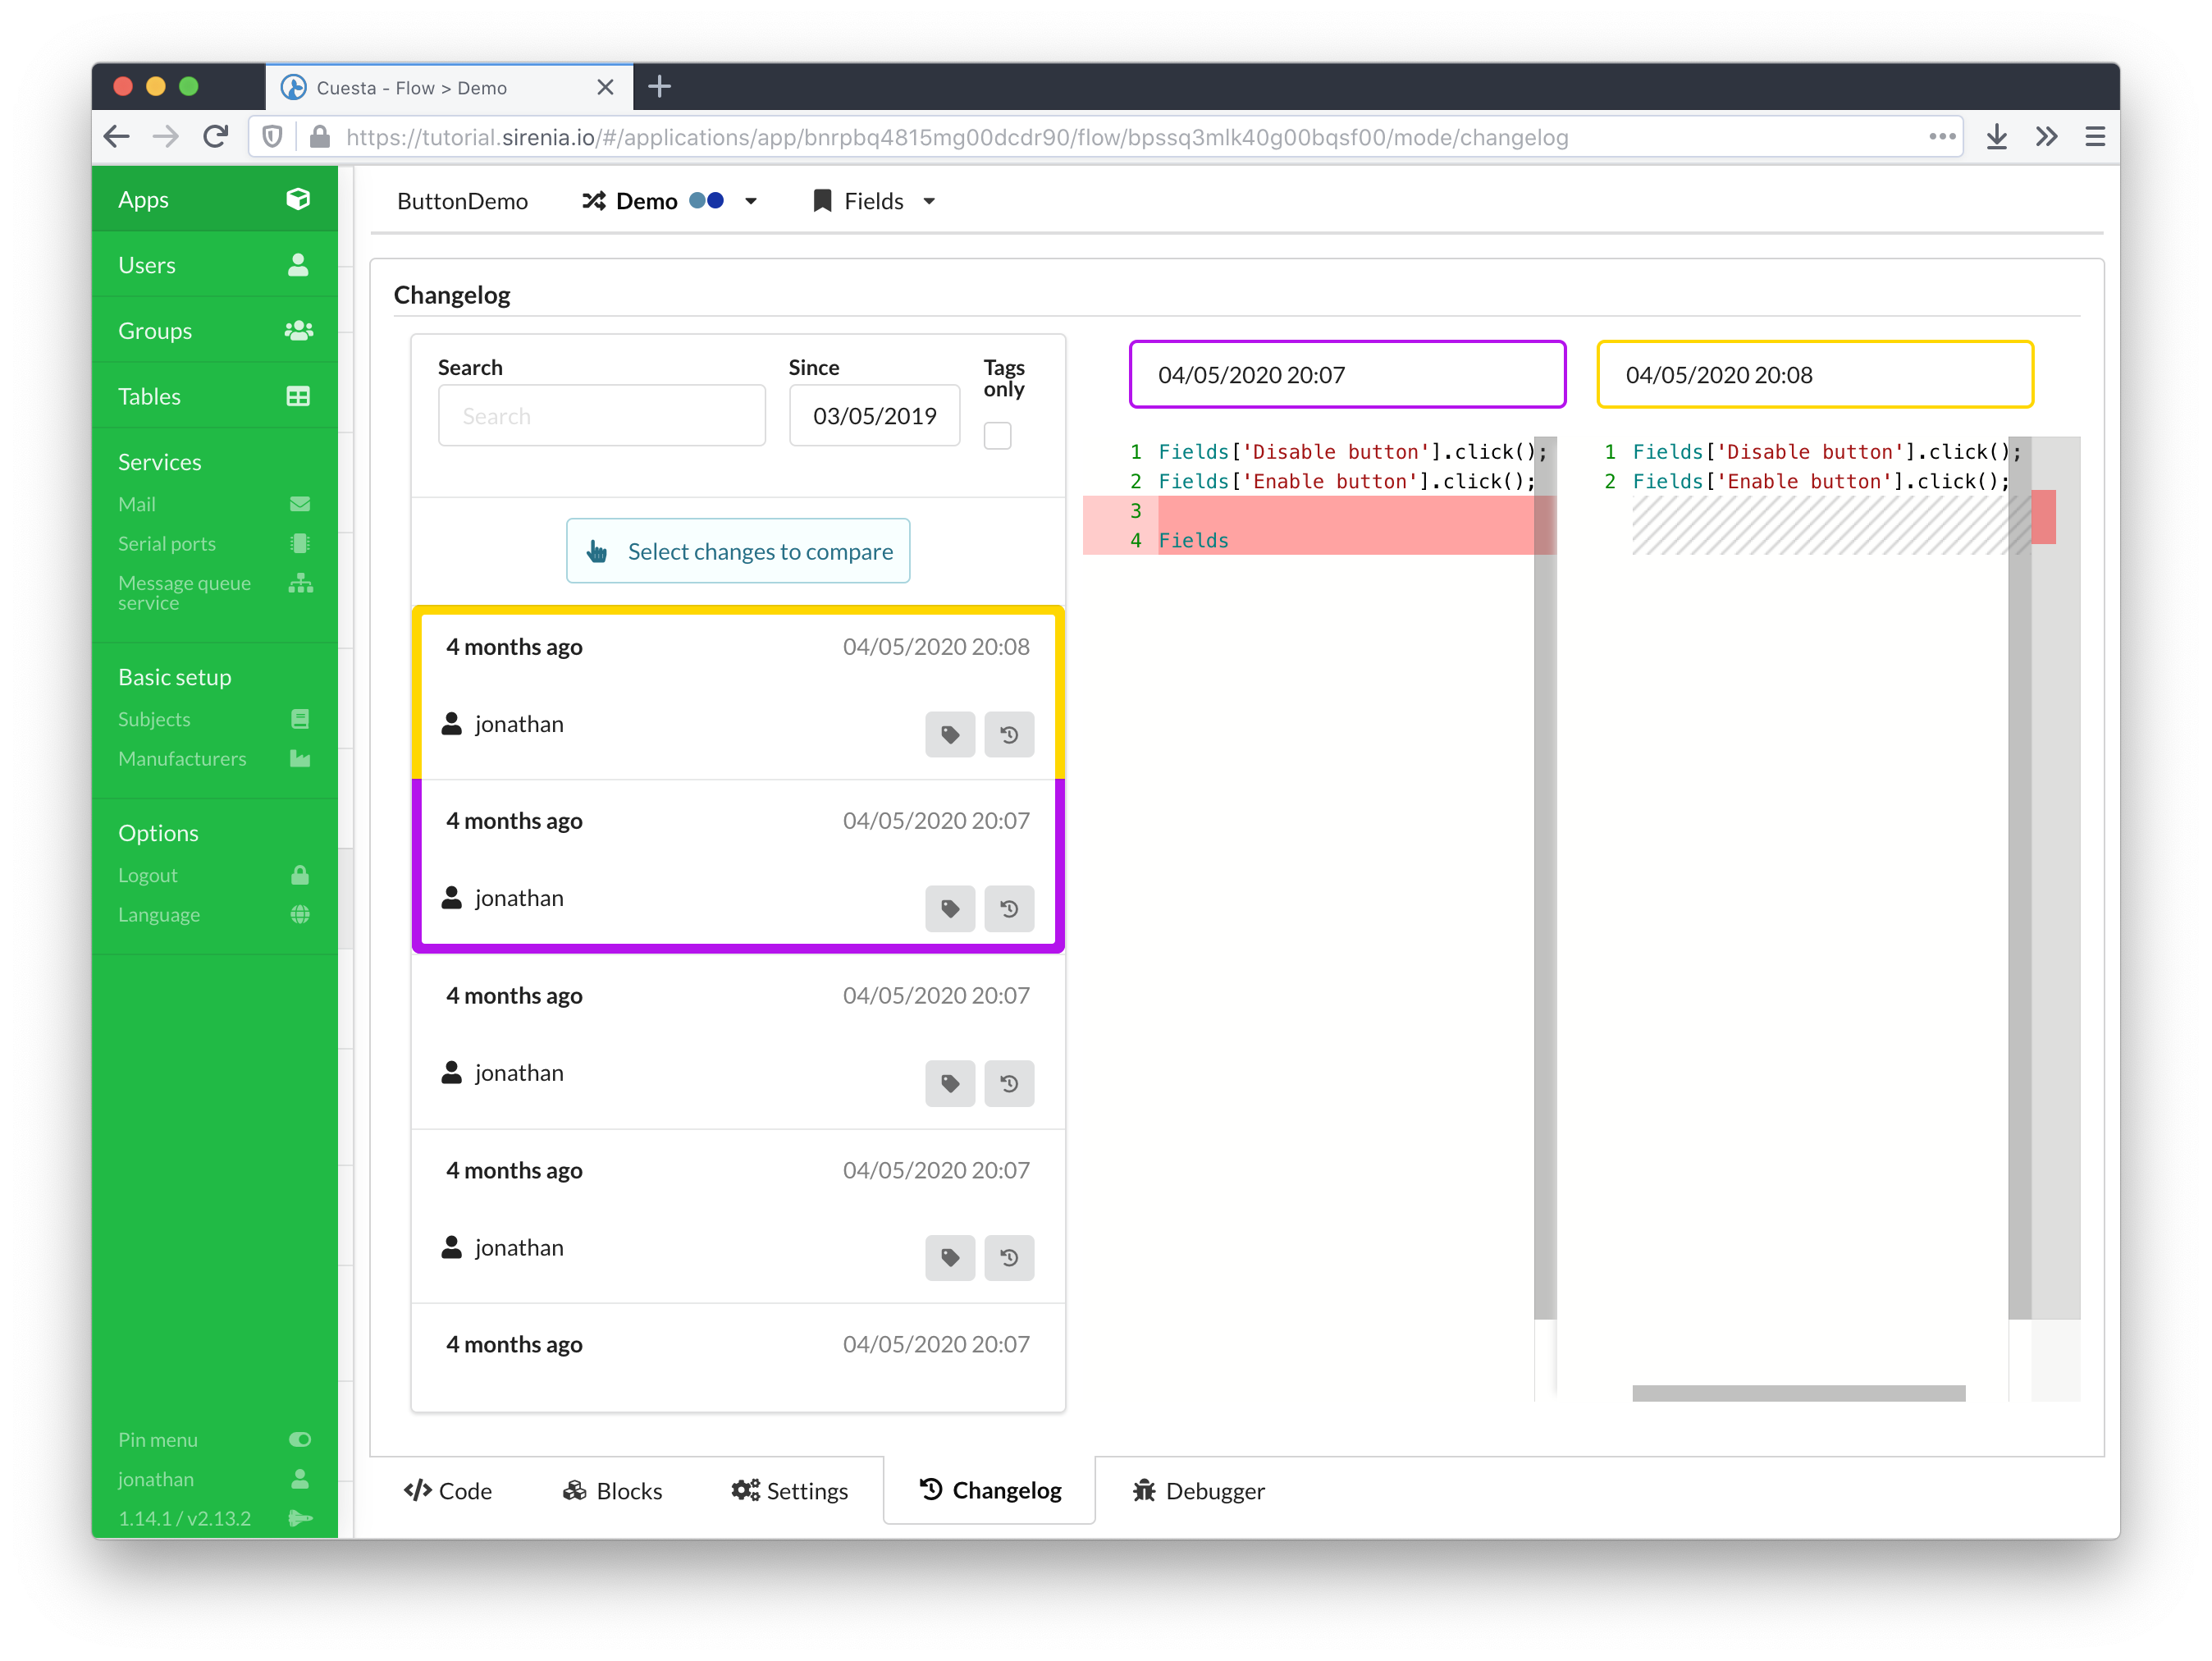
For the rest of the items such as users, groups, tables, subject, manufacturers and services the changelog is accessible throug a changelog button on the item’s edit page. The button provides a list of changes, and after selection of the specific change marks the fields which have been changed.
# Keyboard shortcuts
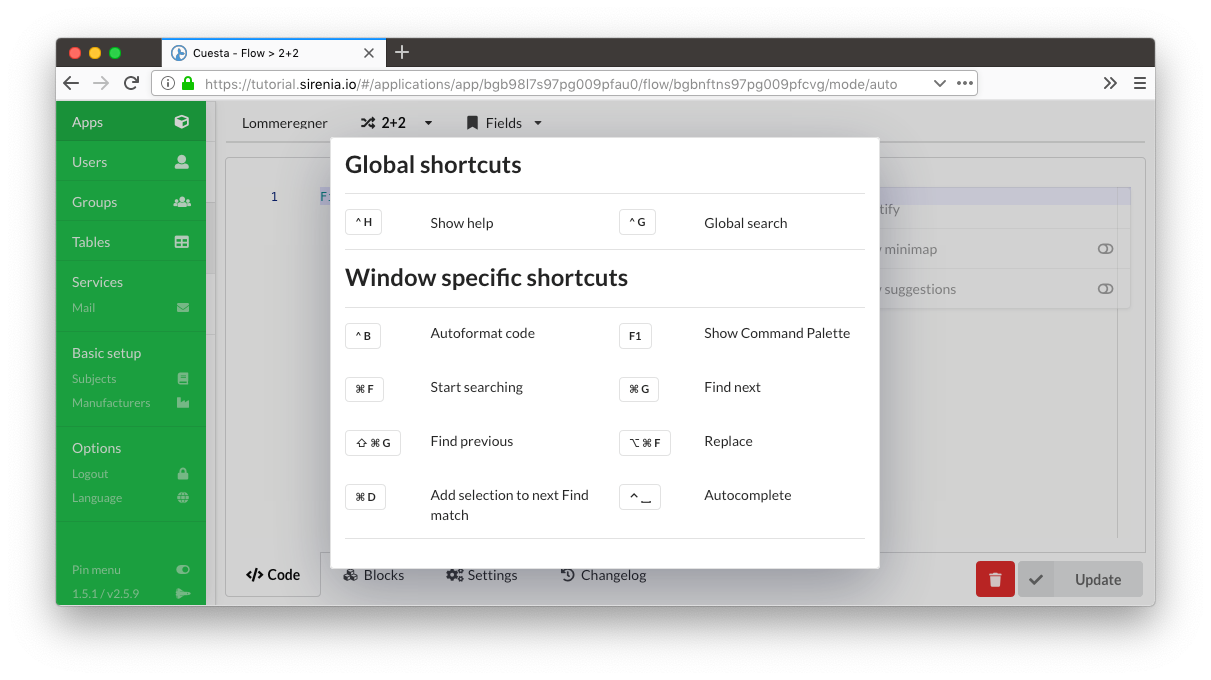
Keyboard shortcuts are available throughout Cuesta. On any screen you can hit the ctrl+h keyboard shortcut to show a window with applicable shortcut keys for this particular screen.
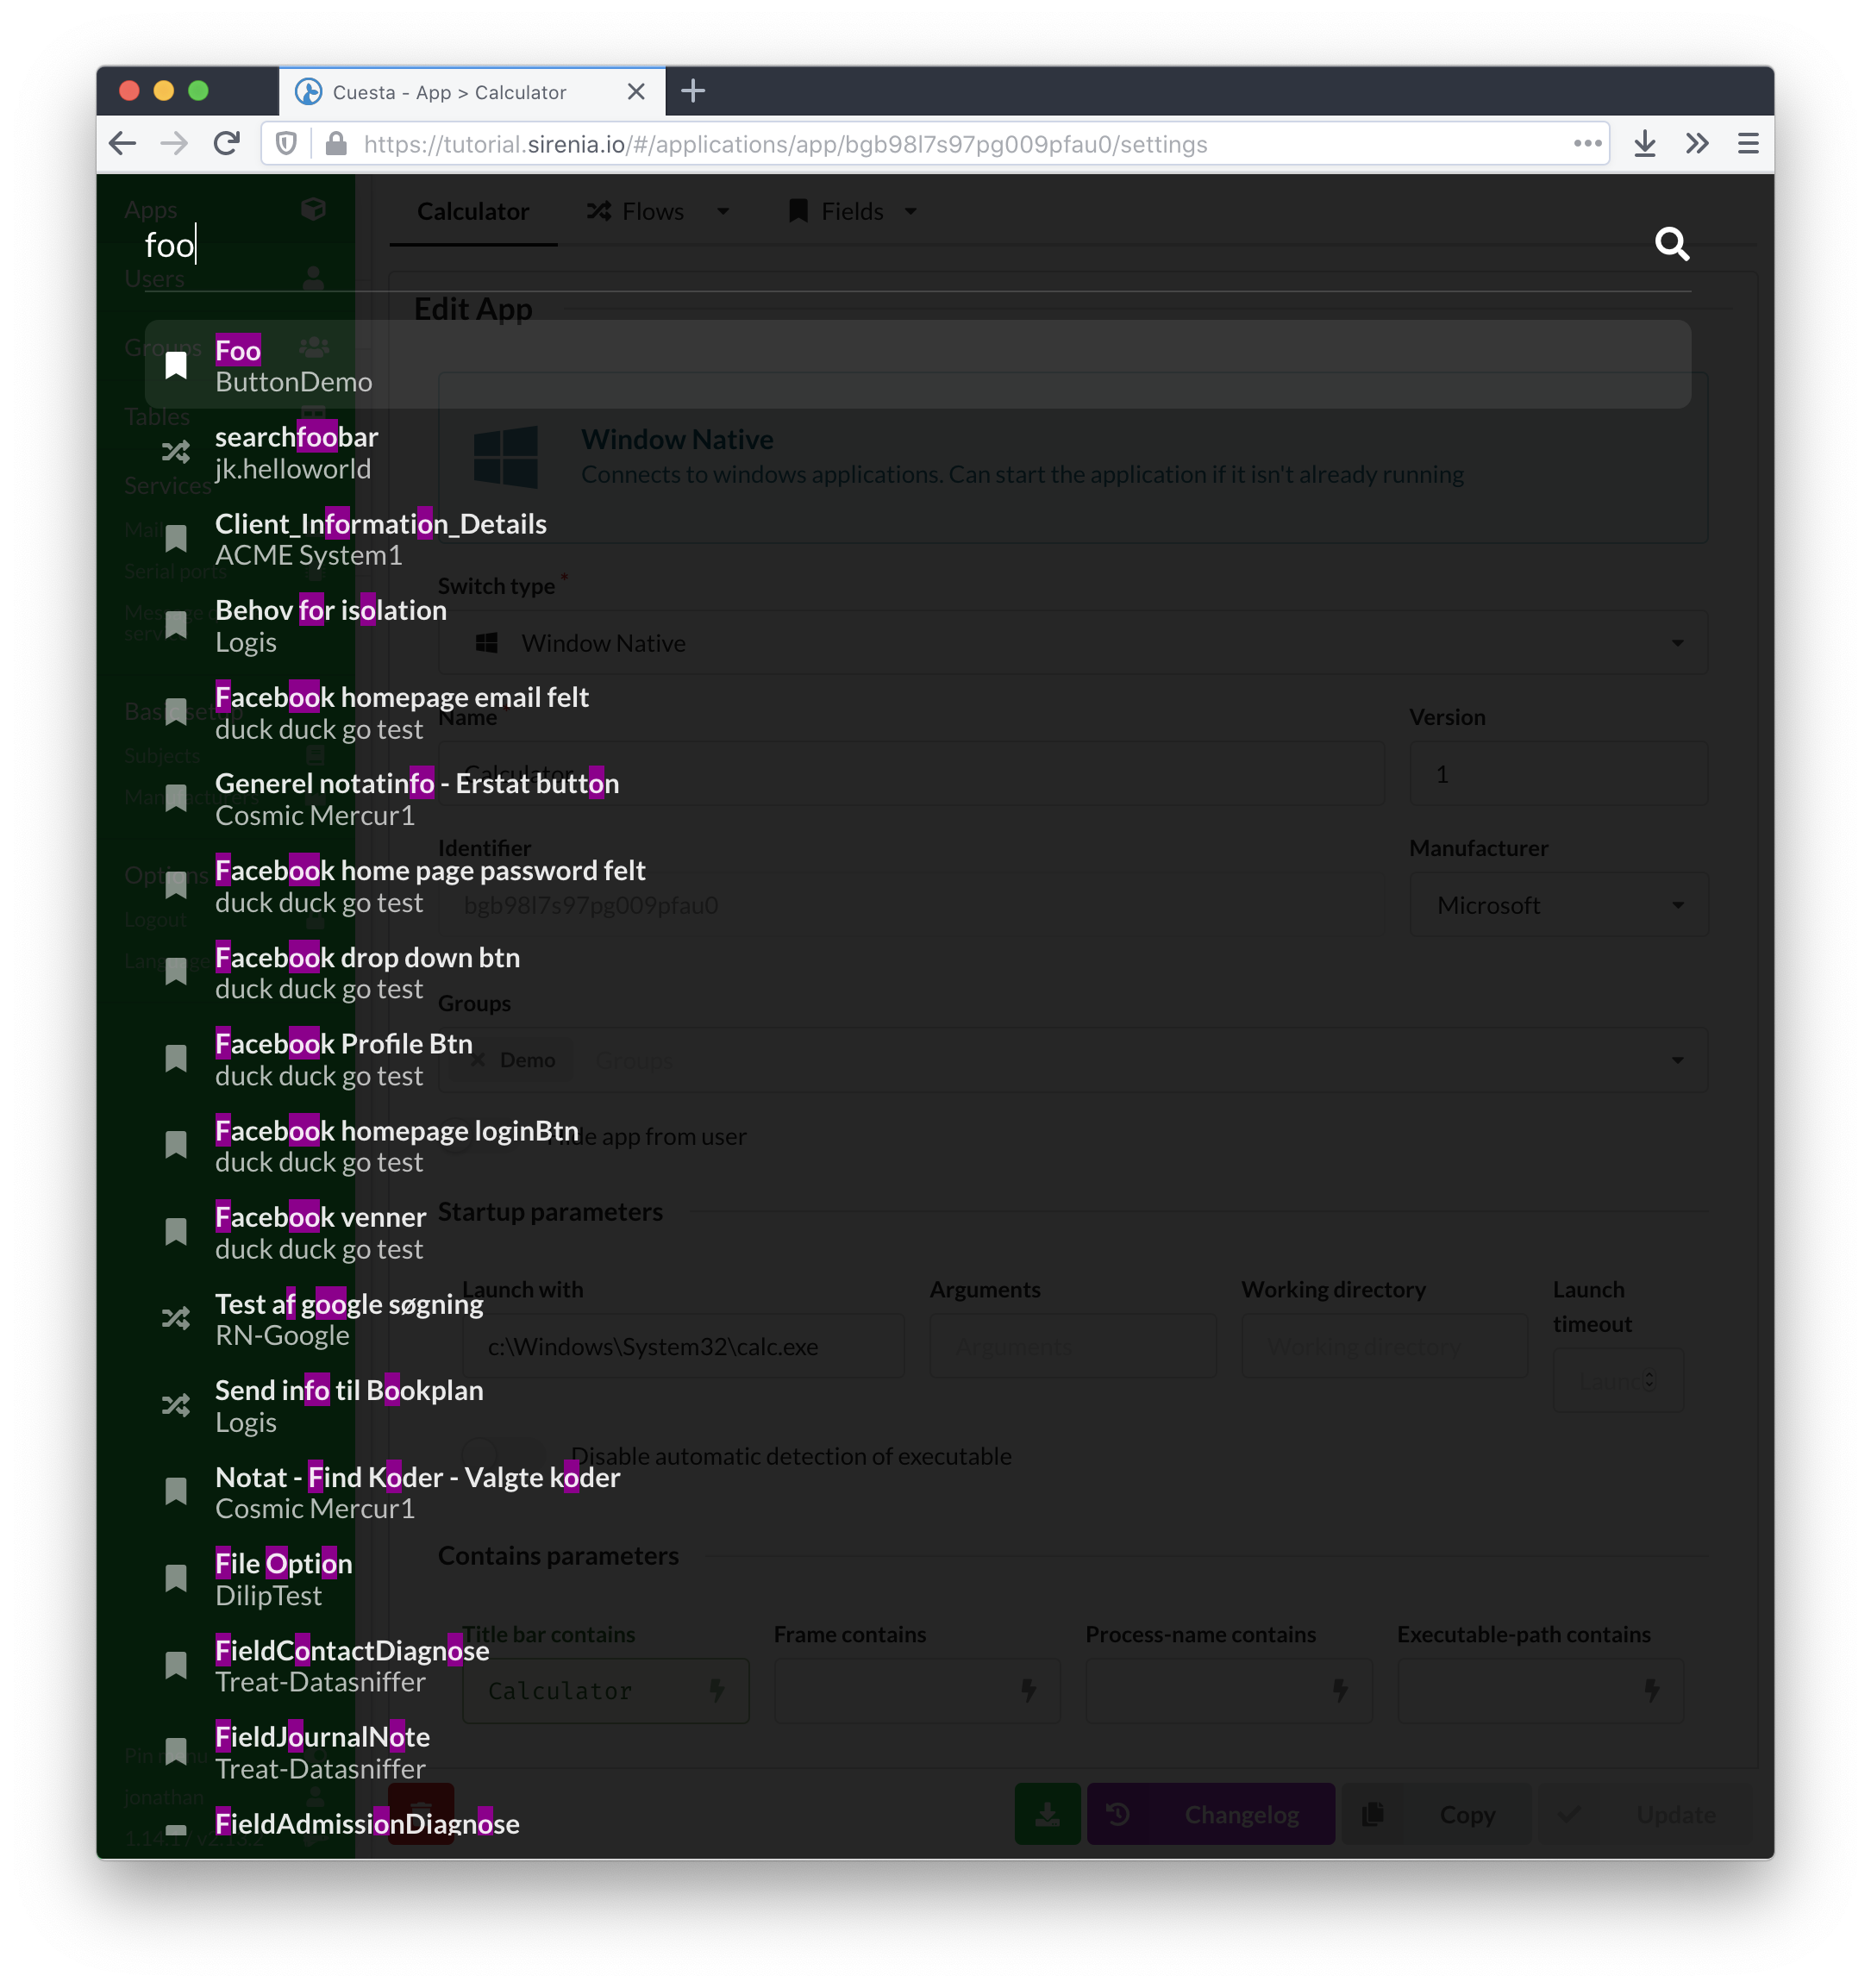
# Global search
Hit ctrl+g on any screen to bring up the global search feature. Then begin typing. This functionality lets you quickly jump to a group, application, flow etc. as long as you type all or part of its name.
# Subjects
The shared context in a CCOW session is in essence a key-value store where the keys are termed subjects and usually have a specific format indicating the origin, type etc. of the information stored for the key. The concept of a subject is re-used in Cuesta as a key for identifying both flows to execute and extracting structured information from the UI of an application.
Subjects are defined in terms of a name, a key (the actual subject) and a regular expression. The regular expression is used to determine whether the subject is present in a string extracted from e.g. the UI of an application.
# Creating subjects
Subjects are created by entering the name and key (use something suitably unique here, preferably a proper CCOW subject) and a regular expression.
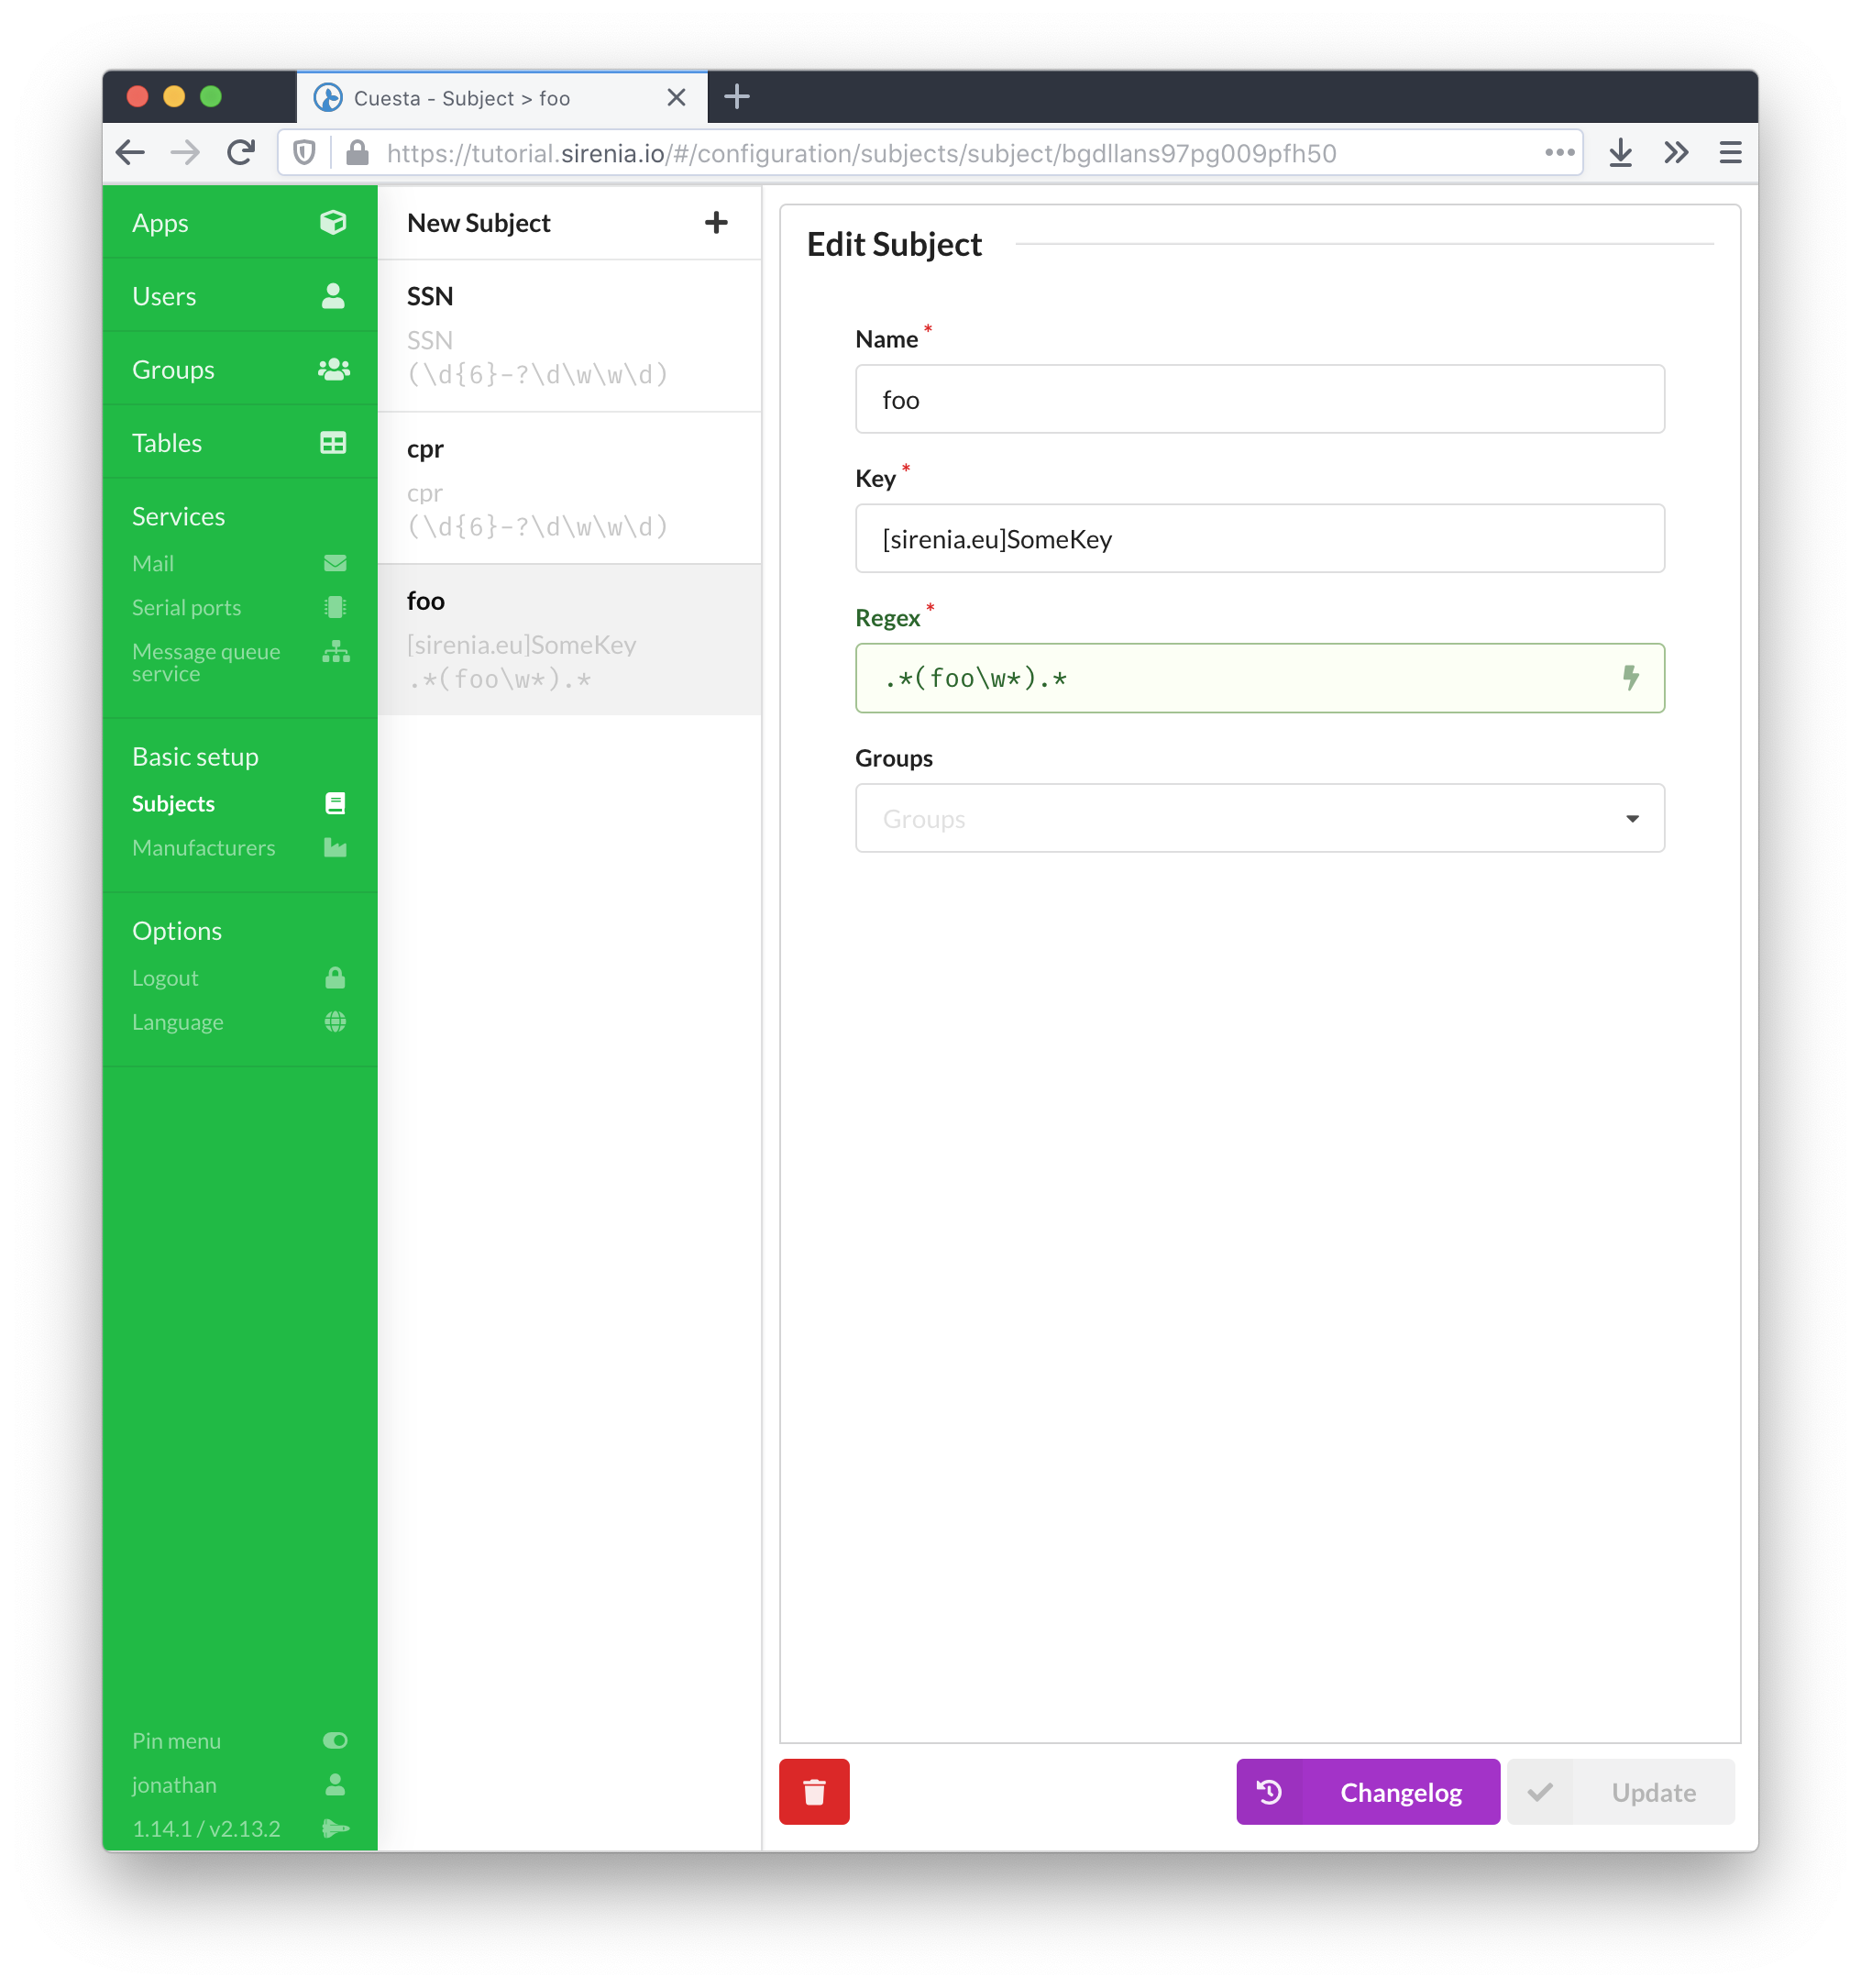
The regular expression should contain at least one group. The group is used to extract the actual value for the subject. A named group (with name value) can designate a single group of multiple groups are required in the regular expression. Multiple named groups can also be used in which case the extracted information is made avaible to a flow as a stringified json object with group names as key and group values as values.
# Applications
An application as defined in Cuesta corresponds to an actual application that the user wishes to include in a session. An application must be defined in Cuesta in order to be automated or take part in context synchronisation.
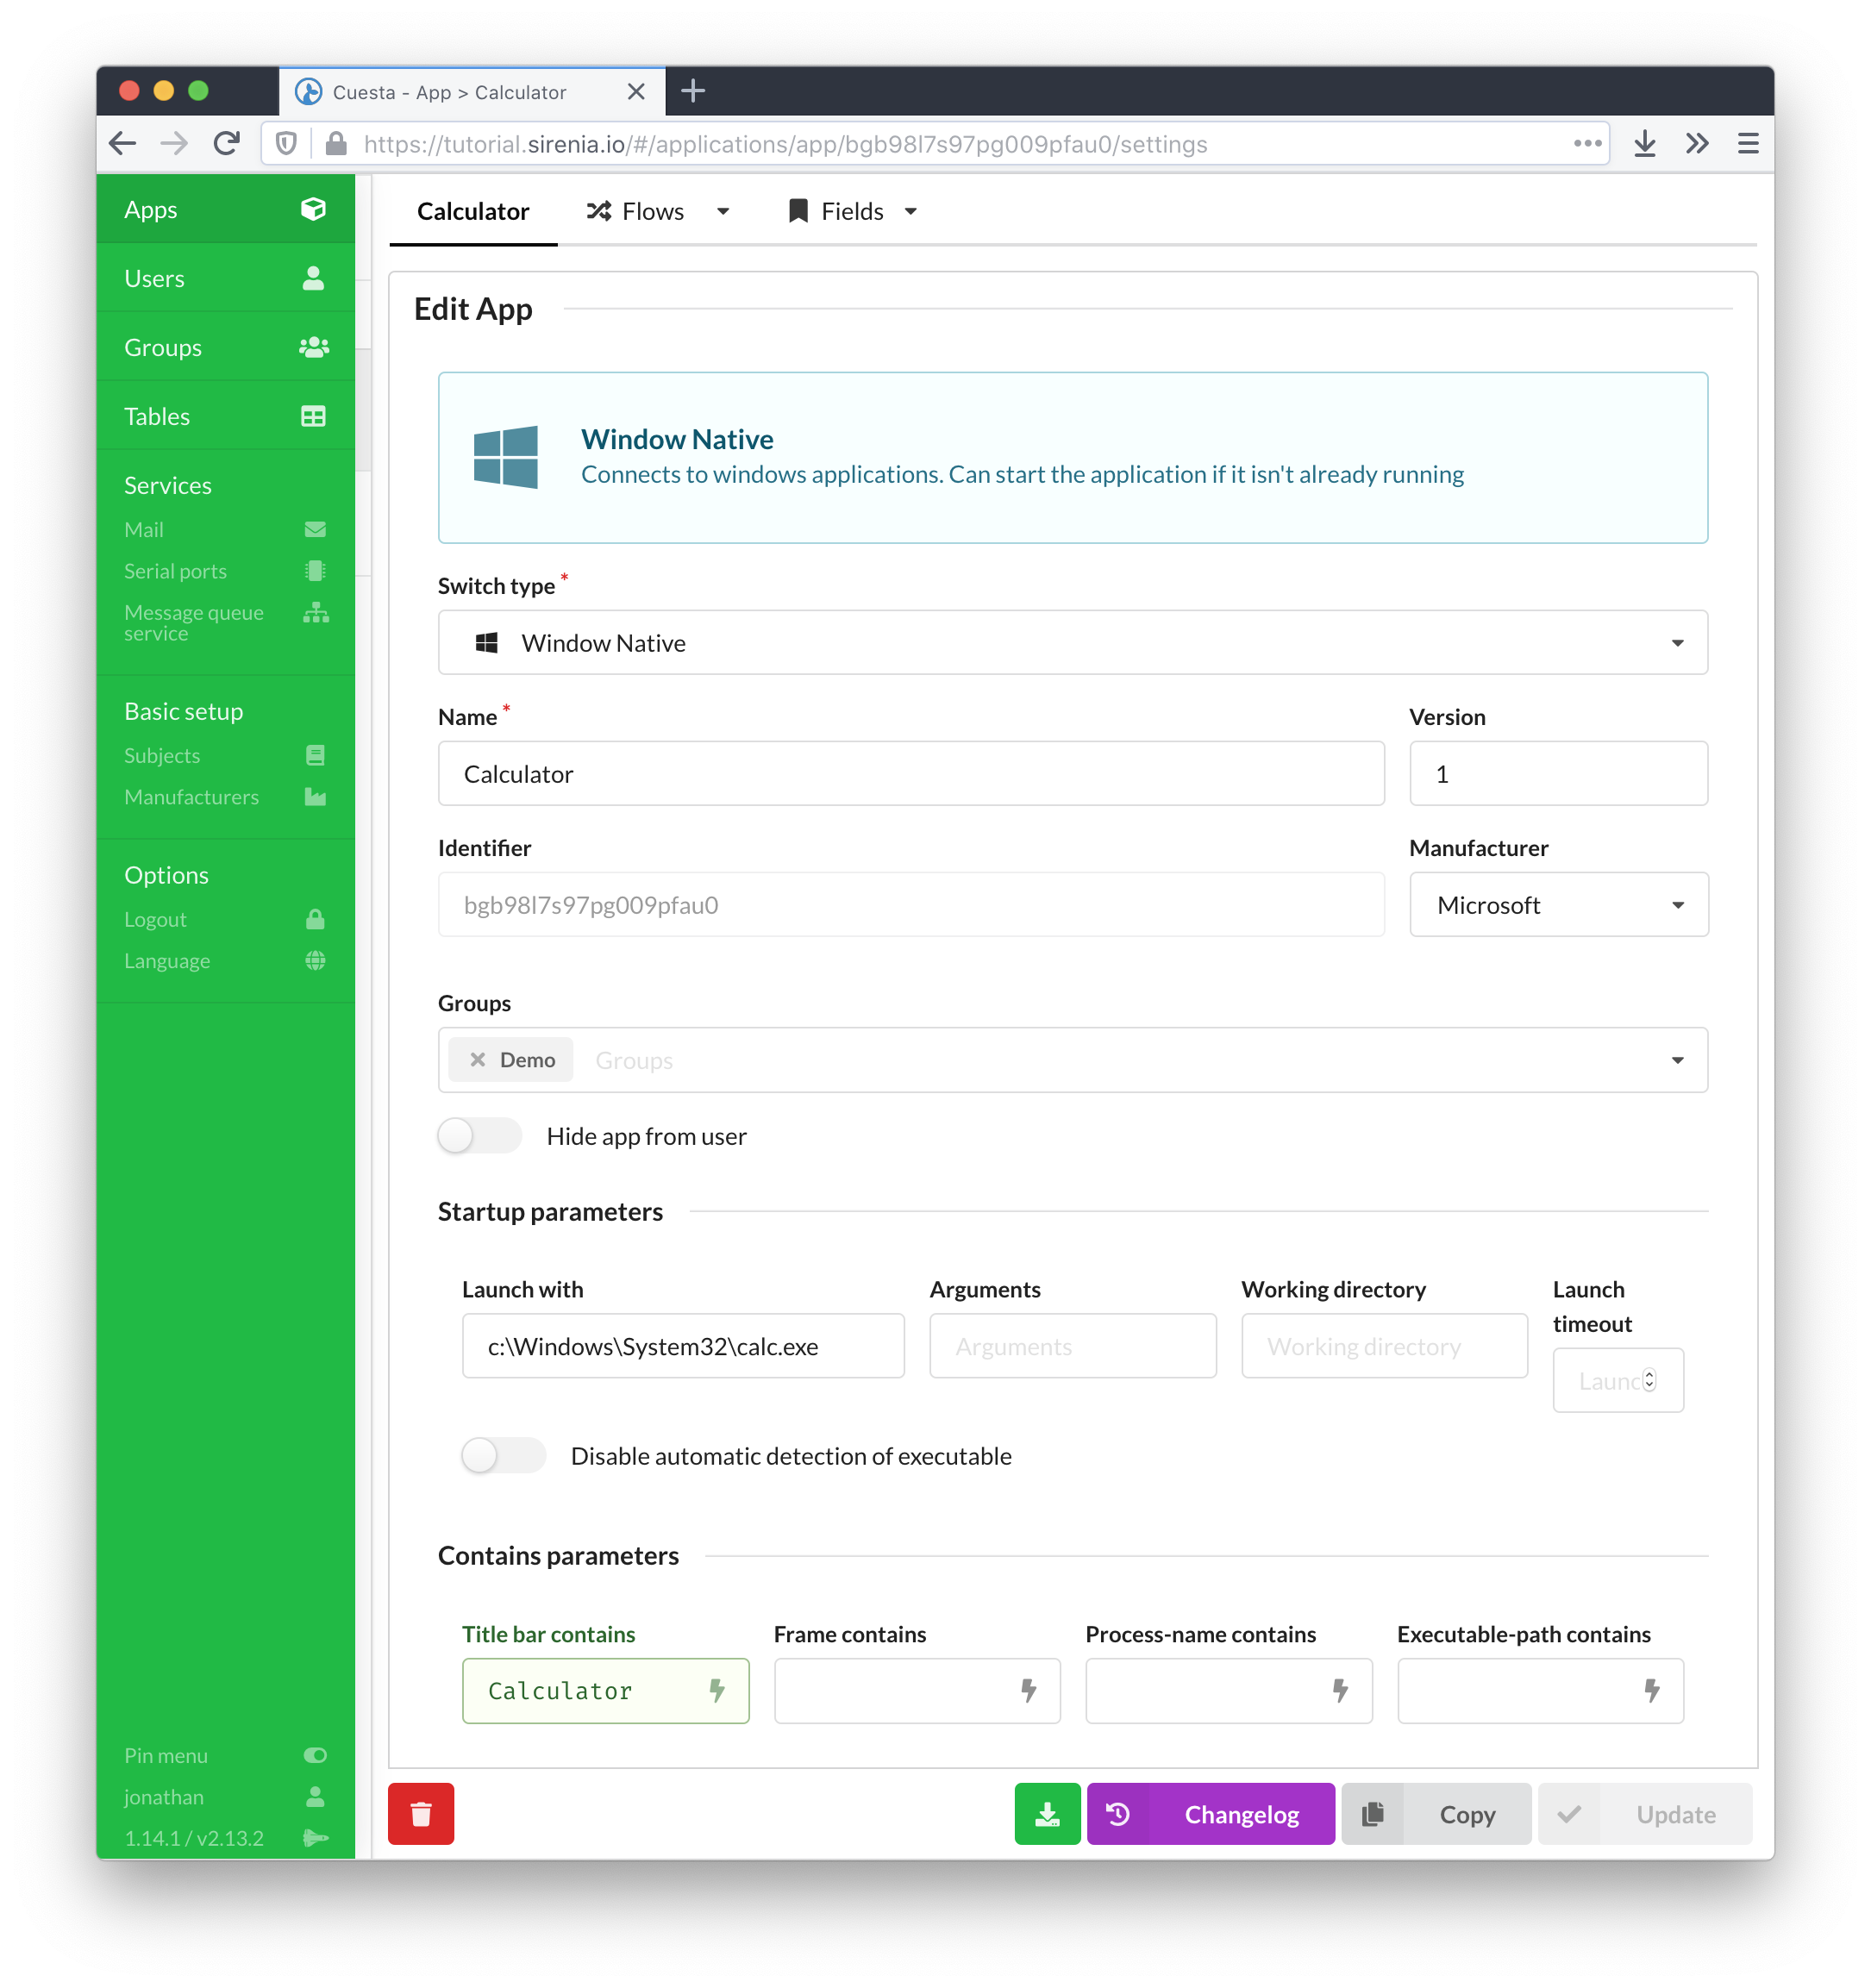
Applications are defined by a name, a type and information about how to recognise and possibly launch the application. The type determines which driver implementation Manatee will use to interact with the application.
The startup and contains parameters are used respectively to launch the application (if needed) and to recognise the application if it is already running.
# Types of applications
Manatee can drive both native, web and java-based applications as well as handle proxies for actual context particpants. Each type of application is handled by a specific driver and some requires extra components to be installed, e.g. a Chrome extension for the Chrome browser.
# Creating and editing applications
An application is created by entering the required information in the new application input form. Each type of application has a specific set of fields that need to be filled out.
# Launching or attaching to an existing application
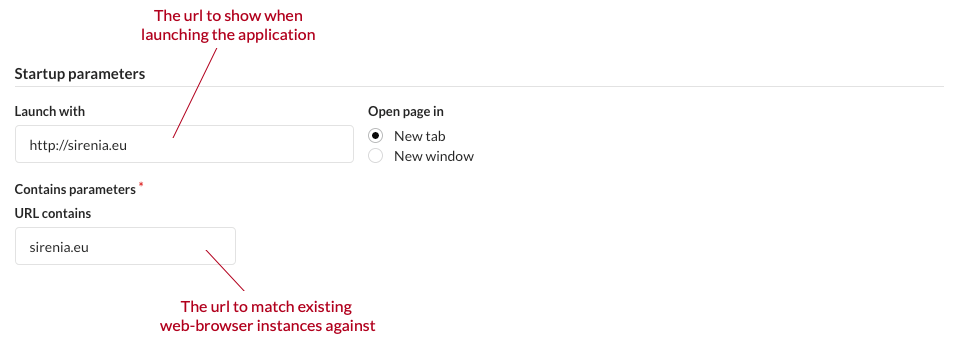
For a web-application the section containing the parameters for launching is simply the url and (in some cases) whether to open a new tab or a new window. Similarly the information needed to detect an already existing instance is the url (or title in some cases).
For a native- or java-based application more information is needed to launch the application as shown below. Detecting an existing instance can be done by different predicates:
- Title bar will match the current title of the application against the regular expression given
- Frame will match the class of the window frame
- Process-name will match the name of process
- Executable-path will match the full path to the executable
The predicates are joined in a conjunction meaning that the more predicates / fields that have input the more specific the match is. All fields accept regular expressions.
# Groups
You can add the application to as many groups as you would like. The more groups you add the greater number of Manatees will be able to use the application. The groups found on an application should be a super-set of the groups of all of its flows - in other words; do not add a group to a flow without its parent application also having this group.
# Fields
Fields are used for interacting with the UI of an application. A field represents an element in the UI, a button, a text-field, a panel etc. Each type of field can be interacted with similarly to how a user can interact with the field. A button can be clicked, a text-field can have text written into it and text extracted from it and so on.
Fields are identified either by a path or a screenshot of the field. The screenshot is simply used to identify the field visually and should only be used if the field cannot be identified by a path. Paths are more flexible and robust with regards to changes in the UI of the application.
A path is a string which identifies the given field by containing instructions on how to traverse the tree that is the structural model of the UI. UIs are normally hierarchical in nature and structurally composed like a tree (e.g. the DOM (opens new window) of a web-page). The window is normally the root of the tree and it will contain a few panels as its children which again will contain other panels or UI elements directly. A path is thus a way to navigate from the root of the application (the outermost window) to the field we are interested in. An example:
/OuterPanel1/OuterPanel2/OkButton
This path specifies that we are ultimately looking for an OkButton element which is contained in an OuterPanel2 which itself is contained in an OuterPanel1. The elements along the path are matched on multiple criteria e.g. OkButton might be the actual text shown on the button or the class/type of button used.
# Creating fields
It is not normally necessary to manually construct these paths as Cuesta will connect to a locally running Manatee instance and try to figure out the path to a given field when you use the field-finder functionality in Cuesta.
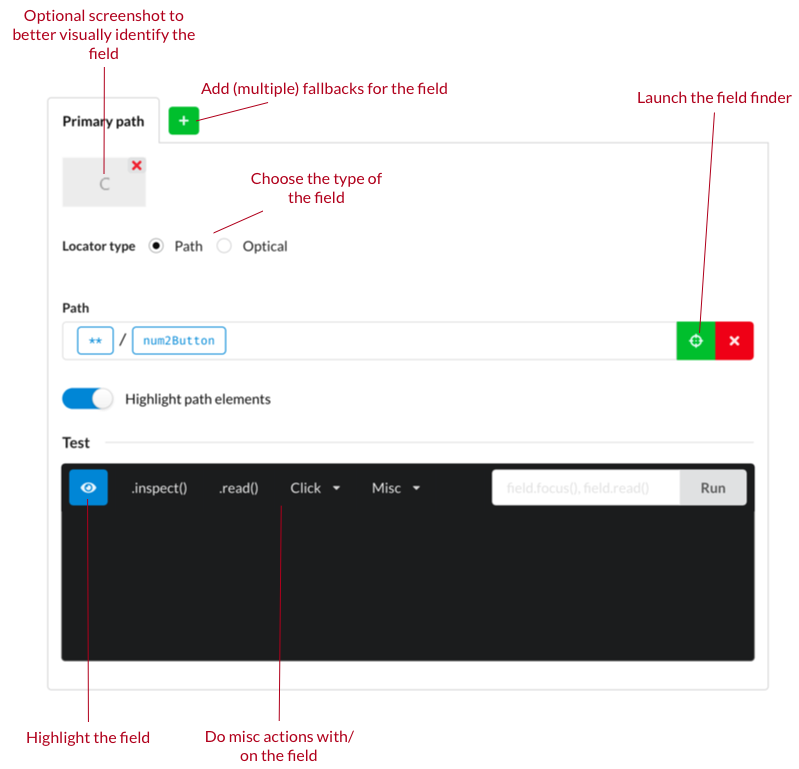
Then you will simply point at the element in question and Cuesta will input the path for you.
# Using a field in a flow
Once defined the field may be used in one or more flows for the application. For example the following code snippet clicks the button designated by the field name “OkButton”.
Fields['OkButton'].click();
A more complex example could be a field which represents a table:
// Inspect (i.e. get a JSON serialized version of) the table
var table = Fields['MyTable'].inspect();
// The `table` variable is an object serialized according to
// the JSON serialization document
var rows = table.rows;
var someCell = table.rows[10]['Header1'];
// There is also functionality for clicking in a certain cell
table.clickCell('row1', 'Header1');
# Flows
A context manager can both facilitate synchronisation and support a form of RPC by letting participants in a context session expose actions which other participants can ask the context manager to run. Both state synchronisation and action invocation are central concepts for Manatee. A flow is a single executable script which can interact with UI of an application or perform other functionality as described in the modules documentation (opens new window). A flow can be either a state, an action or a module.
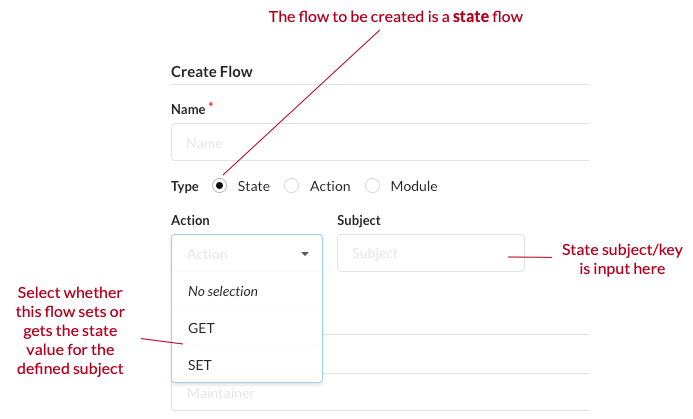
# State flows
A state flow represents functionality to set or get the state of an application for a given subject. Both a get and a set version for the same subject is required for the state synchronisation to take place.
An example: Getting an application A and application B to synchronize state using UI integration with the subject foo can be accomplished by creating two state flows for each application, one for getting the current value of foo and one for setting it. If the current value of foo in application A is stored in a textfield accessible with the name fooA then we’d perhaps simply write the get foo flow as follows:
Fields['fooA'].read();
and the set foo flow as:
Fields['fooA'].input(Value);
Similar flows may be applicable for application B.
Manatee will then take care of extracting the value and setting it when necessary. The state of foo will be extracted and stored in the context manager regardless of whether there are other applications that must be synchronised.
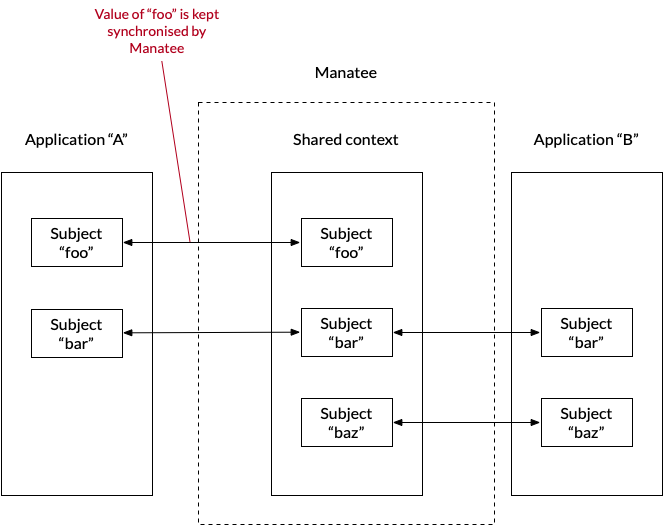
The shared state (the current value of all synchronised) subjects are available to all flows of type state and action in the Inputs map. The current value for the subject of state flow is also made availble in the special Value variable (as seen in the set foo flow above).
An application does not need to support all subjects made available in the shared context but may decide on supporting a subset only.
# Action flows
An action flow resembles an RPC invocation either internally in an application or between applications. A flow always belongs to an application and will be run in the context of that application. It cannot be run unless the application is running and attached to a session in Manatee, so Manatee will always attempt to connect to an existing application before starting a new instance when asked to run an action flow for a given application.
Action flows can be started in numerous ways. Two of them are either by a trigger or by using a flow-menu which appears in an application in a context session when the user right-clicks while holding the alt key down.

Action flows can be used for automation and for fire-and-forget frontend integrations. It is also possible to create action flows, which spans multiple-applications to transfer data or to automate multi-application workflows.
# Filtering flows shown in the flow-menu
The flow-menu displays flows, which are relevant for the application and location within the application in which it was invoked. It does this in two ways;
The first filtering is done by extracting values for any subject from whatever the user might have clicked. If the flow has inputs these must be matched with the subjects and values extracted from the context of the click. The purpose of this mechanism is to ensure that the flow has the correct inputs, but it also provides a neat mechanism for open-ended integration. If, for example, we’ve defined a subject for a patient identifier then for a flow which switches patient in an EHR we can define this as an input. Now this flow can be everywhere where we can extract patient identifiers, e.g. you’ll be able to switch the EHR to patient found in an Excel spreadsheet or any other type of application where a patient identifier can be extracted.
An example. If a subject is defined for a patient identifier, this subject can be used in a flow, which switches patient in an EHR. This flow can be initiated from everywhere where we can extract a patient identifier, e.g. to switch the EHR to a patient found in an Excel spreadsheet.
The second filtering is done such that anchored flows are only shown if they’re the anchor matches the location clicked.
# Module flows
Module flows are flows which contain some shared functionality which is made available to other (state and action flows). It is a mechanism by which functionality (code) can be shared between flows. A module flow should follow the following template:
// Define some functionality that can be useful for other flows
var isEven = function (n) {
  return n % 2 === 0;
}

// The `exports` object should be populated with the functions
// and variables that should be exported from the module flow
exports.isEven = isEven;
There are more details on module flows in the flow documentation.
# Built-in modules
A flow may interact with the user interface of the application in which it belongs by using any of the defined fields. A number of built-in modules are also made available for a flow. The details and exact nature of these are described in the Manatee v1.28 (opens new window) page for each version of Manatee.
The modules cover a wide range of functionality from inspecting and manipulating the OS windows to accessing external services through http and creating Excel documents. The flow documentation contains numerous examples of their usage.
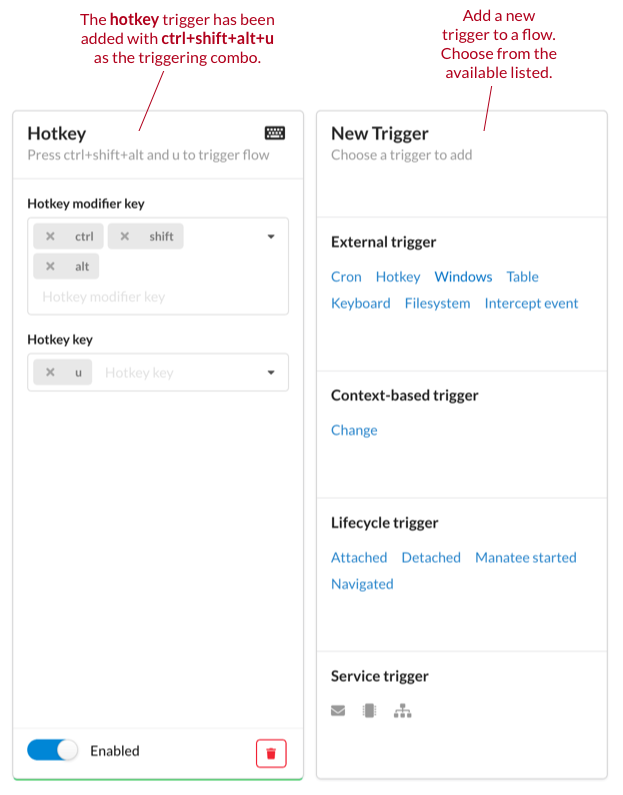
# Triggers
Triggers are hooks which determine when a flow is run (if not invoked manually). It is possible to have multiple triggers for a single action flow.
Once a trigger is added to a flow it will run the flow when the trigger conditions are met on the Manatee instances which the flow is made available to. It should be noted that adding a trigger can thus interrupt a user of s/he is using the machine running the triggered flow and is therefore recommended primarily for unattended machines. In some cases it will make sense to trigger a flow in an attended situation though.
Examples of triggers are;
- When a window with a certain title is opened.
- When a file in a certain folder is created.
- When the user presses a certain hot-key combination.
See more info in the triggering flows section as well as the documentation for each type of trigger (opens new window).
# Creating a flow
A flow must have a name, a type and some auxiliary information depending on the type of flow. For state flows you must specify its subject and whether the flow gets or sets the state for the subject.
For an action flow the subject prefix should be set. This serves as an identifier for the flow.

For both state and action flows it is useful to set a maintainer as well. Cuesta can be configured, so only the maintainer can edit the flow.
# Groups
A flow will not be available for a Manatee unless it has at least two groups; one that is the same as the primary (production) group of the Manatee instance and one that is in the set of all the (AD) groups of the user (combined with the username and the name of the machine). Both of these groups must be applied to the application as well.
# Editing a flow
Once a flow is created the functionality or code of the flow can be edited as text or in the blockly editor. See the flow documentation for details of how to write flow code and examples as well as documentation on the available modules .
# Code
The code of a flow can be edited directly in the code editor.
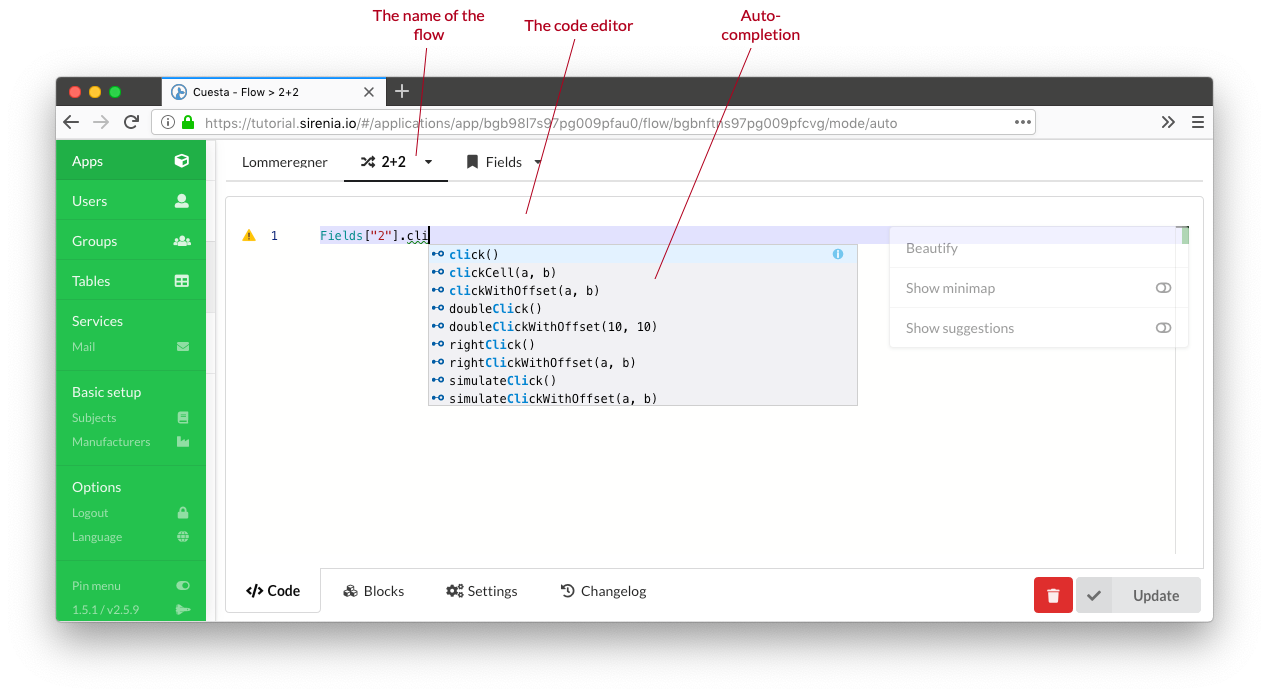
The code editor has auto-completion and other semi-advanced features. Hit the F1 key to show a list of editor functions and their assigned keyboard shortcut (if any).
# Blockly
Blockly (opens new window) is a visual programming tool which uses blocks that combines like a puzzle to define complex functionality. Our modules, field interaction etc. is available as pre-defined blocks. Running a sub-flow (i.e. invoking a flow from another flow) is also possible. Blockly can be used to construct the same flows as done via the code-editor and it is possible (to a certain extent) to switch back and forth between the code editor and blockly.
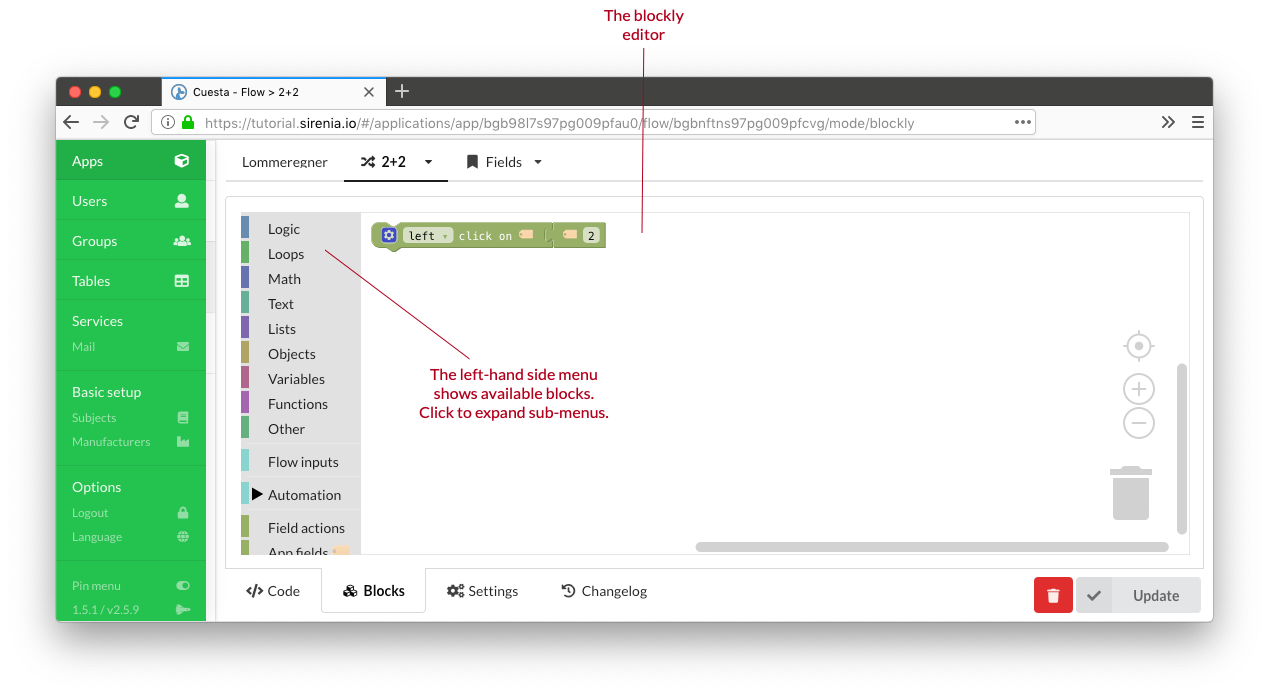
The simplicity of blockly also makes it possible to setup a workflow where you have dedicated developers constructing the “building blocks” for your automation needs in the code editor while the domain specialists use blockly to piece together actual workflows without writing a single line of code.
# Anchors
Anchors are used to filter where a flow can be activated using the flow-menu. Adding an anchor is simply done by selecting which field(s) to use as anchors. When added the flow will only show in the flow-menu when activated within one the fields given. Defining no anchors means that the flow will appear regardless of where the menu was activated.
# Inputs and outputs
A flow can accept inputs and produce outputs. Each input can be typed to any of the configured subjects. This is also used for deciding which flow to show in the flow-menu; only flows which can have their inputs matched with extracted content is shown. The value of the input can be accessed in the flow using the Inputs map, e.g.:
var myInput = Inputs['myInputSubject'];
Outputs from a flow can be any root scope defined variable. If we have the following flow;
var myValue = 'foo';
var myOtherValue = Windows.topMost.title;
then myValue and myOtherValue can be made outputs in the Settings tab of the flow.
# Triggering flows
A flow can be setup to run automatically by using a trigger. Triggers include:
- Cron which runs flows at certain pre-defined times.
- Window which runs flows when certain windows are shown or hidden.
- Filesystem which monitors a folder and runs a flow when files are added, removed or changed
- and several more …
The group filtering still applies to flows with triggers - thus it is only Manatees which match the groups of a flow that can be triggered.
# Groups
In order to decide where a certain application or flow can be run we use the concept of a group. A group in Cuesta is simply a label which can be attached to e.g. an application or a flow. The group itself can contain a few properties which determines how the attached entities behave in Cuesta. An example is adding prompts to be displayed when you add e.g. a flow to a group. Or to disable editing of all flows in a certain group.
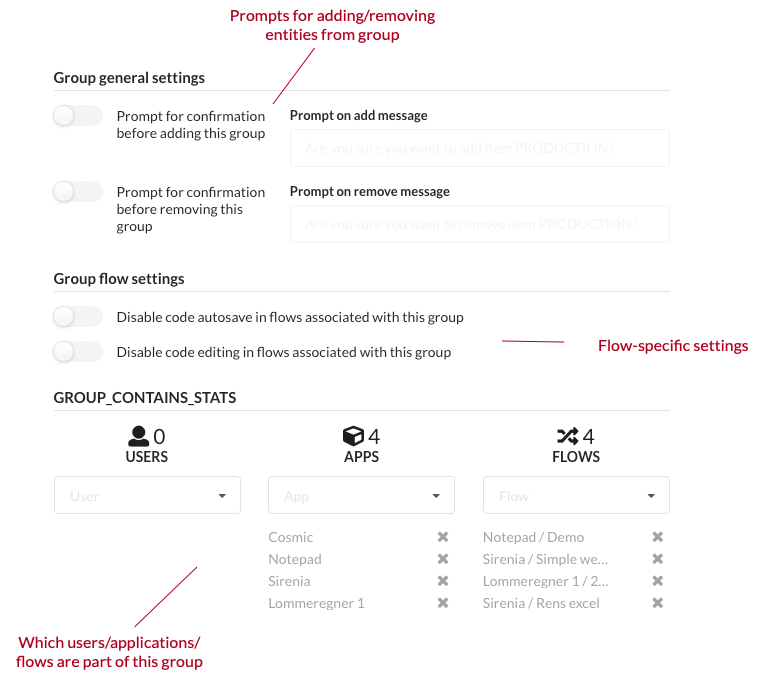
Manatee uses groups to determine which flows are applicable for the specific instance of Manatee. It uses a configurable primary (production) group and a list of secondary groups to do this. The primary group is configured and can be changed by the user. The secondary groups are a union of;
- the (AD) groups of the current user,
- the name of the current machine, and
- the username of the current user.
A flow must be in both the primary and at least one of the secondary groups to be available for a given Manatee instance.
The concept of groups thus makes it possible to control in which Manatee instances certain functionality (flows) are available.
# Tables
Tables is an internal datastore in Kwanza which can be accessed from Manatee. Typically tables are used for mapping tasks but they are in essence a general purpose data store.
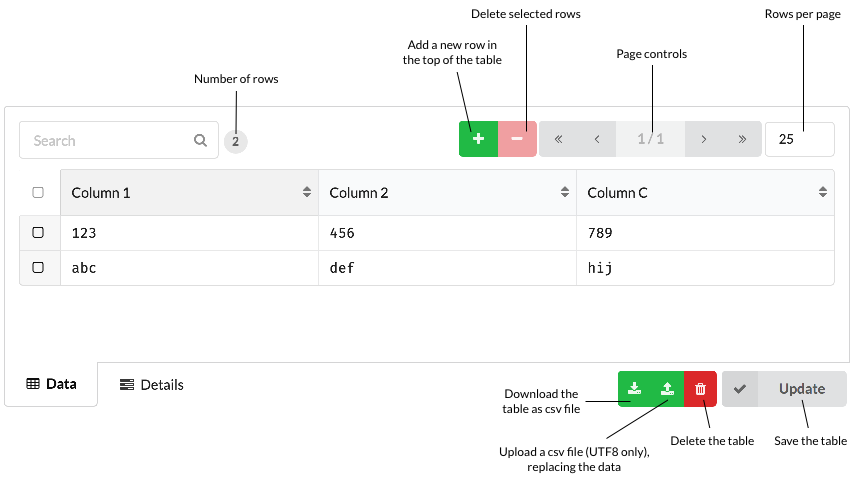
# Creating and using tables
A table must be created in Cuesta before it can be accessed from Manatee. It requires a unique name. Once a table is created it has an interface like a spreadsheet in Cuesta. You can move around using the keyboard and change content of cells, add new rows or columns. Again, press ctrl+h for the relevant keyboard shortcuts.
You can also upload or drag-and-drop a CSV file onto a table and it will get uploaded and stored (once you press the update button).
It is also possible to search/filter using the controls at the top of the table.
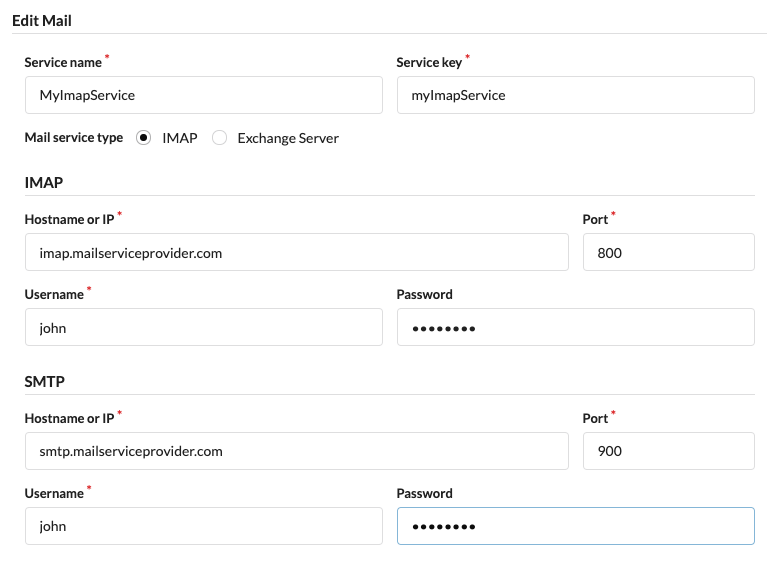
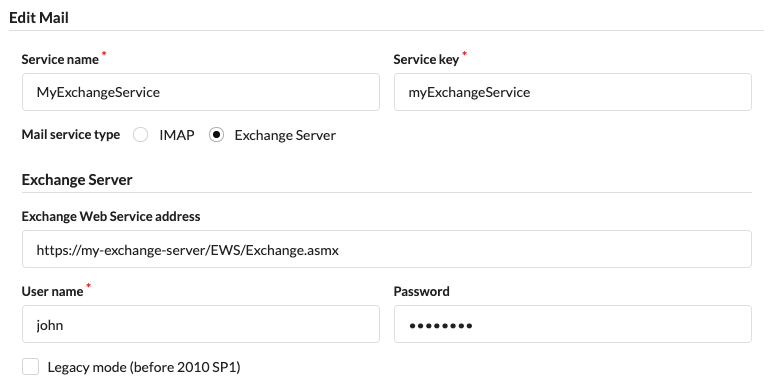
# Services
External services are defined by adding their configuration to Cuesta. Currently we support an IMAP/SMTP and Exchange mail services, serial port services and message queue services. For details see the services document.
# Creating a mail service
Creating a mail service is simply done by entering the details (e.g. IMAP or Exchange server and credentials) into the service details form. Once a mail service is created it can be used to trigger flows (when a mail matching certain paramaters is received) or for sending mail from a flow.
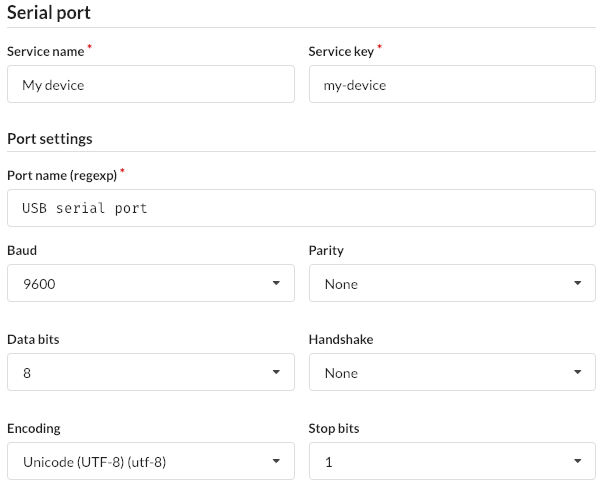
# Creating a serial port service
A serial port service specifies how to connect to a device attached to the local host through a serial port connection. To do this it needs to know how to choose the serial port to connect to as well as the various standard connection parameters.
# Port name
The hard part is helping manatee choose the right serial port to connect to. On different hosts running the manatee driver platform, the same type of device may be connected to different COM ports. If the ports are shown in windows with just COM1/COM2, this can be a challenge that requires some more fine grained configuration work.
If the device is connected to the computer through a usb-based serial port, there will often be extra text in the port description in windows, which can be used by manatee to identify the port to connect to. For this reason, the port name field in the configuration interface supports regular expressions.
# Encoding
The encoding setting does not need a value if the service is only going to be used for communicating binary data. It defaults to US-ASCII. Note that if the service is going to be used in a serial port trigger, the correct encoding must be provided as the trigger matches against the data in the form of decoded text.